Trusted by:
Search
Updated: June 24, 2025
11 min read
How to Send Emails With Badges to Multiple Recipients? (3-Ways Guide)
You're just a step away from sending badges in bulk via email. Three methods to choose from. See which one suits you best.
You probably came here with a burning question in mind: “How to send multiple badges via email?” If your recipients list puts your grocery shopping list on shame, then you need a reliable way to send multiple badges in one go.
And there is not only one secret method to do that. You can do it in three different ways:
All at once with Certifier (it literally takes a minute!)
Semi-manually, through Google Apps tools
Manually, with a little help from the badge generator
Let’s go into details and find out how to send even 600 badges in the same amount of time as 5.
Unbeatable perks of sending badges via email
Are you still wondering whether sending a digital badge email is a good idea? Frankly said, there is no better option than that. We have 2023 – digital credentials are becoming more popular than paper ones with each passing day.
Do you need more proof?
Reason 1: Digital badges meet the expectations of today’s badge earners. They can share active credentials via social channels or get to know their social network on LinkedIn once they have gained a new title. They can build their online presence in the professional world, which is essential in today's job market.
Reason 2: Digital credential network gives you complete control with saved time and effort. You can use automation to create badges, grant them to users and track their progress. All this can be managed through a single online platform or within one badge generators.
Reason 3: Think about Mother Earth. The digital credential solution is a much more ecological option. You don't have to print anything, you don't have to hire credential designers, and you don't have to optimize your design options for printed versions (and we know that sometimes the corrections from the printing house seem to have no end).
Option 01: Sending badges by email automatically via one single tool - Certifier (it’s free!)
Follow along with this video:
We won’t lie to you. This is the most reliable and convenient way to send your badges online. With a minimum effort on your side. Imagine a certificate tool that makes badge distribution seamless, requiring just a few simple clicks – that's what Certifier does.
It’s a digital credential management software that, except for providing an array of credentials templates, also plays the role of an analytics tool. Certifier allows you to have insight into badge status and the group of recipients and manage many different credential designs all at once.
So, how to send badges via email with the help of Certifier? The process is pretty simple. Create a badge profile and follow the steps.
Step 1: Prepare your badge design and recipient list
Customize your badge with pre-made templates or create your own from scratch. You can choose from a variety of ribbons, bases, and badge icons, change the font and text – make any tweaks you wish.
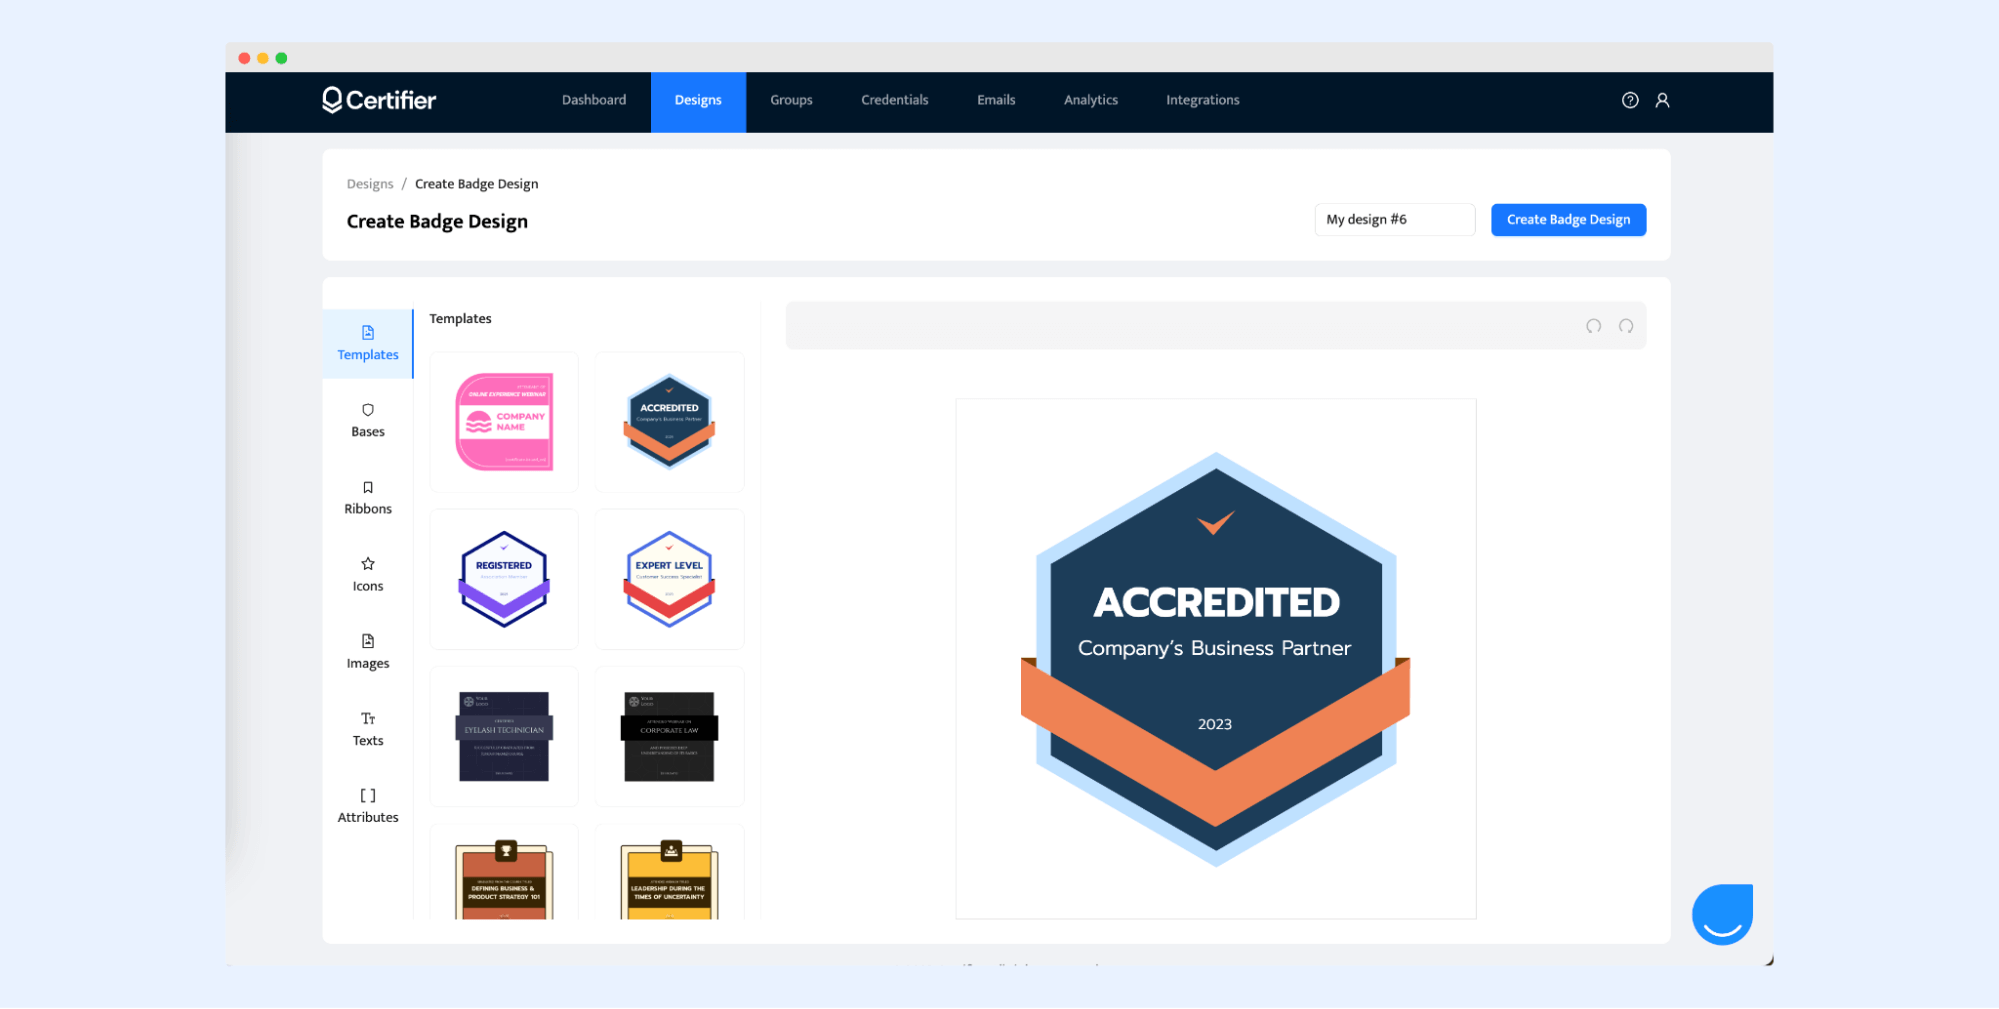
👉🏼 Certifier provides a library with free digital badge templates. You can customize them within the Certifier editor or download to Word, Photoshop or vector formats.
Once all your badge details are good to go, make a list of entire recipients who joined your webinar, training course, or class learning. These are the very same people you'll be sending your badge invitation email to. Download it (preferably to CSV, XLSX, or XLS file). Easy peasy!
Step 2: Start the badge management process
Go to the Groups tab and select “Create group.” Give it a name, and choose your badge certificate design from the list. If you’re using a premium version, you can even select the email template. You can also set up an expiration date for your badges. Click "Create Group" to confirm your settings.
Note! Remove the certificate design if you do not want to include it.

Then, click “Issue credentials” at the top right corner. Select a group name and choose to upload recipients via spreadsheet.
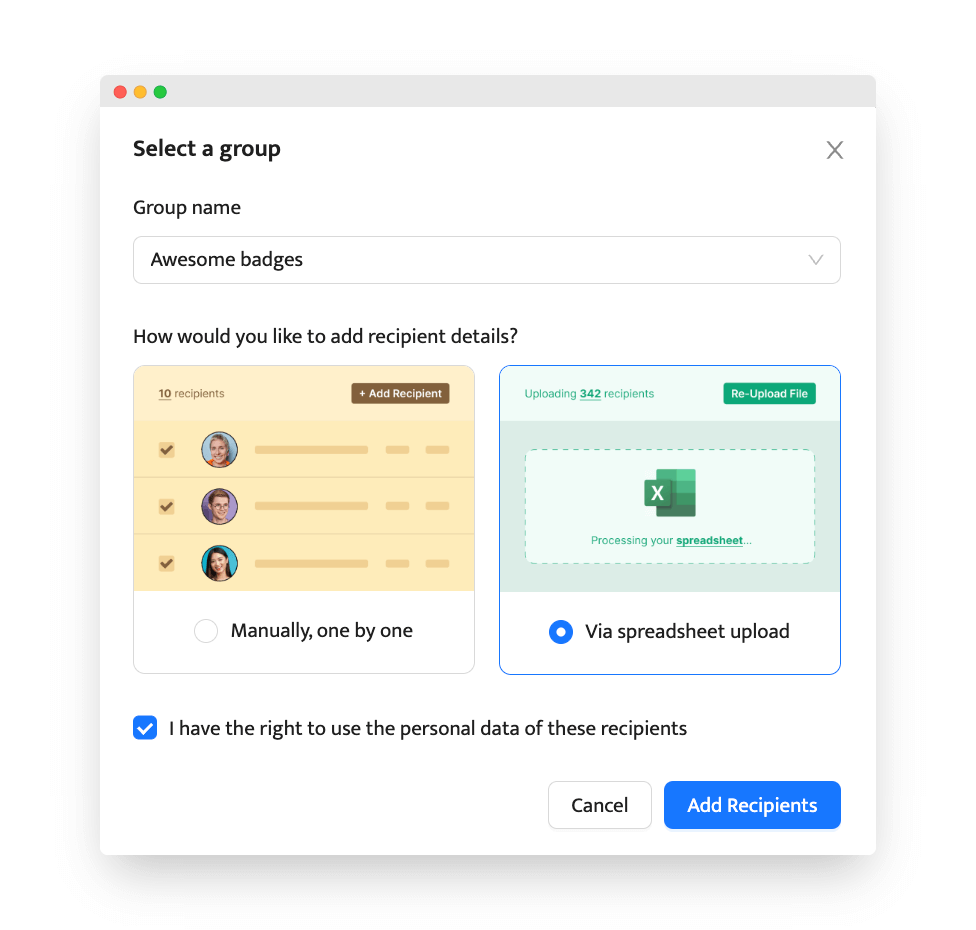
You are almost there! Upload a recipient list or get a spreadsheet template if you don’t know how to create one (email address and name are everything you need to send out your digital credentials).
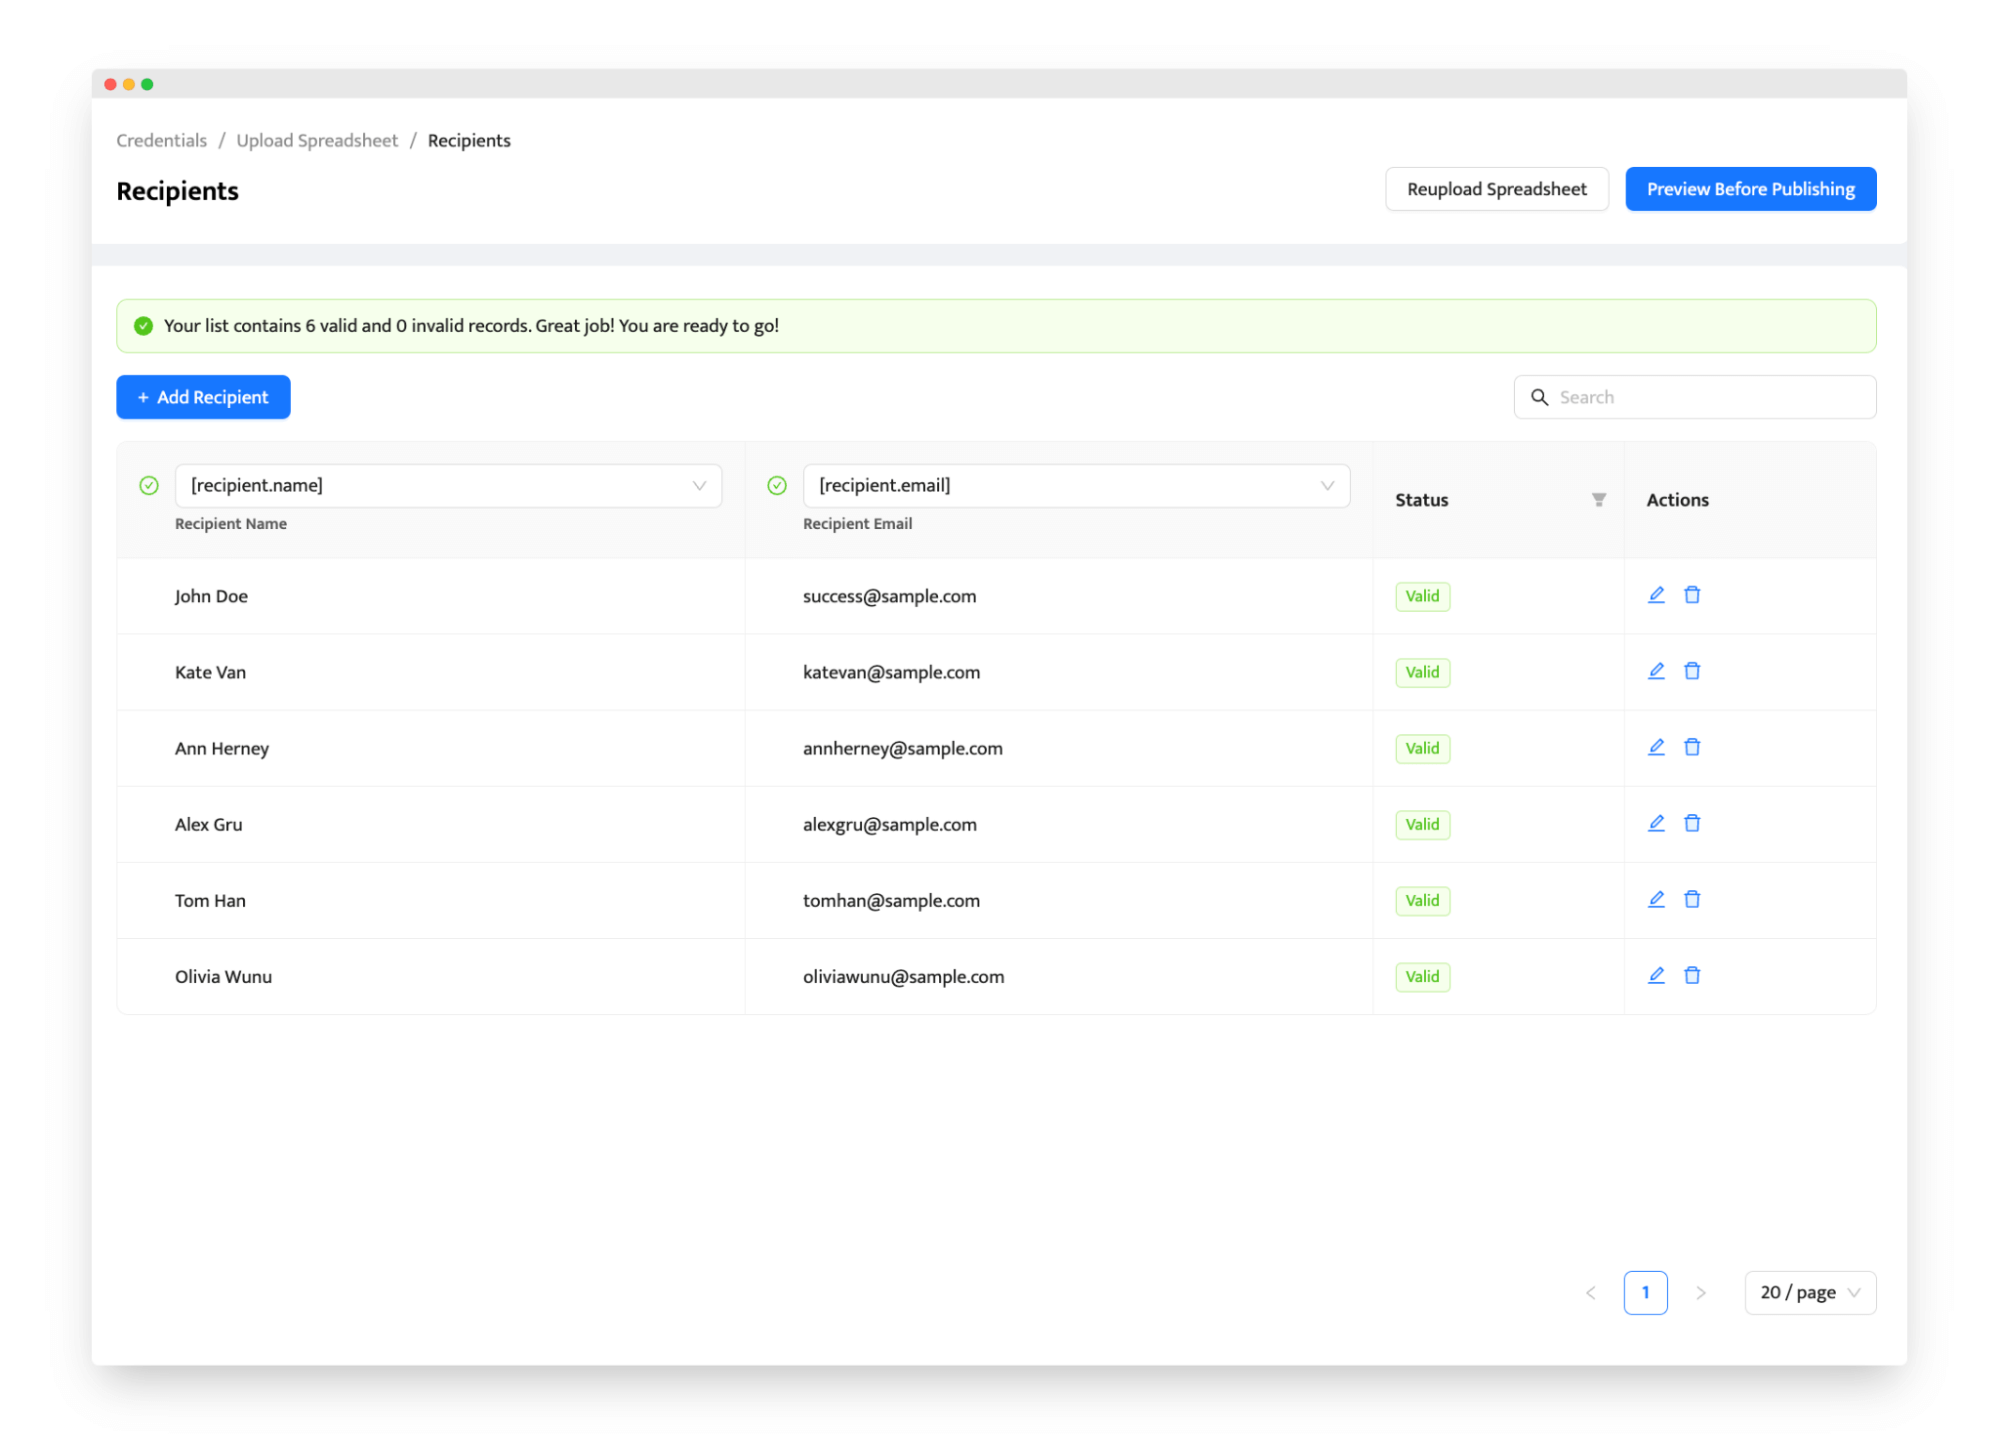
That’s all. You get your list ready.
Step 3: Send emails and track badge status
To make sure everything looks great, click "Preview Before Publishing". There you can check badge and email appearance.
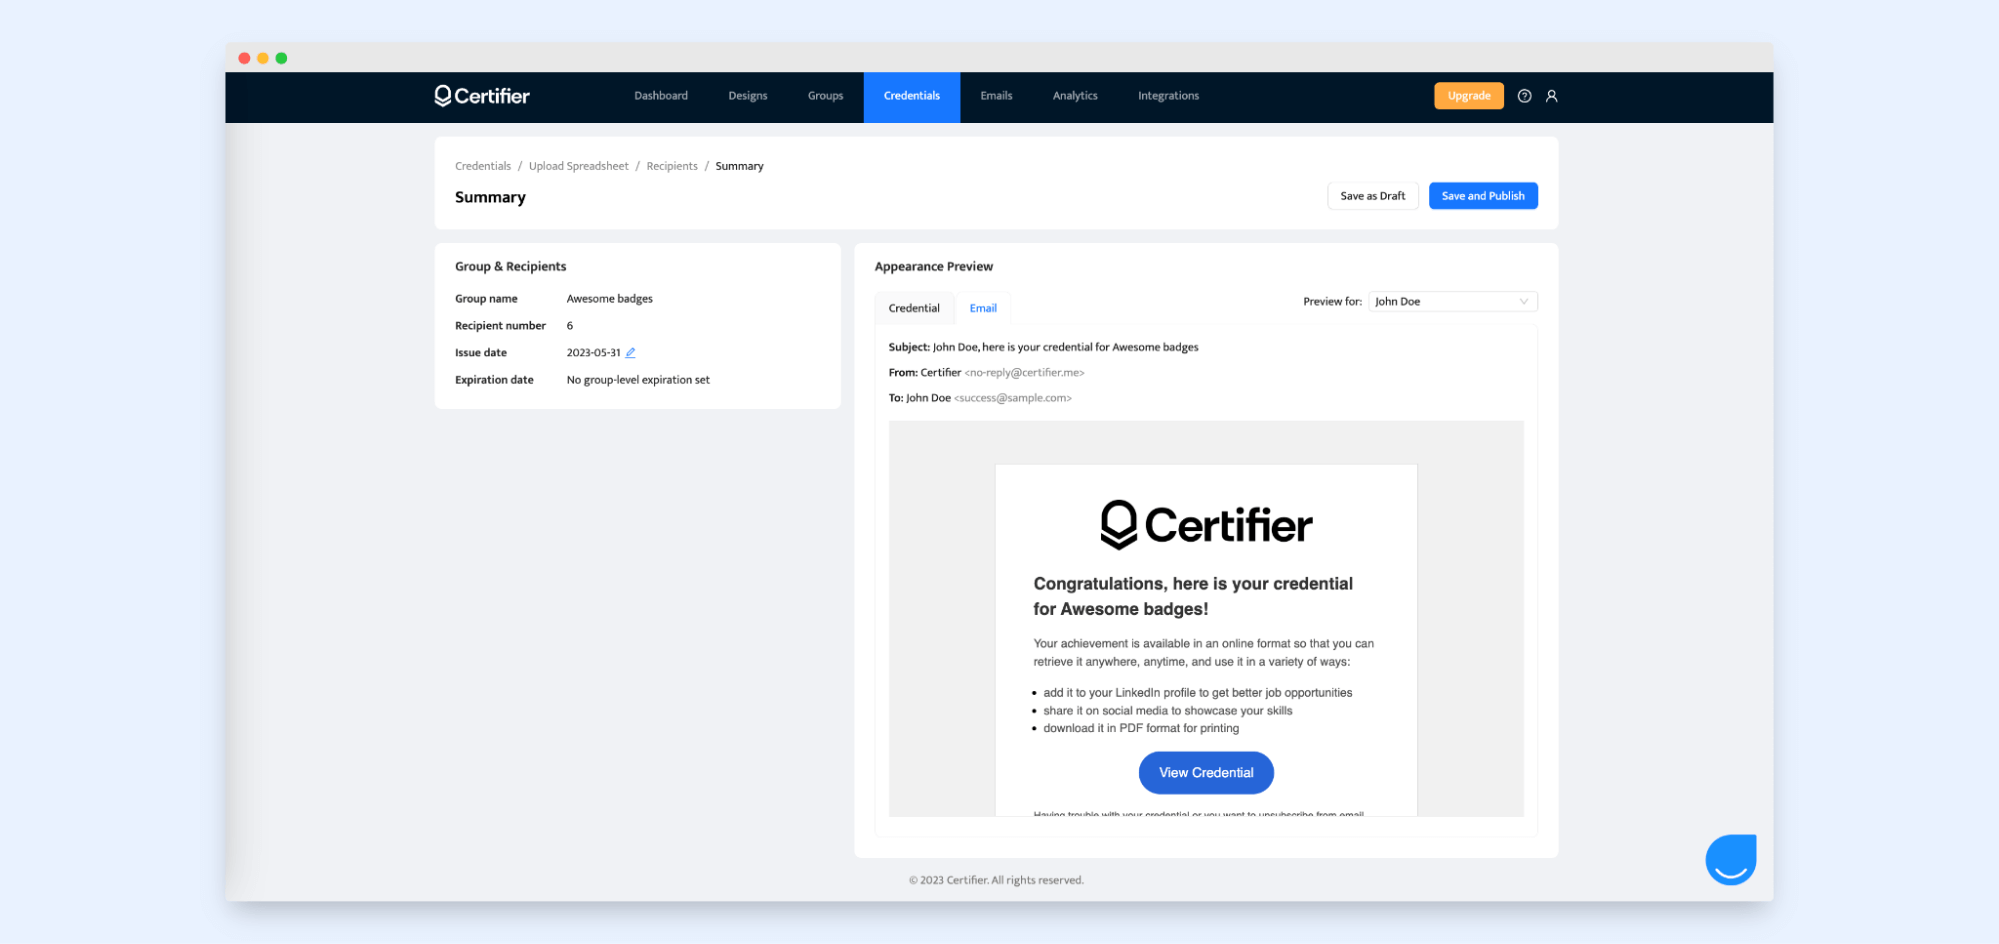
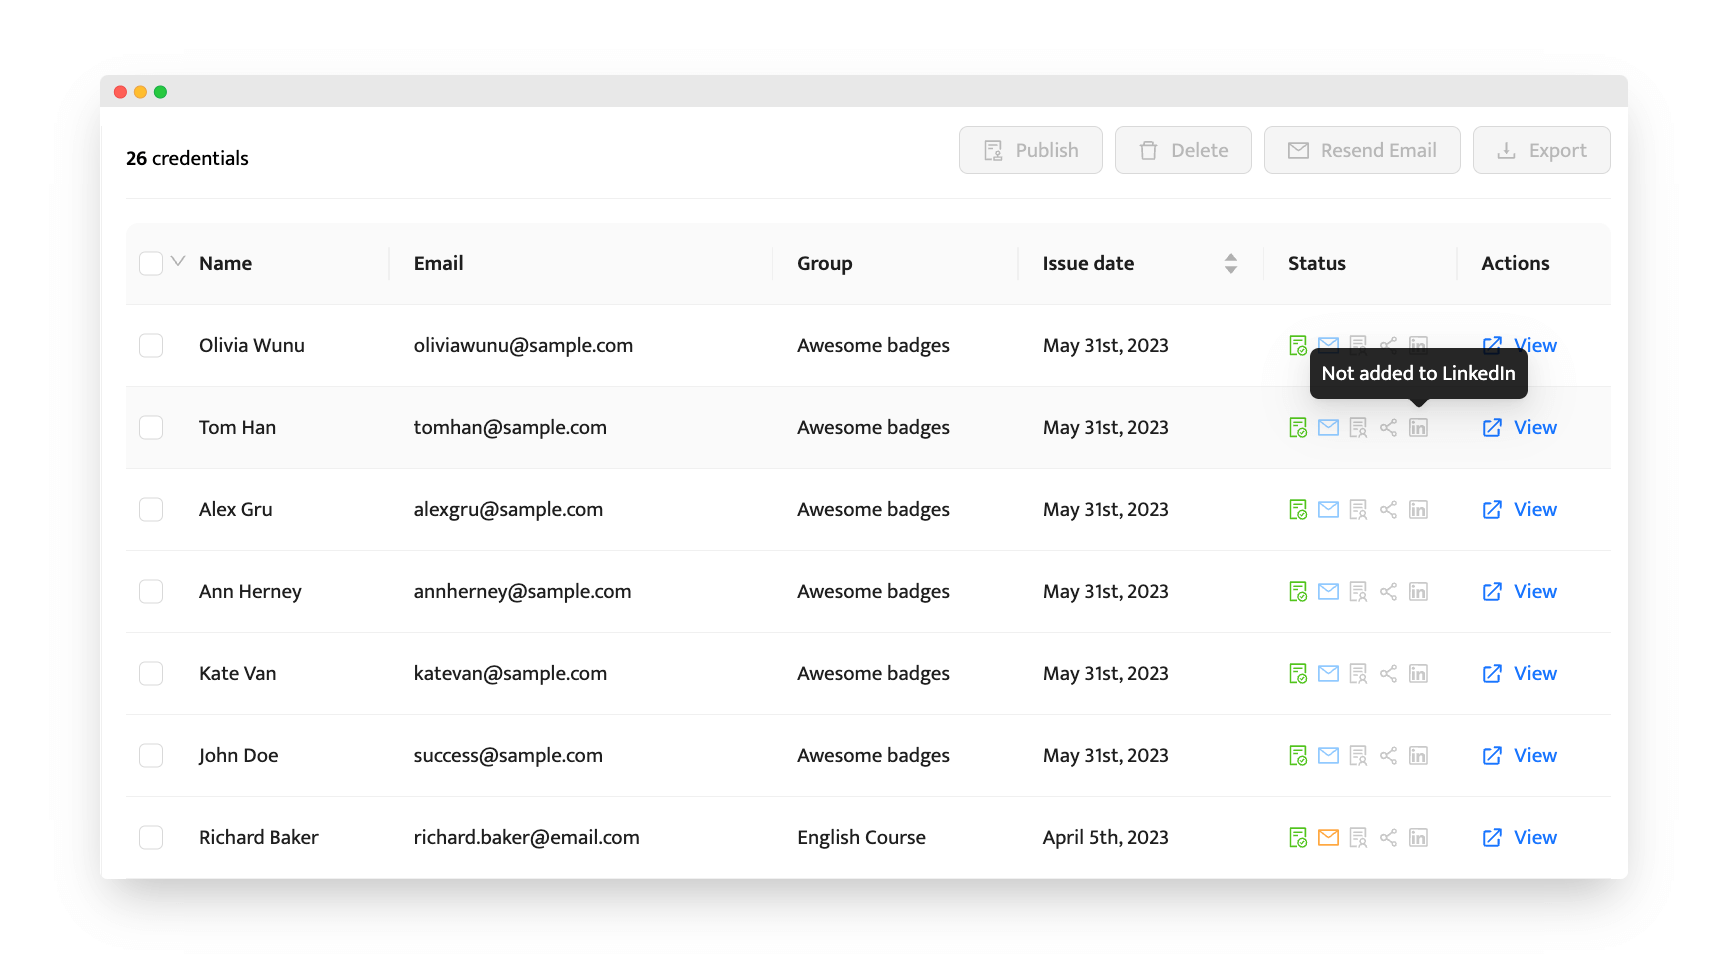
All checked? Save and publish – your credentials are being distributed! The "Credentials" tab allows you to track their status at any time. See if your badge email has been opened or even added to social media sites like LinkedIn!
Note! Good to know that Certifier provides seamless integration via API or such tools as Zapier, Google Sheets, or Google Forms. Also, it allows for custom integrations via API.
Option 02: Semi-manual emailing of badges using Google Apps
Now, let's dive into the ins and outs of sending certification badges via email using Google Drive Apps. While this method might take a little extra time, it'll still save you a ton of hassle compared to doing it all manually.
There are a few different ways you can create online badges using Google Drive. There is only one Google tool that can be used to create badges – Google Slides. Be careful, though. It’ll be quite limited.
If you need some help on how to create Google Slides, this article might help you out: How to Make Google Slides Certificate in 5 Steps. It’s aimed at digital certificates, but it still will work out in terms of badges.
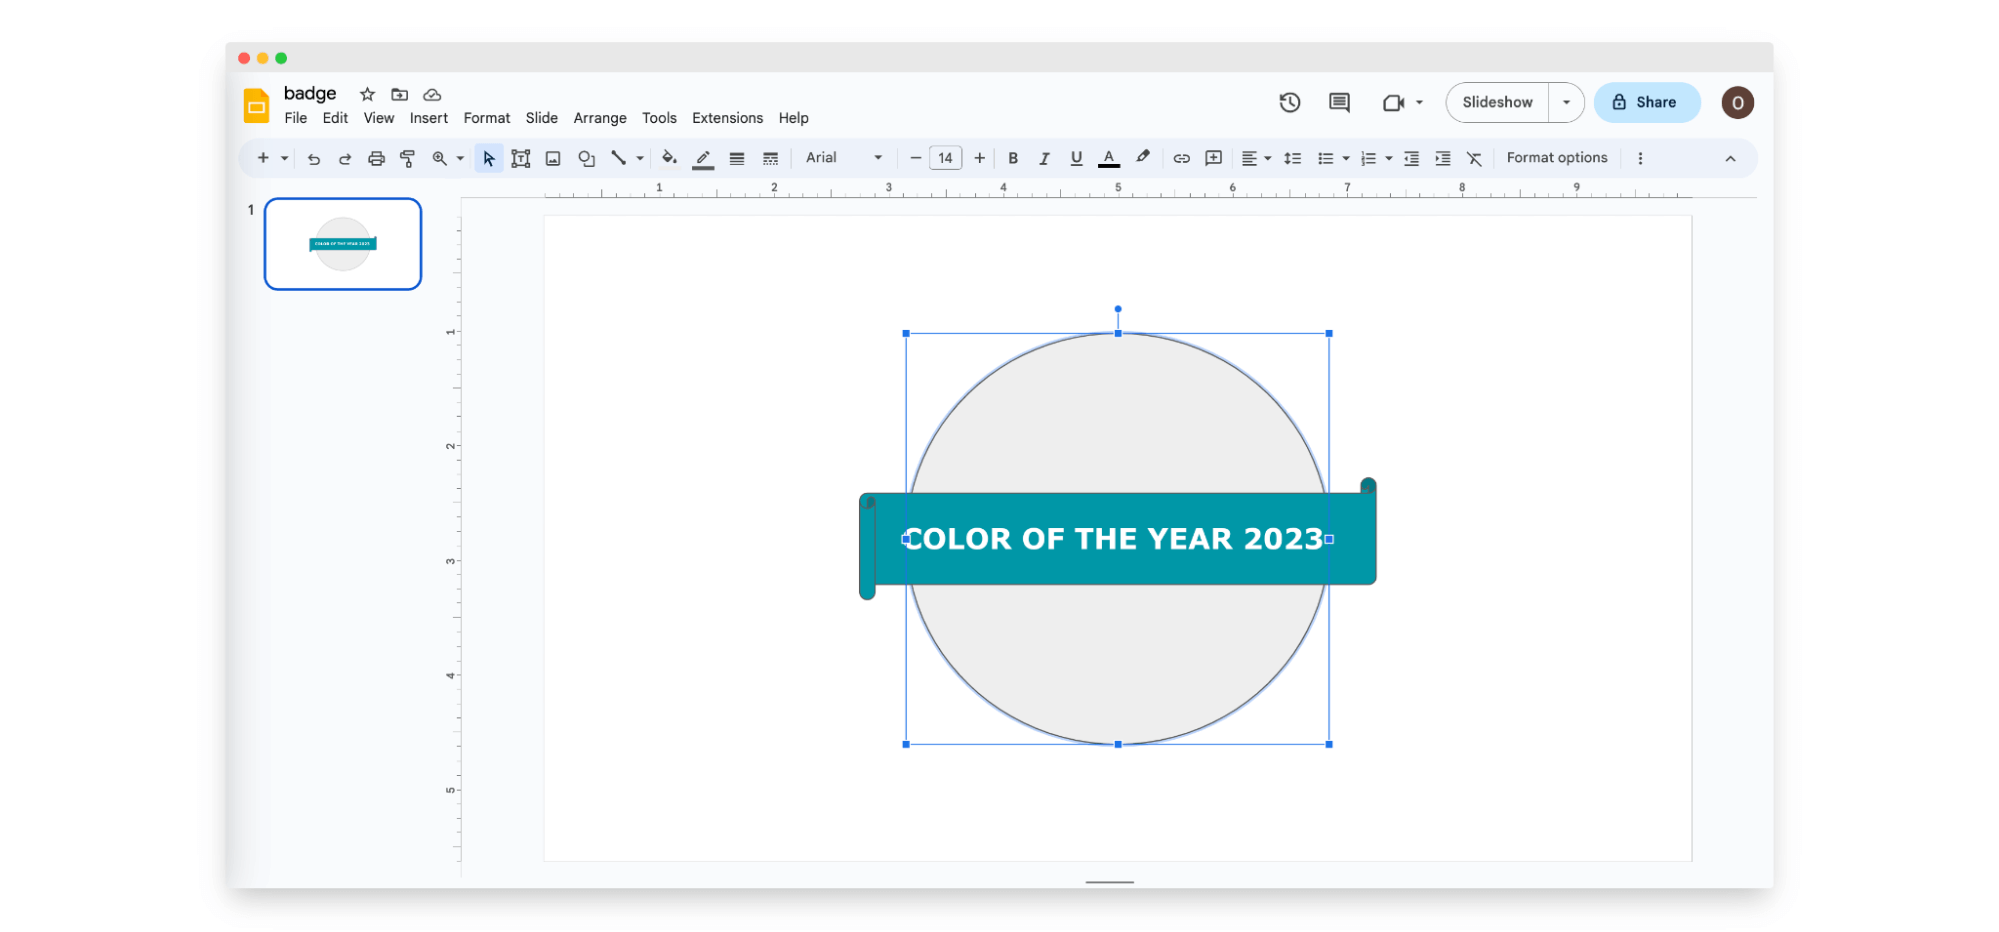
Once your badges are ready, go to the main menu of Google Drive and create a new Google Form. Click “Responses” and then “Link to Sheets” – thanks to that, e.g., after registering via a form, all your recipients' data (with an email address) will be stored here.
The last step is to add an AutoCrat add-on so that you’ll be able to send badges by using your Gmail account. You can choose to send certificates right away as soon as someone fills out the form, or you can schedule them to be sent at a specific time.
This option may not be the perfect one, and there are some pitfalls to watch out for, but it's still possible to optimize it so that it works.
Option 03: Sending badges manually along with an online badge maker
Here it is – the last, the most time-consuming option. The method will work if you have a few badges to send. But, if you have a lot that you want to customize individually, it might take too much of your energy.
To begin with, you need to find an appropriate design credentials tool. You can use such tools as Figma, Canva, and Adobe or just order the design from a graphic designer. Basically, you need to enter the recipients' data manually and prepare each design separately (unless you use one design for all recipients).
Generate a customized link for each badge (e.g., via a folder in Google Drive). Copy the link to the first badge and paste it into an Excel file.
Drag the cell with the link over other cells to automatically generate corresponding links with consecutive numbers.
Add columns for recipients' names and email addresses, and save the Excel file.
Sync the file with your email client or use a tool like Instantly to send emails automatically.
Craft personalized content for each email and attach the badge link.
Comparison table: Compare options for sending badges through email
You have the opportunity to compare all three options available here. Each of them surpasses traditional printed credentials in terms of speed and efficiency.
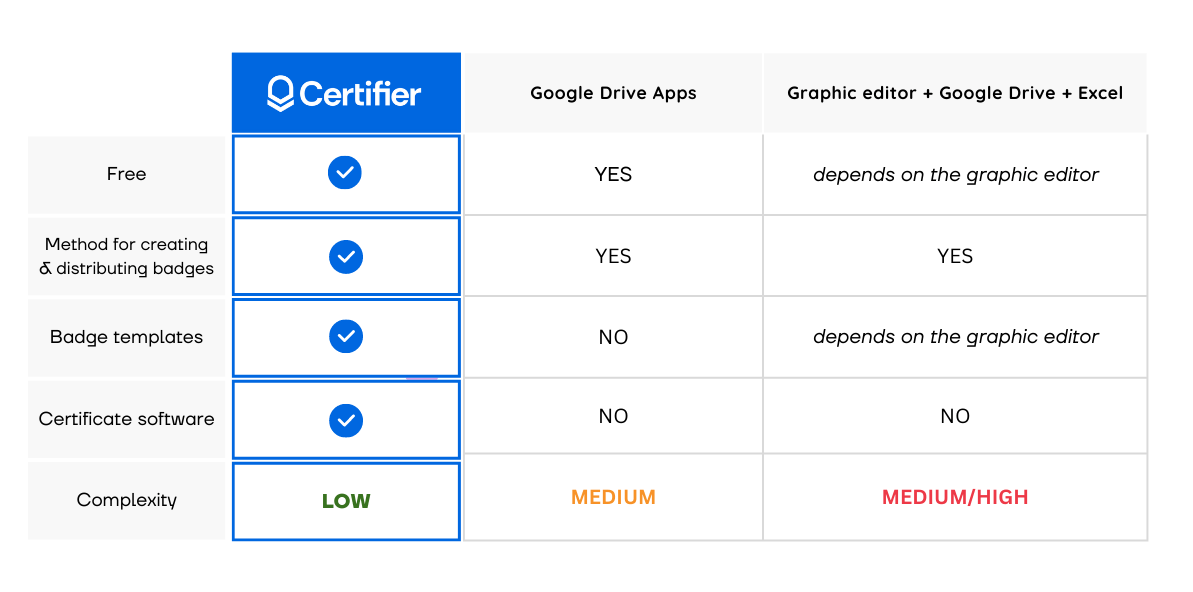
The result? Option #1 stands out as the only choice that enables you to automate the entire process, from start to finish, resulting in significant time savings. Also, just Certifier provides an easy-to-access free editable badge templates. It’s also the easiest way to send your badges via email, allowing you to badge creation and distribution from one single dashboard.
Put your trust in badge automation
Having virtual badges sent to recipients is a nice thing, isn't it? You don’t have to worry about finding a special delivery service or waiting for the mailman. And with the automation of badge sending, you don't even have to worry about allocating your time and resources to printing them properly.
Just trust in your automated processes and leave it up to tools when it comes to sending badges via email.
Among the options we've explored, one solution stands out from the rest – Certifier. It's the ultimate superstar that will revolutionize your badges sending experience. Do you want to see for yourself? Sign up for your forever free plan today and start creating and sending your electronic badges today.

- SaaS Growth
- Digital Credentials
- APIs
- Product Marketing
- Company Operations
CEO and Co-Founder
Sergey is CEO and Co-Founder of Certifier, a Forbes 30 Under 30 honoree building digital credential infrastructure for 2,000+ organizations worldwide and shaping the future of credentialing.
