Trusted by:
Updated: January 19, 2026
10 min read
How to Send Certificates Through Email in Bulk? 3 Ways to Do It In 2026
How do I automatically send certificates via email? What is the most efficient and agile way to send custom certificates in bulk in 2026? If these questions come to your mind, see this article to get tips and insights on how to save time and money by using reliable ways of distributing digital certificates via email messages.
Did you know that issuing both 5 and 5,000 digital certificates can take the same amount of time if you know one secret trick? This hack involves sending certificates automatically via email.
Optimizing the process of manually sending thousands of PDF certificates can save countless hours and significantly impact any business or individual. There are many routine tasks you should eliminate. And creating certificates is one of them.
Don’t worry – once you read this article, you will be familiar with three different methods of sending your certificates via email! We will also compare these methods and advise you on the most efficient and agile way to send bulk certificates through Gmail and Outlook.
TL;DR
The fastest way to send certificates via email in bulk is by automating the process with Certifier.
Certifier lets you design, personalize and email thousands of certificates in just a few clicks–no manual work needed.
Integrations with Google Sheets and Excel keep certificate issuance fully automated for continuous workflows.
Other methods like Google Apps or Canva work, but they’re slower, less scalable and require more manual effort.
01 Automatically send certificates via email
If you are looking for the most reliable certificate delivery method using an automated emailing process, you should give Certifier a try. It is an online certificate generator that allows you to design, personalize, issue, and send online certificates in bulk using traditional email methods.
Thanks to Certifier, you can mass-produce certificates with varying data and automatically email each certificate to each recipient. The process is hassle-free and with minimal effort on your part.
So, how to send multiple certificates via email?
Step 1: Create a certificate design
Step 2: Prepare a list of the certificate recipients
Step 3: Upload the certificate recipients' data to Certifier
Step 4: Send certificates to all the emails at once
If you’ve ever wondered how to email a certificate quickly and professionally, here’s the easiest way to do it.
Before starting, create a free Certifier account here.
There’s also an alternative way to handle this. Instead of manually uploading the list of certificate recipient data to Certifier, you can create an automated workflow via the native integration with Google Sheets or Microsoft Excel.
Thanks to this integration, every time a new row is added to your spreadsheet, Certifier takes that data and automatically generates a certificate.
This approach is best suited for ongoing workflows where users or customers need their certificates immediately after completing an action (like finishing a course, passing a test, or registering for an event).
In other words, it’s perfect for situations where certificates are issued daily, not just once in a while.
Step 1: Create a certificate design or upload your own
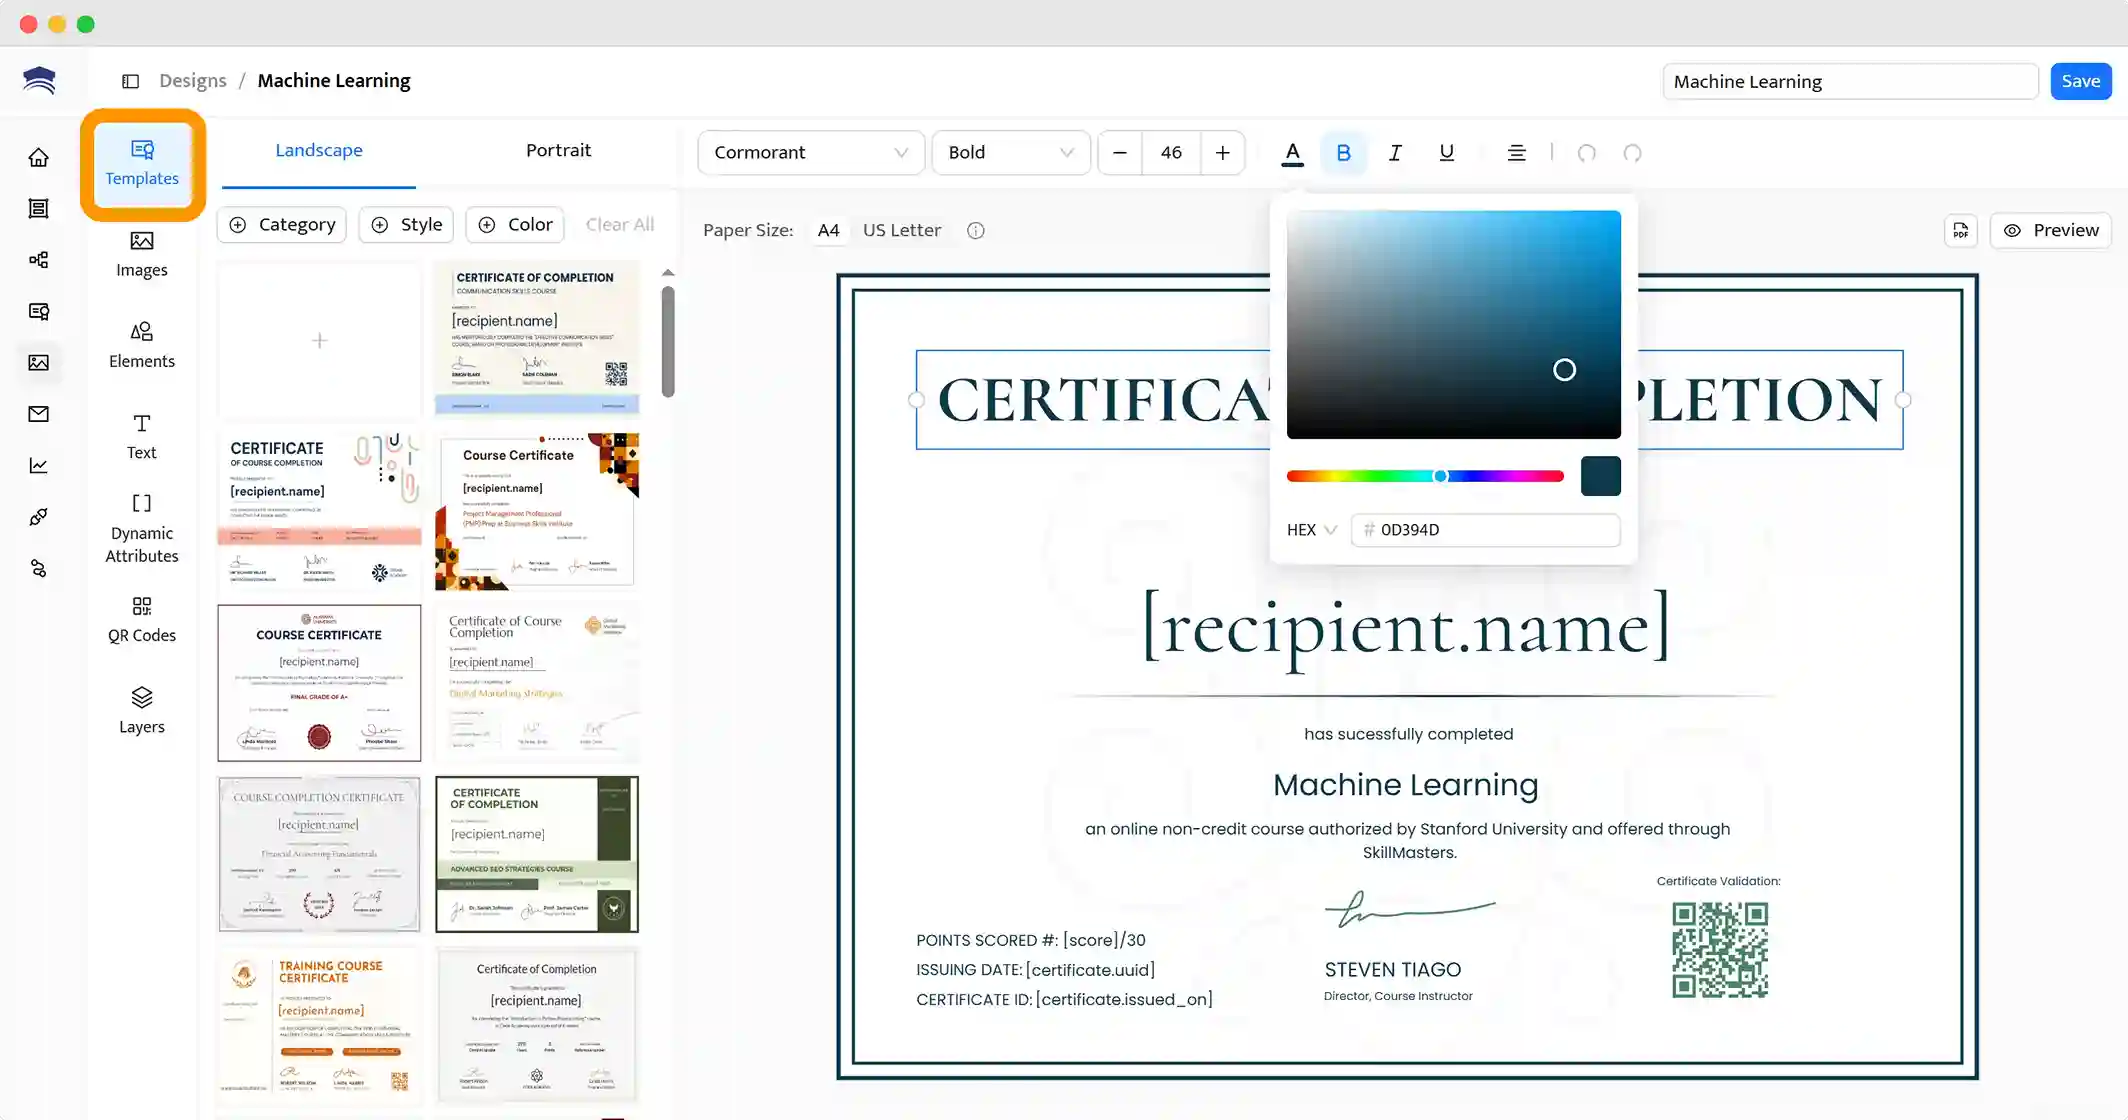
In order to send digital certificate, log into Certifier to create a certificate design or upload your own certificate background, design, logo, etc. It’s super simple with Certifier.
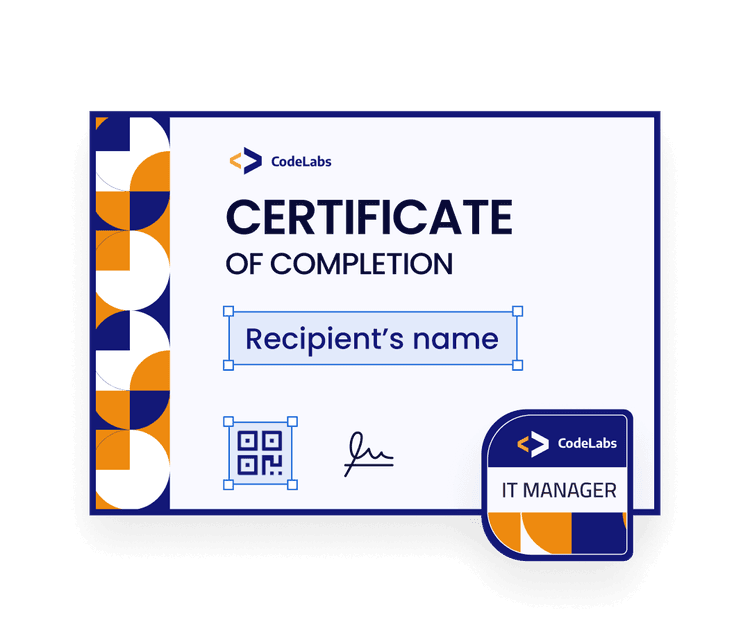
Go to the Designs tab to open the certificate builder. You can choose from available templates or create the certificate from scratch.
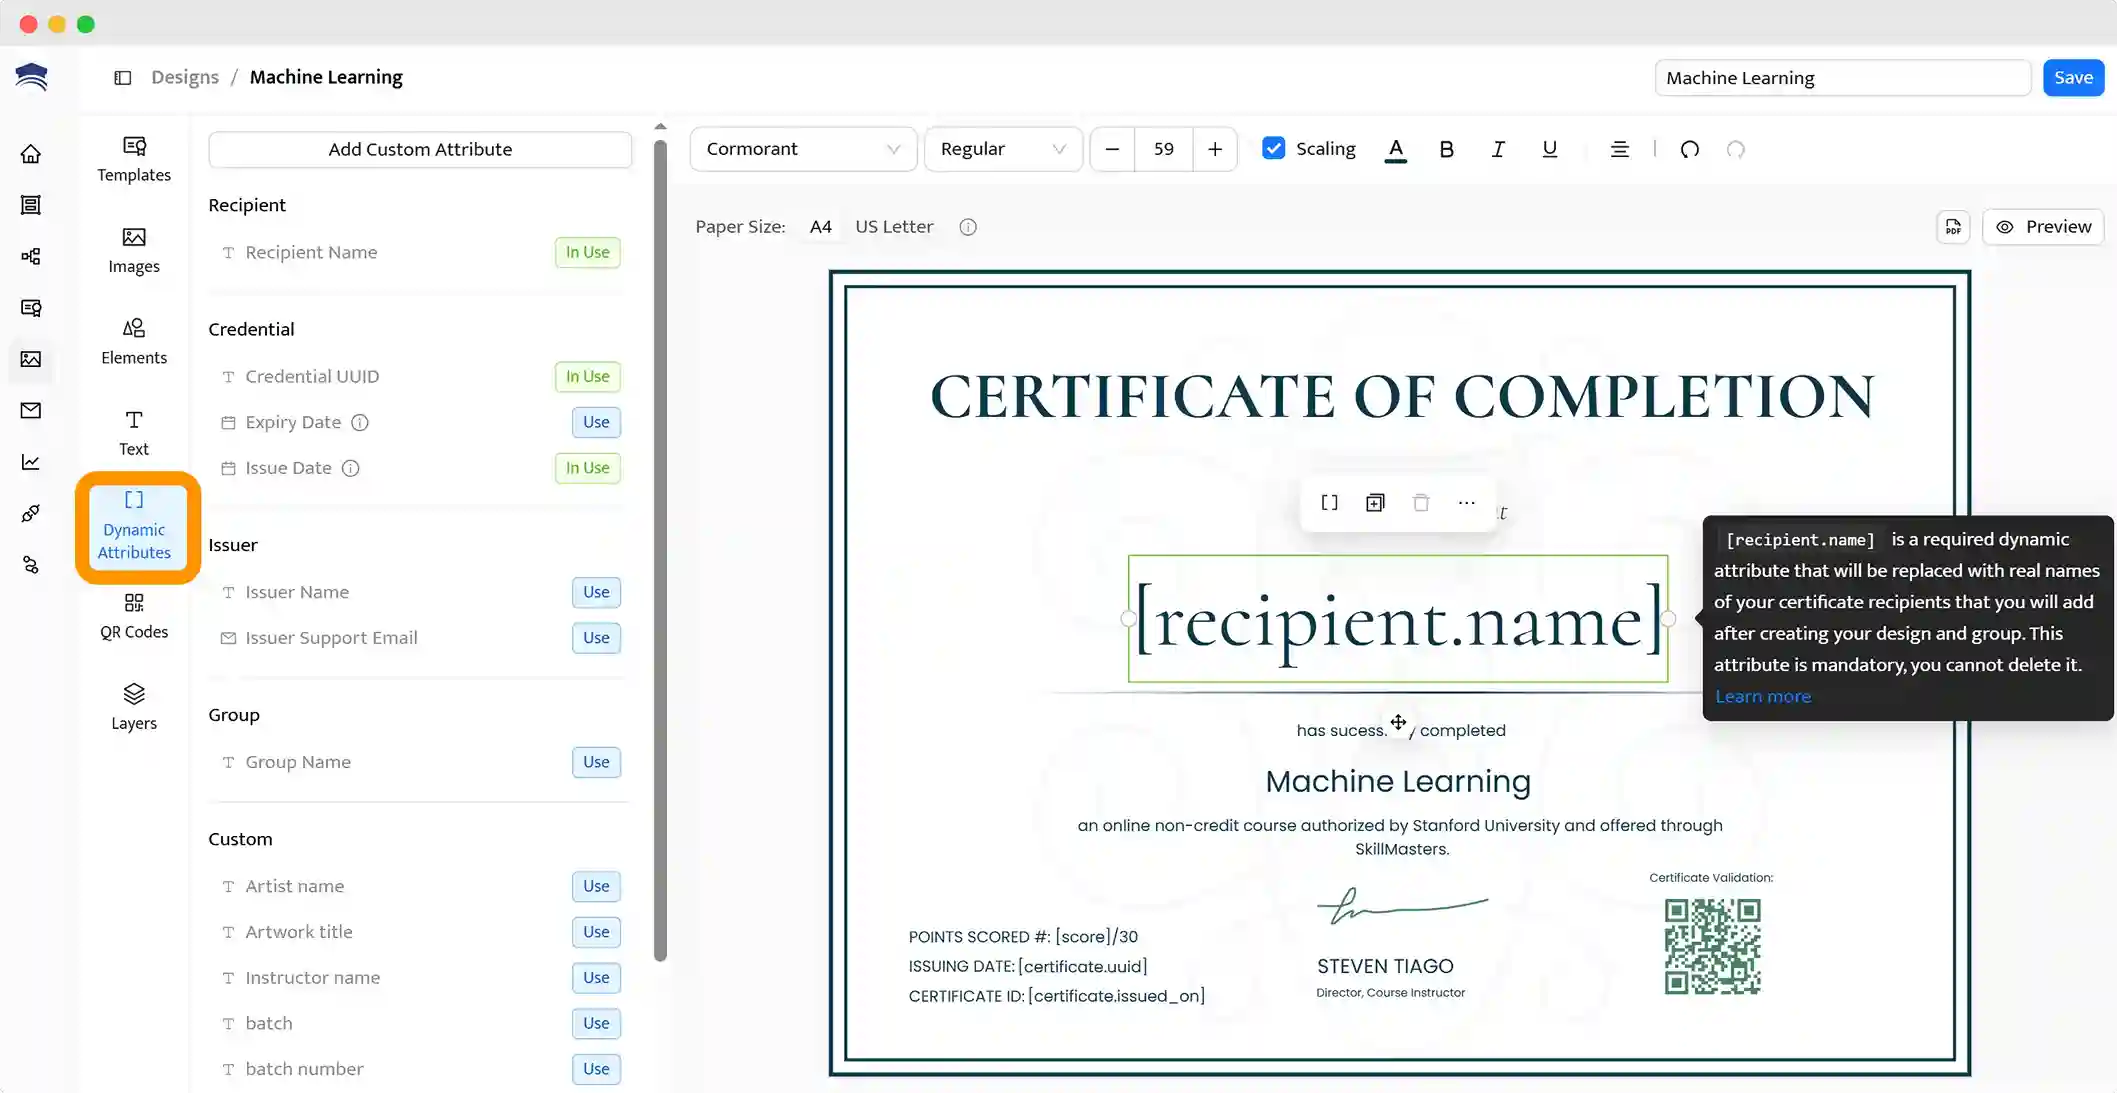
✋ Don’t forget about the dynamic attributes like the recipient's name to generate certificates in bulk – they make it possible to send digital certificate to each person automatically.
Dynamic attributes are default placeholders (see the screen below) named [recipient.name] that will be automatically filled with the appropriate recipient’s name based on the spreadsheet data. You can also add popular dynamic attributes like the issuing date, expiration date, CPD points, and more. Thanks to these dynamic attributes, you can generate certificates in bulk and send them out through email without any manual work.
Step 2: Prepare a list of the certificate recipients with their email addresses (preferably in a CSV file)
You can download a ready-made list from a webinar platform, your LMS, or prepare it as a CSV file or a Google Sheets list. Make sure that each recipient has an assigned email address and full name.
If you don’t have a spreadsheet with the recipients’ data, you can easily create one for those to whom you will be sending your certificate file – these are the same people who attended your webinar, online course, or workshop.
Step 3: Upload the certificate recipients' data to Certifier
This step is crucial when you want to send digital certificate efficiently to all your participants at once.
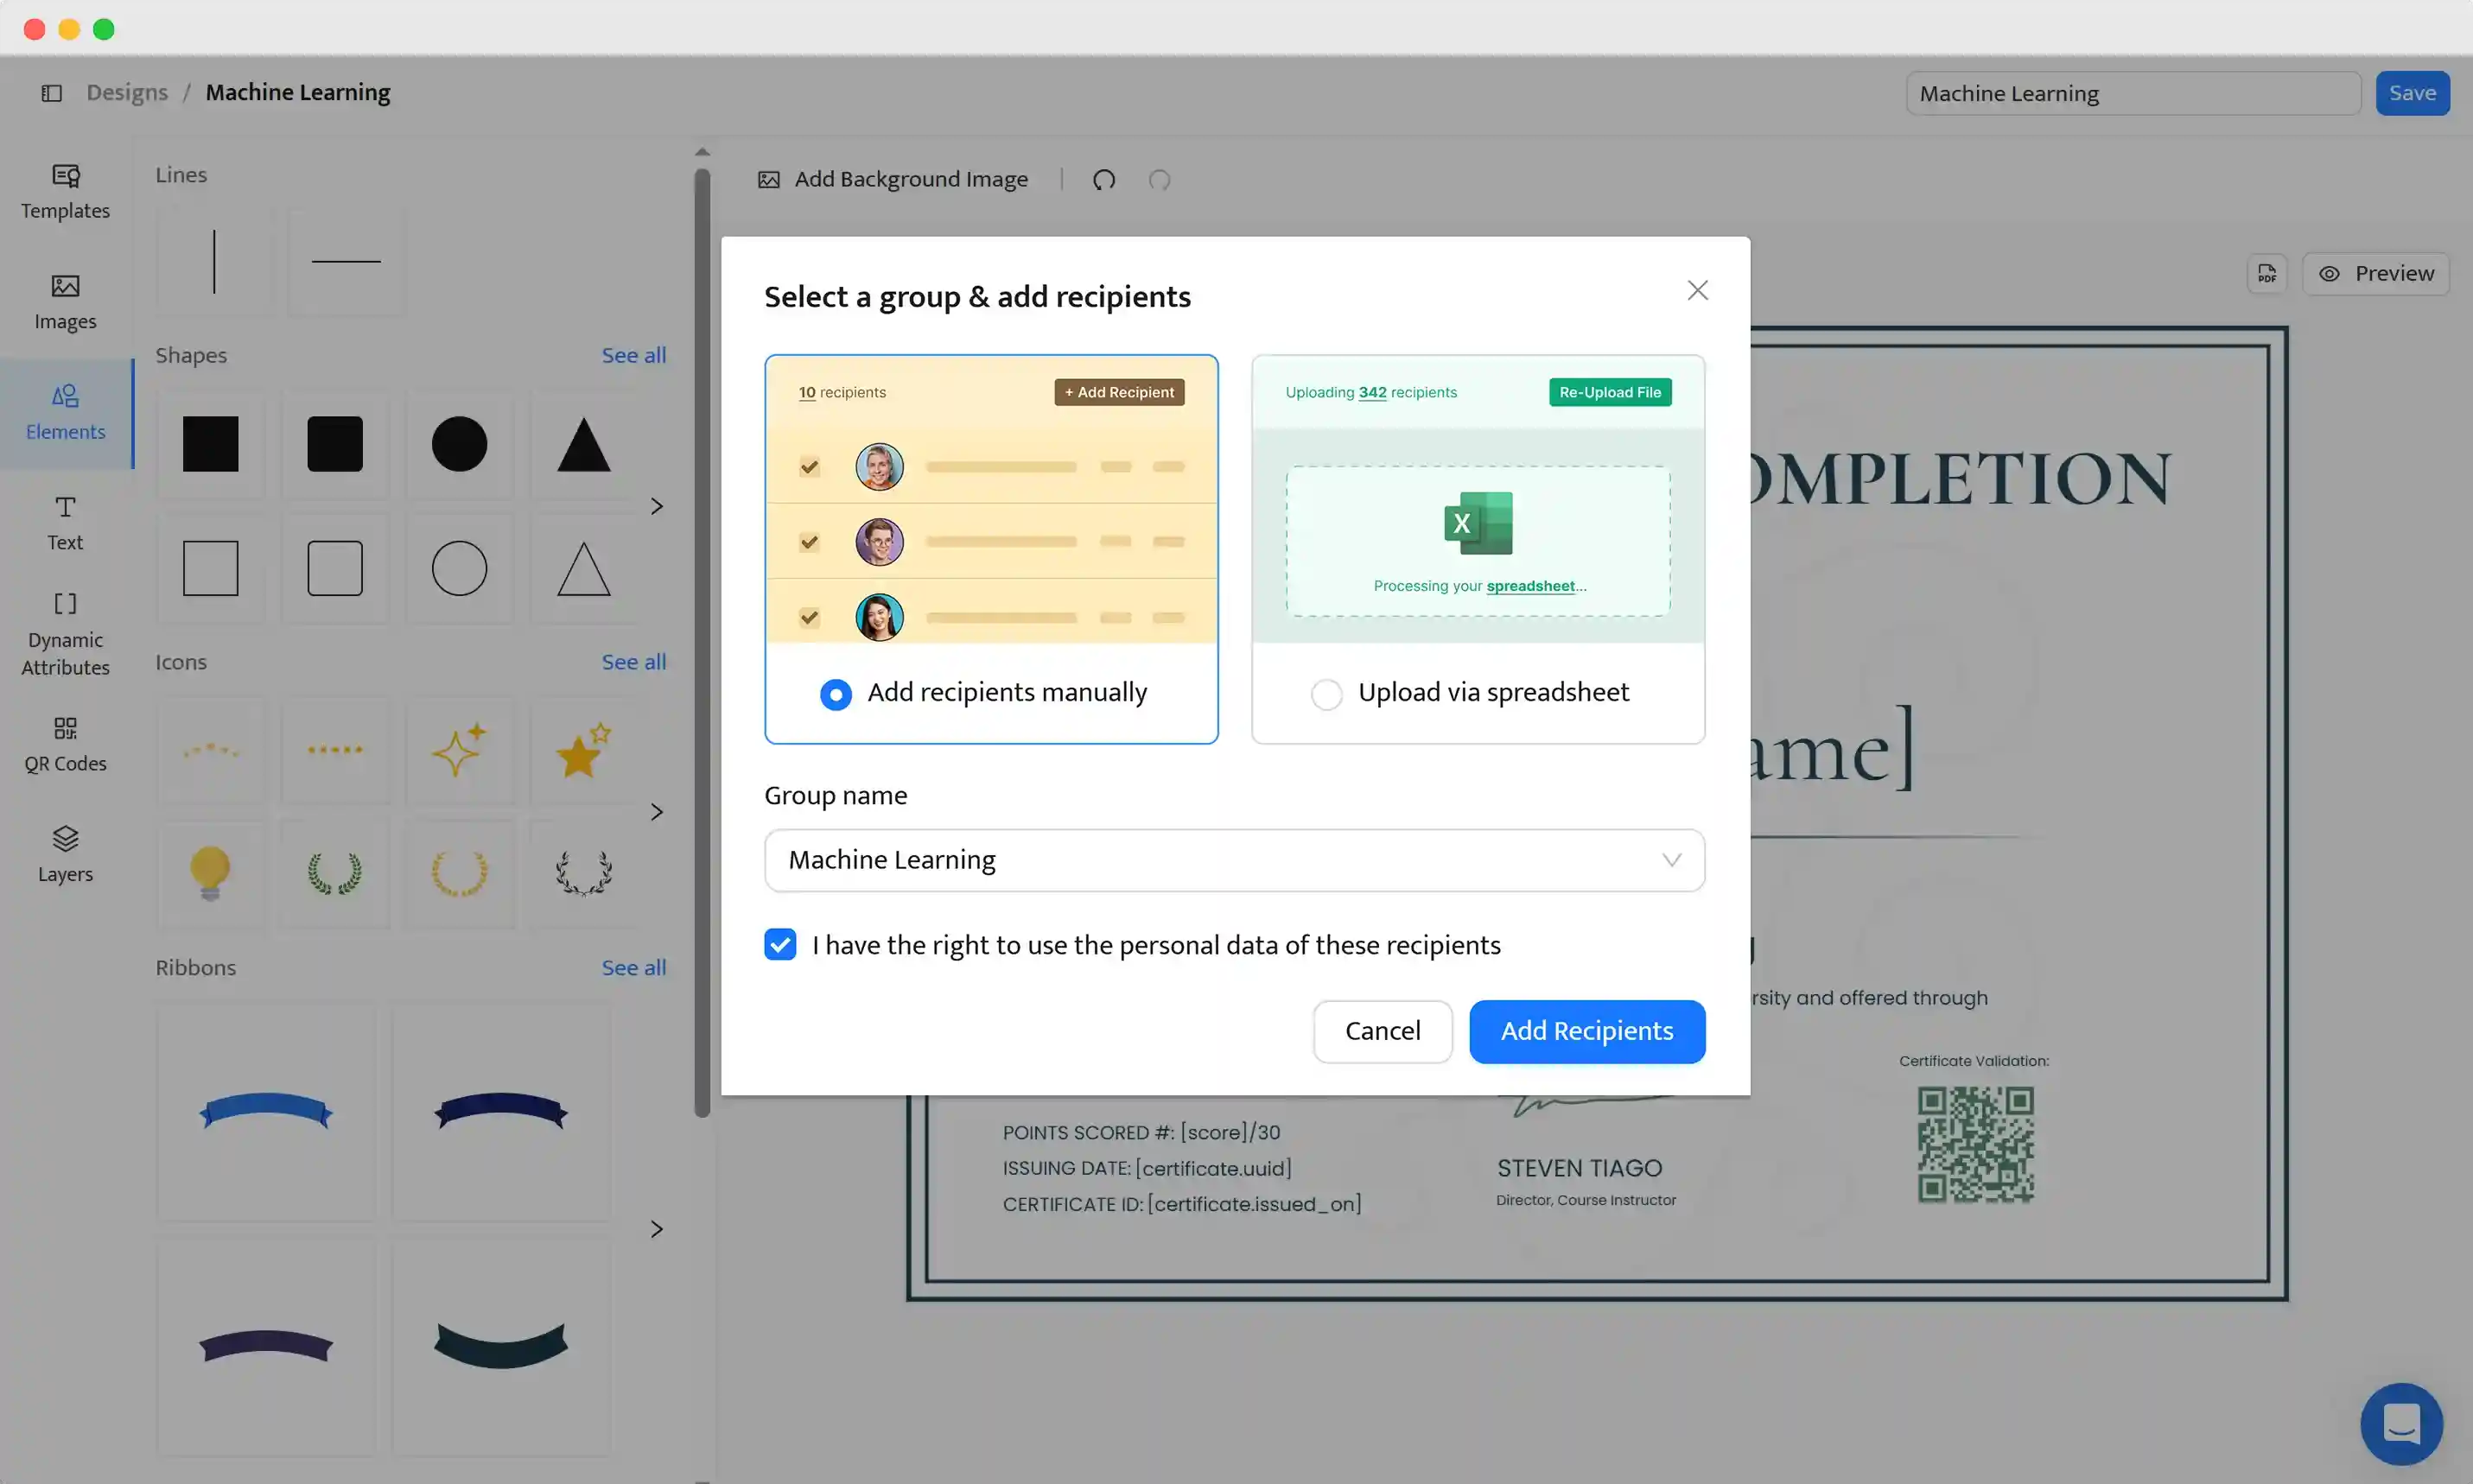
Once you click "Save" to generate your first certificate design, a pop-up will appear, prompting you to upload the recipients' data. Follow the instructions – they're super simple. Choose via a spreadsheet upload (recommended).
Here, you must match the custom attributes to the spreadsheet columns. Certifier is quite intelligent – it will help you map your spreadsheet columns to the correct attributes so names align with names, emails with emails, and grades with grades. Map each column to its corresponding attribute.
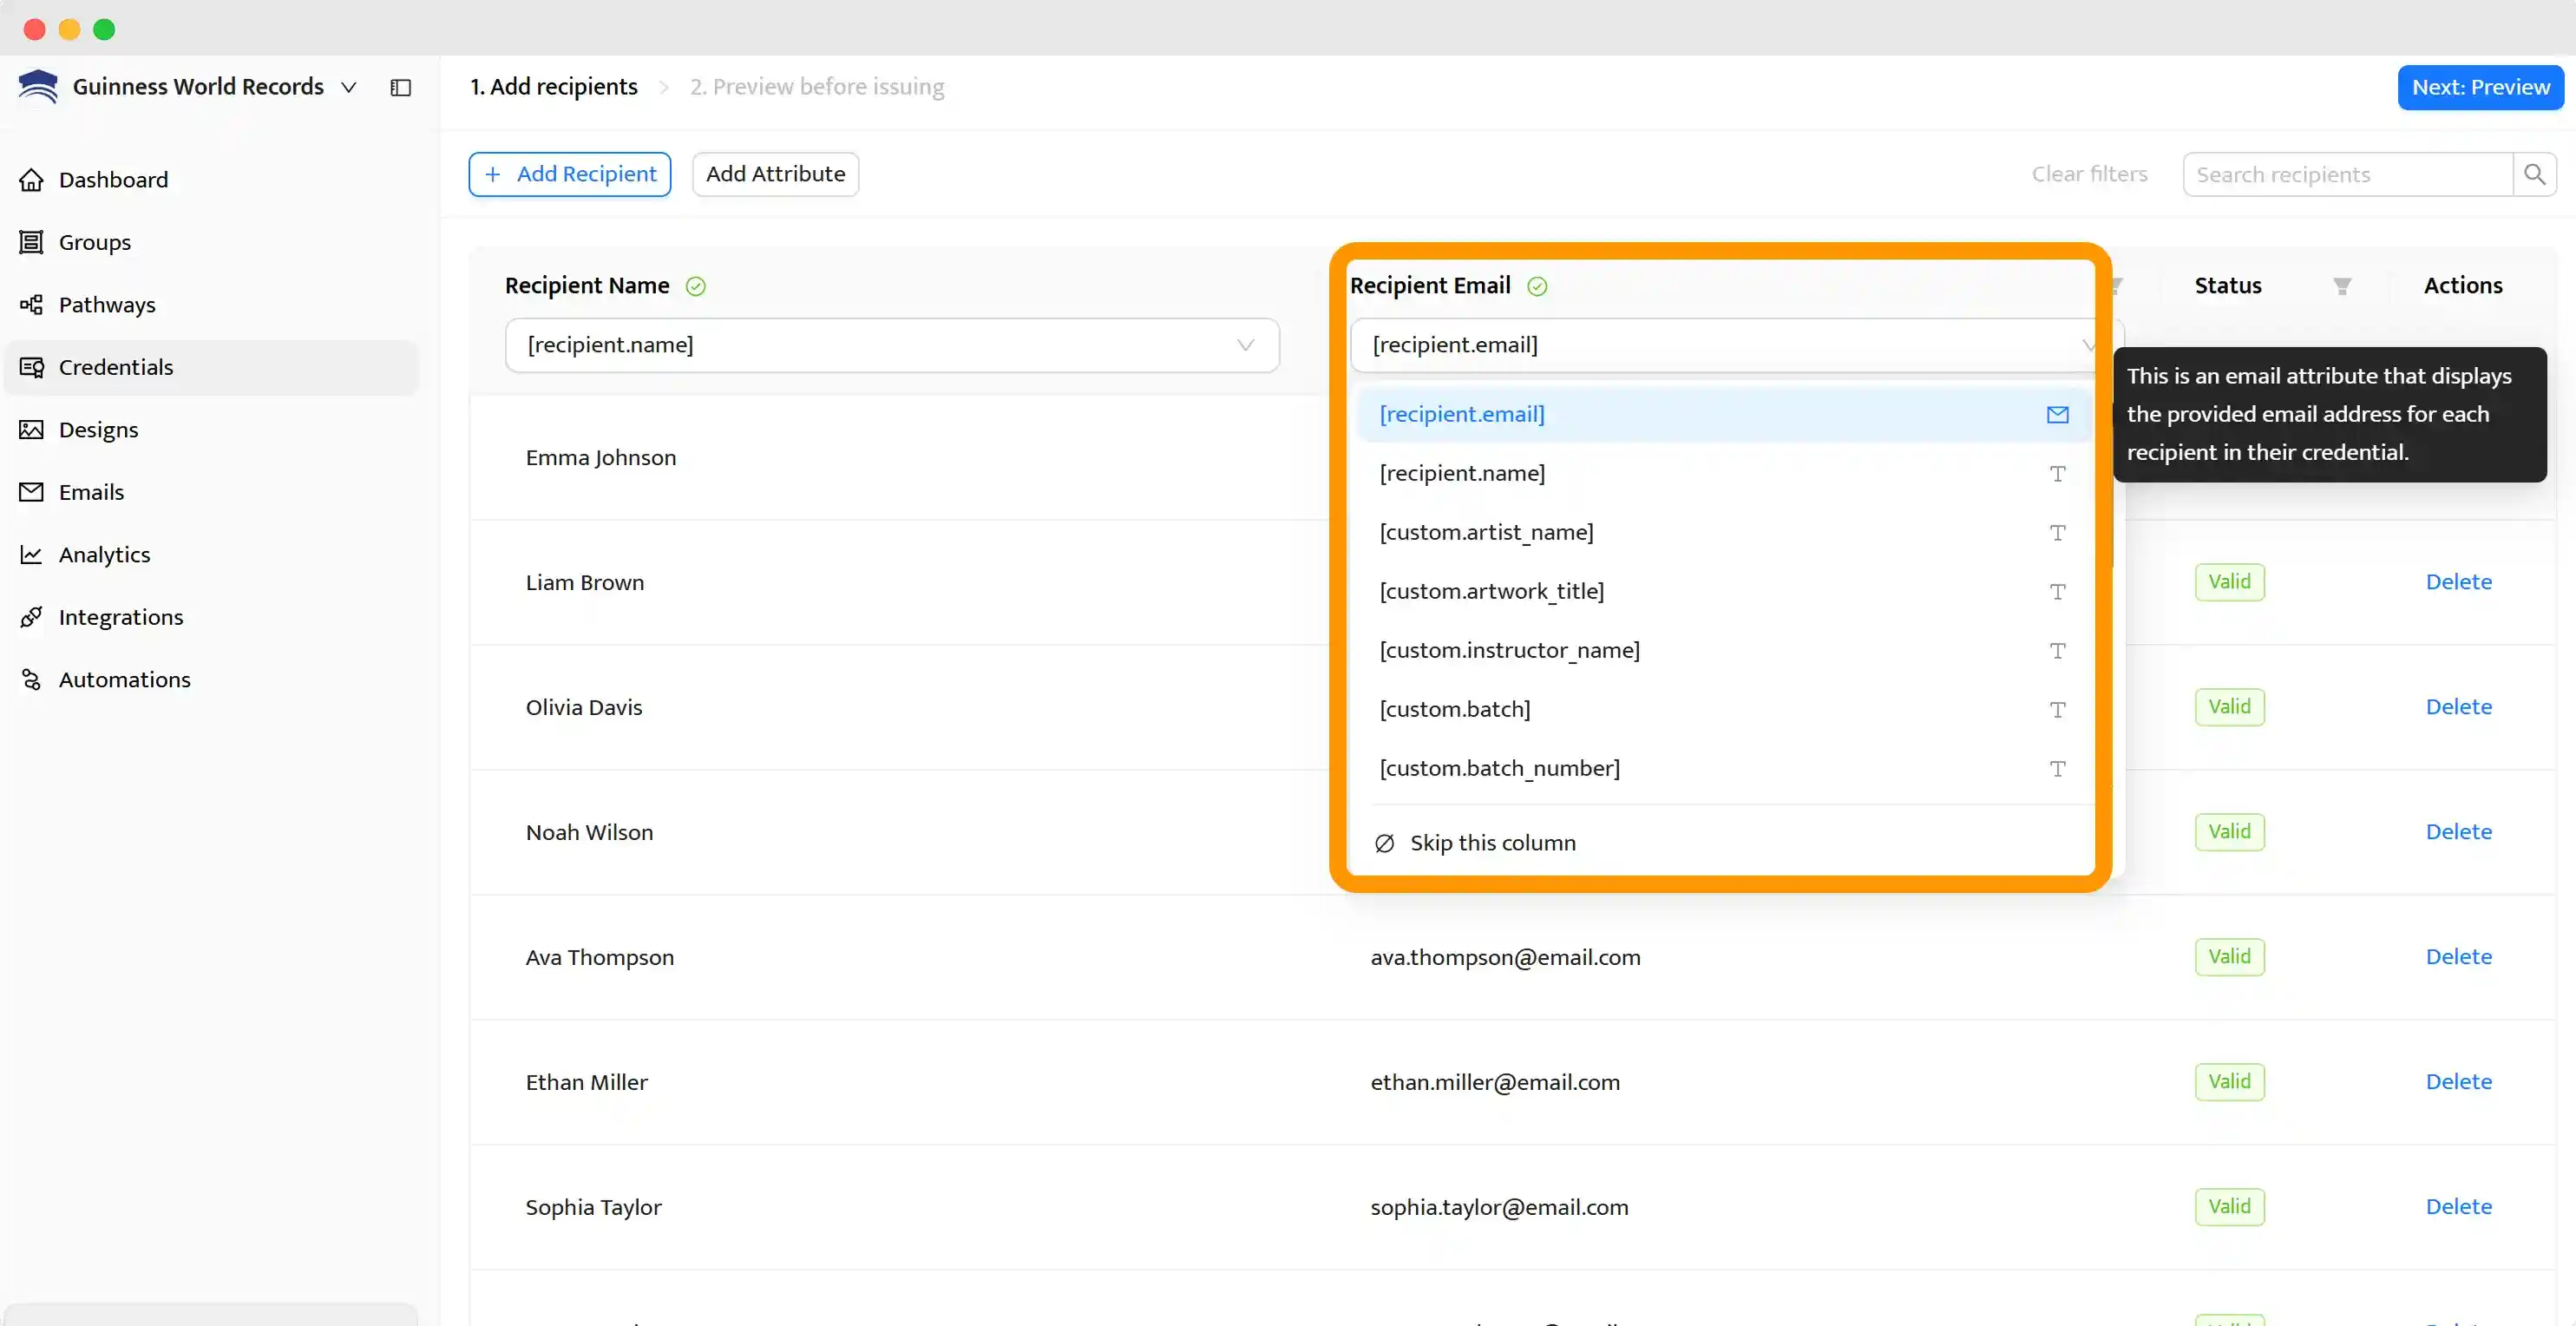
When you see a column that you do not want to include, simply click "skip column.”
Double-check to ensure everything is in order. If you need additional information about mapping certificate data with a spreadsheet, you can check our manual here.
Step 4: Send certificates to all the emails at once
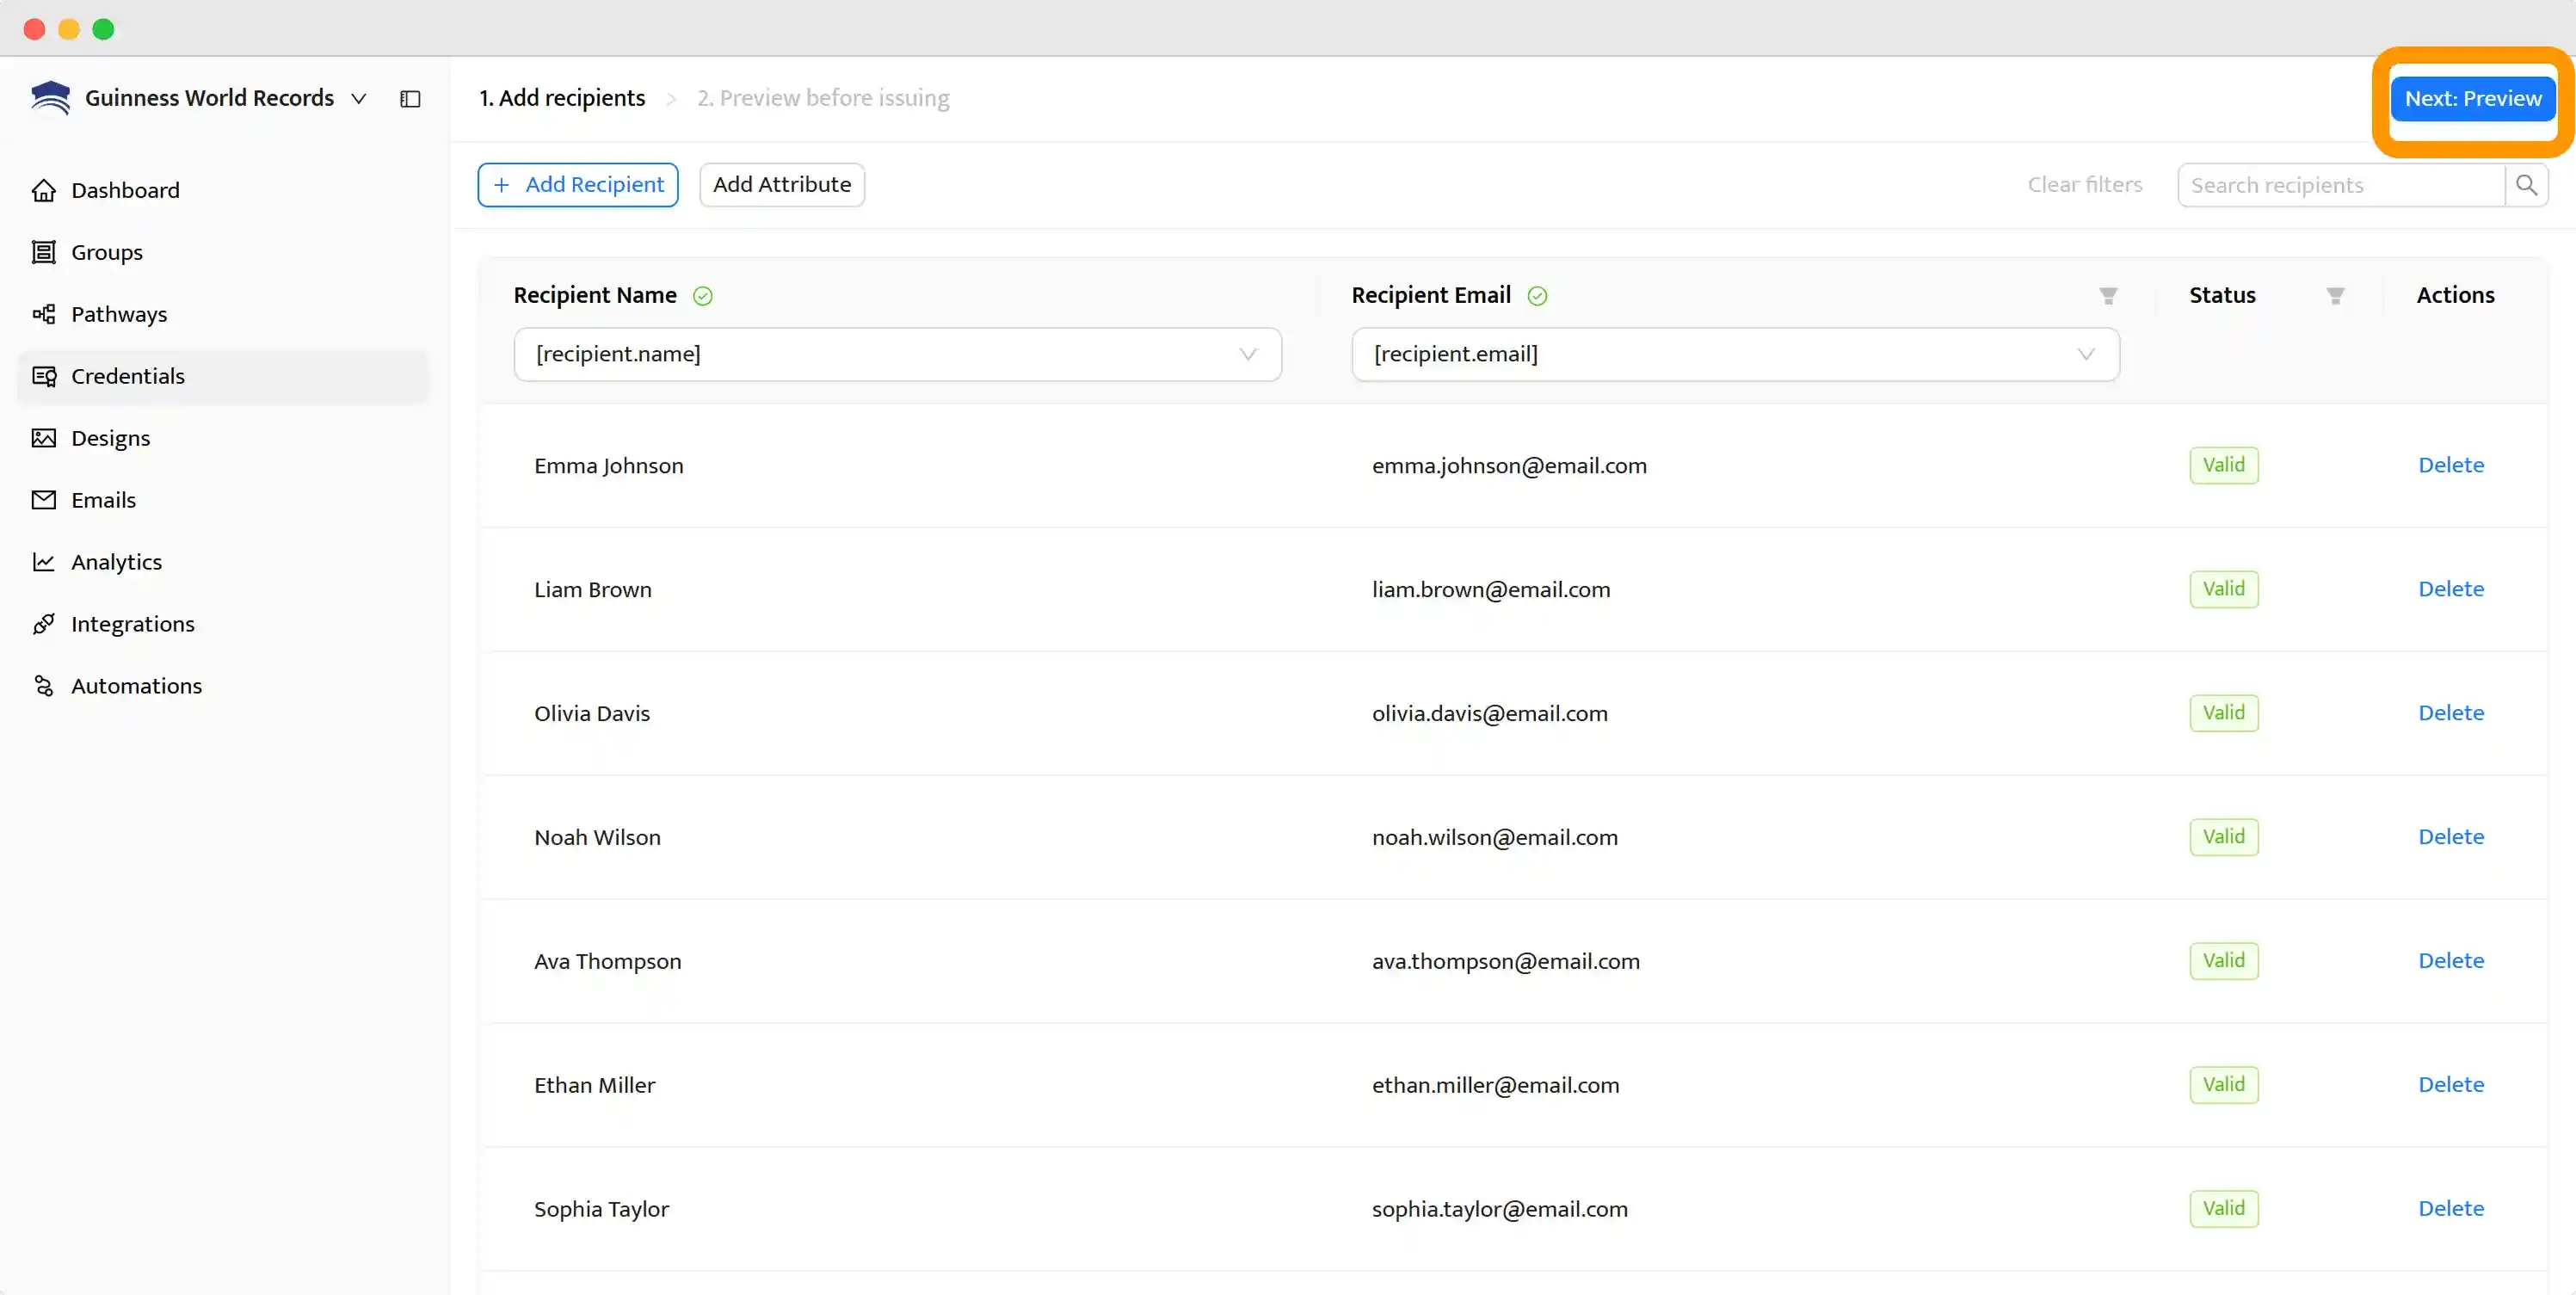
Certifier will check whether you have provided all the necessary information to issue and send certificates by email. Then, select "Next: Preview" at the top right corner to ensure all certificates were generated without errors.
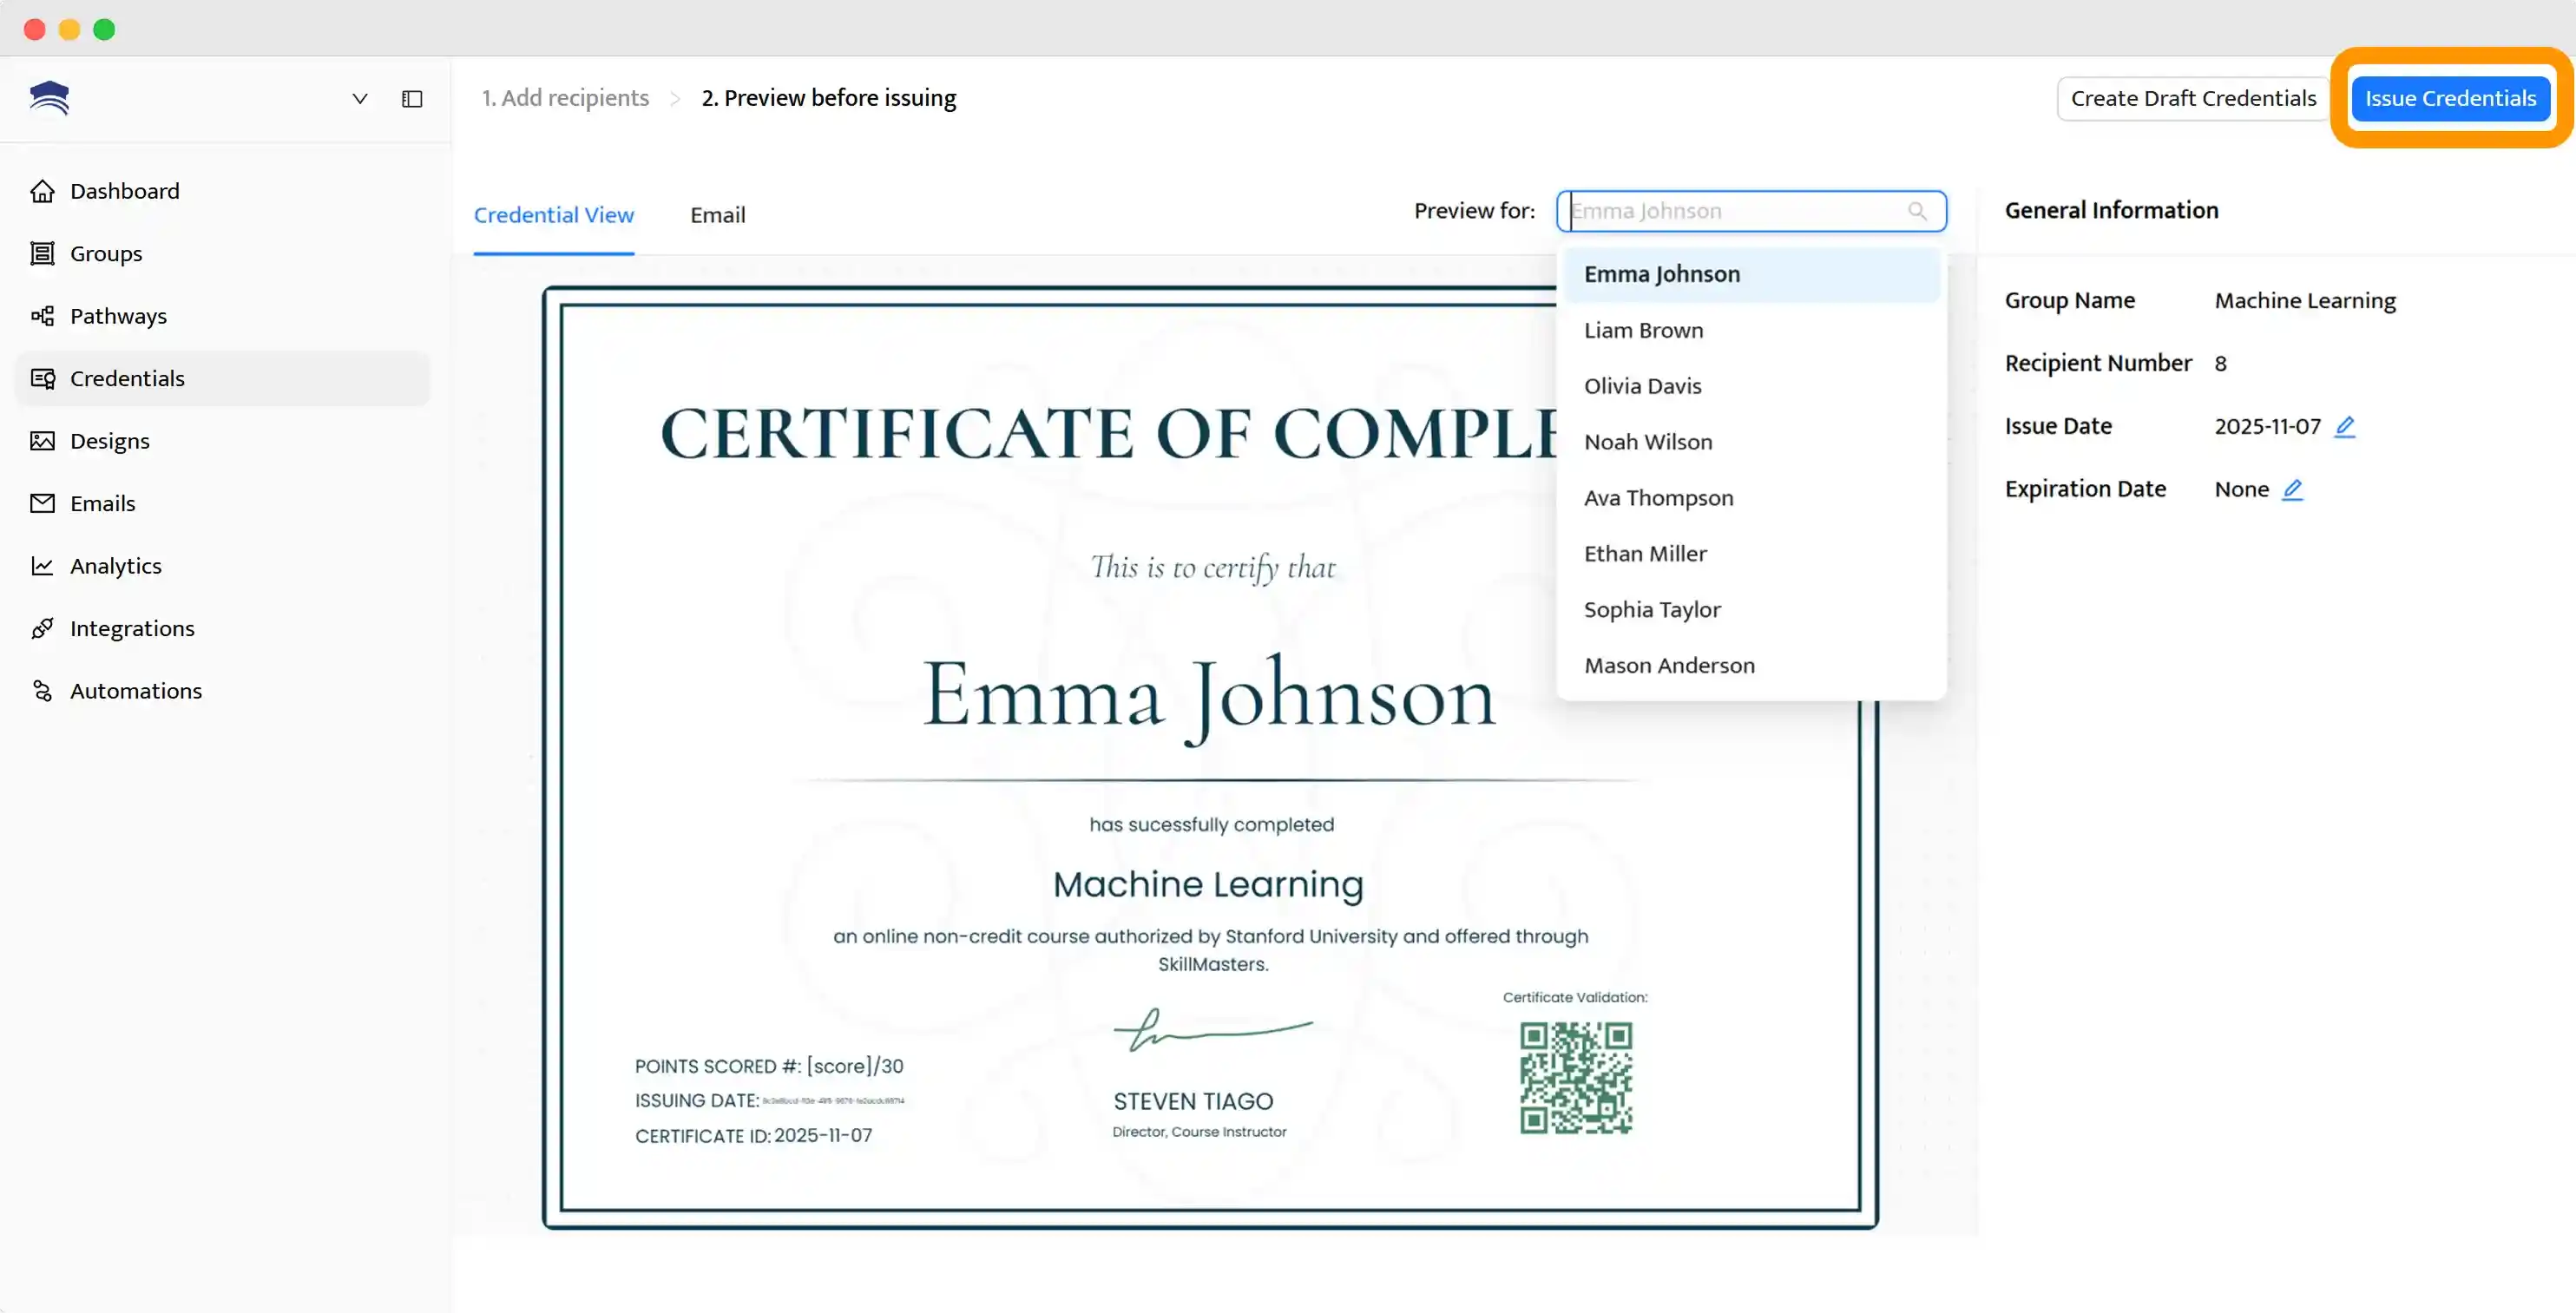
After that, you can click "Issue Credentials" to send digital certificates instantly to all recipients.
As a result, a professional email format for distributing certificates will be sent as a separate email to every person on the recipient list you uploaded to the Certifier.
The recipient will gain access to their personalized certificate after they click a button in the email body. Each recipient who receives an email with a certificate can download the certificate in PDF for free, share the document on any social media, add it to their LinkedIn profile, or verify their own certificate.
✍🏻 Don’t forget: You can also customize certificate email templates via the Emails tab and create a completely branded experience. See how to write email for sending certificates for more information.
And that's all! You can mass-deliver certificates by email in a few simple steps. With Certifier, you can do it for free, or you can use a professional plan if you need to send a large number of certificates regularly and want to do it in a highly professional and efficient way.
Additionally, you can check out the video tutorial on how to send certificates to multiple recipients via email. Here it is:
02 Fully automated certificate issuance with Certifier’s native integrations
If you don’t want to upload a CSV file each time, you can connect Certifier directly to Google Sheets or Microsoft Excel. Then, your certificates are issued automatically in the background as soon as new data comes in.
This is one of the most efficient automated delivery of digital certificates options available for anyone who issues credentials regularly.
The setup is simple, most steps from Way 01 stay the same (designing your certificate, preparing your data). The difference is that instead of uploading a file, you only need to set it up once to automate the process:
Open Automations in your Certifier account.
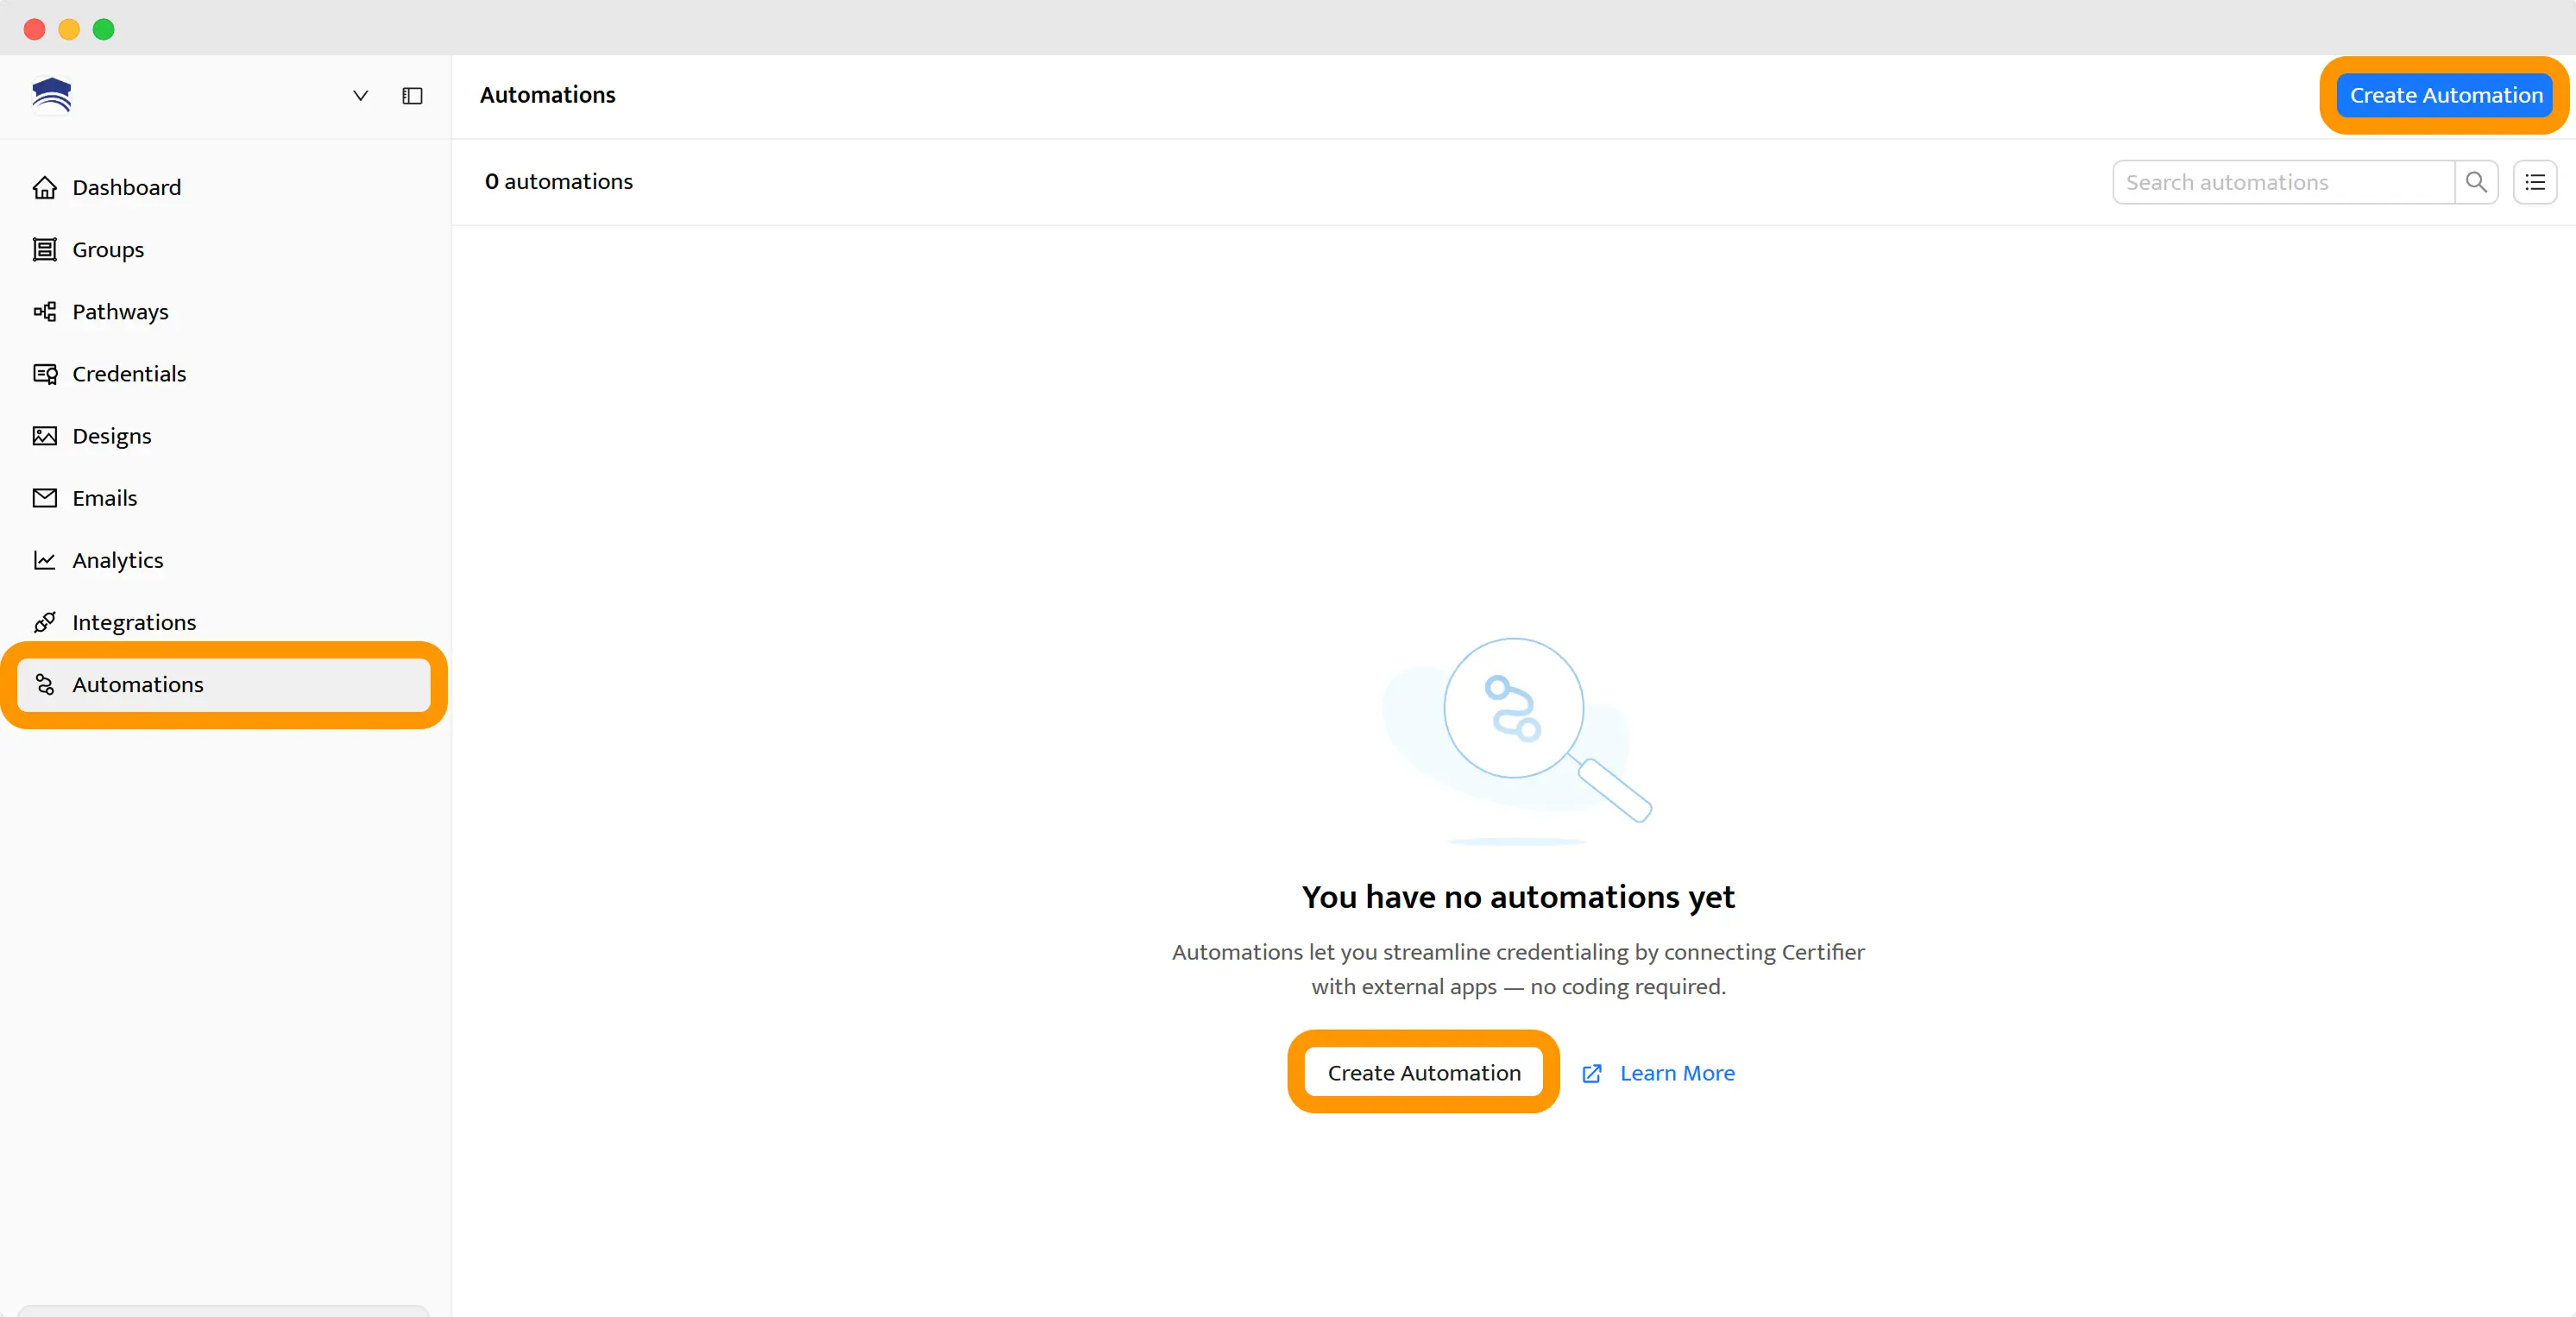
Choose Google Sheets or Microsoft Excel as your source.
Connect your account, select the spreadsheet, and map your columns.
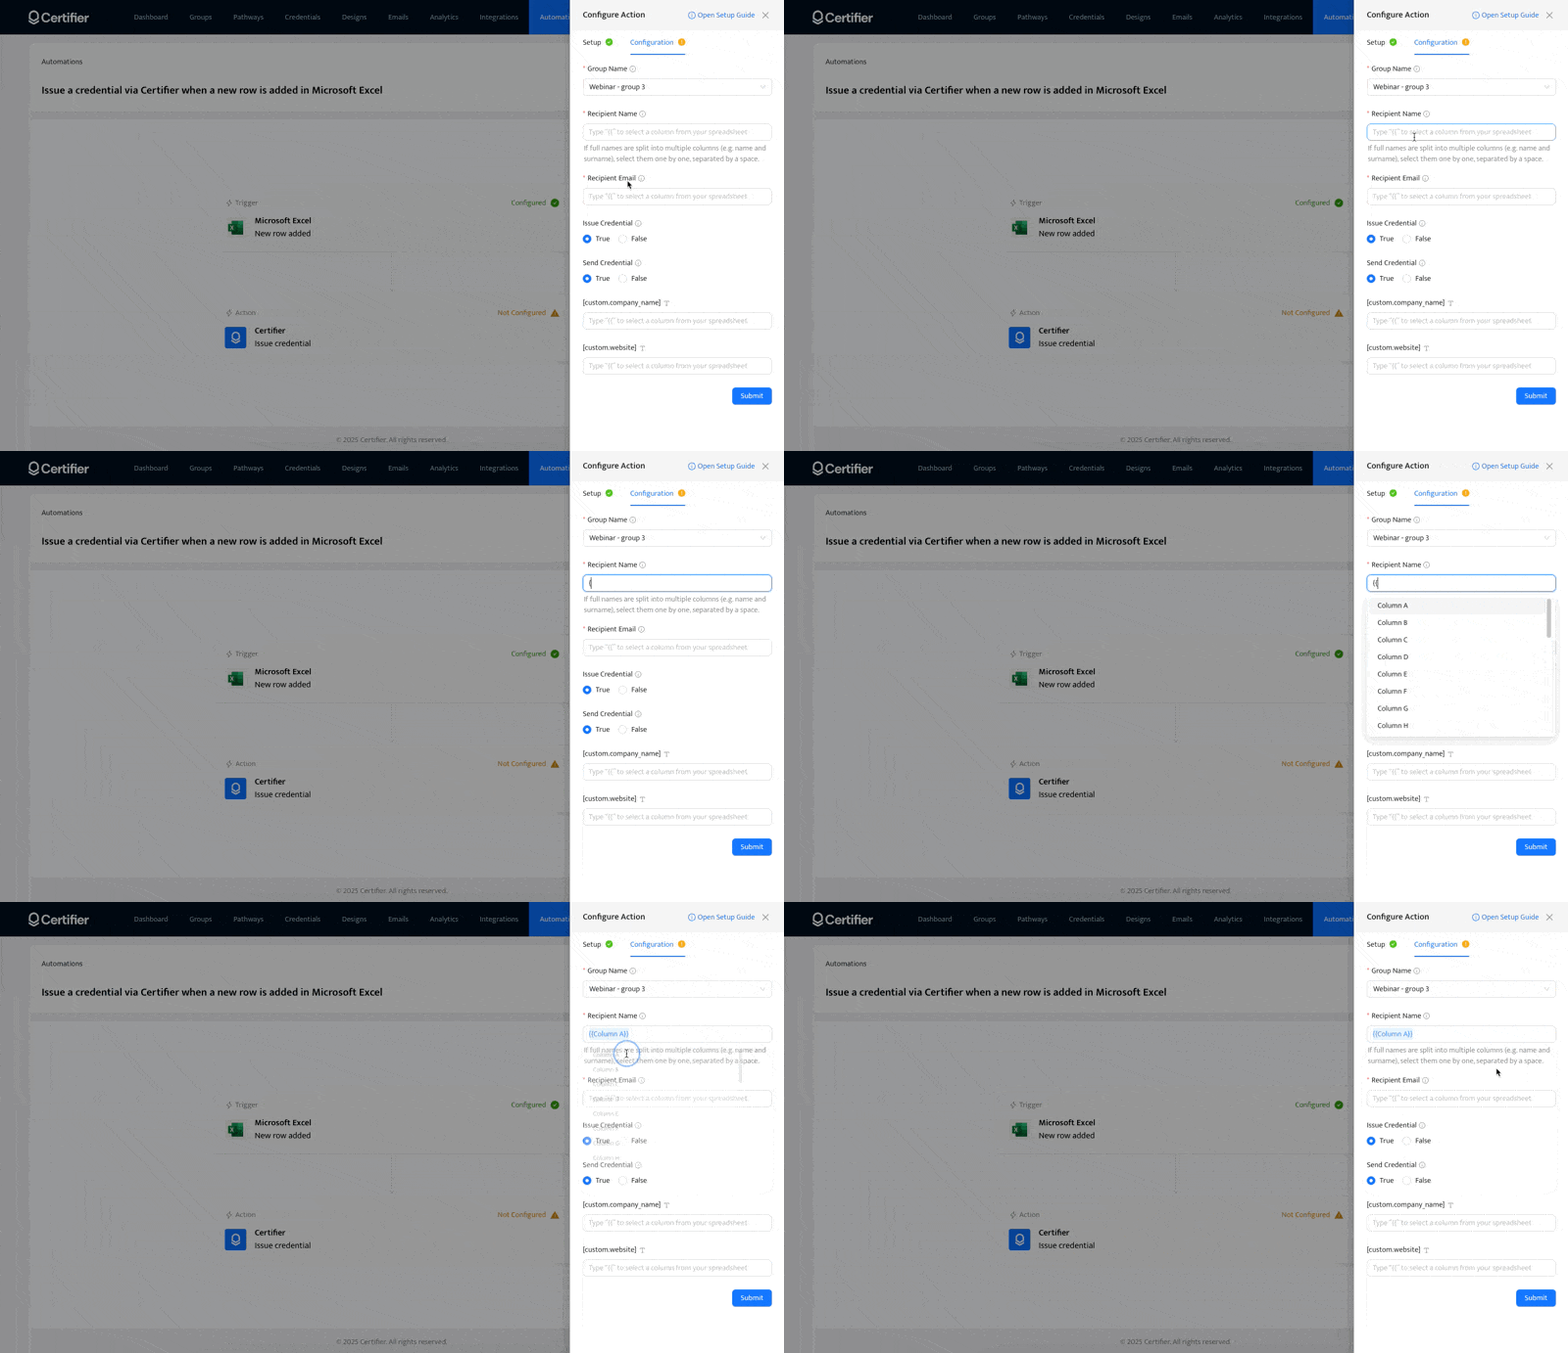
Activate the automation and let Certifier handle the rest.
For a step-by-step walkthrough, see our detailed guides for Google Sheets integration and Microsoft Excel integration.
With this setup, you don’t have to lift a finger once it’s running. Certifier keeps an eye on your spreadsheet and issues certificates continuously. It’s a perfect solution for courses, tests, or events with rolling registrations.
Create and Send Digital Credentials
03 Semi-manual way of sending certificates via email using Google apps
Now, we'll guide you through sending certificates via email using Google Apps. This method is more time-consuming than some, but it still represents a significant time savings compared to manual processes. How to send certificate in email with this method?
Step 1: Create a Google Drive folder for certificates
First, create a dedicated folder in Google Drive to store all your new individualized certificates. This folder will serve as a centralized location for accessing and managing certificates created through Google Drive.
Step 2: Create a Google Slides certificate template
There are several ways to create online certificates using Google Drive. The most popular options include using a simple Google Docs template or a more advanced solution like Google Slides.
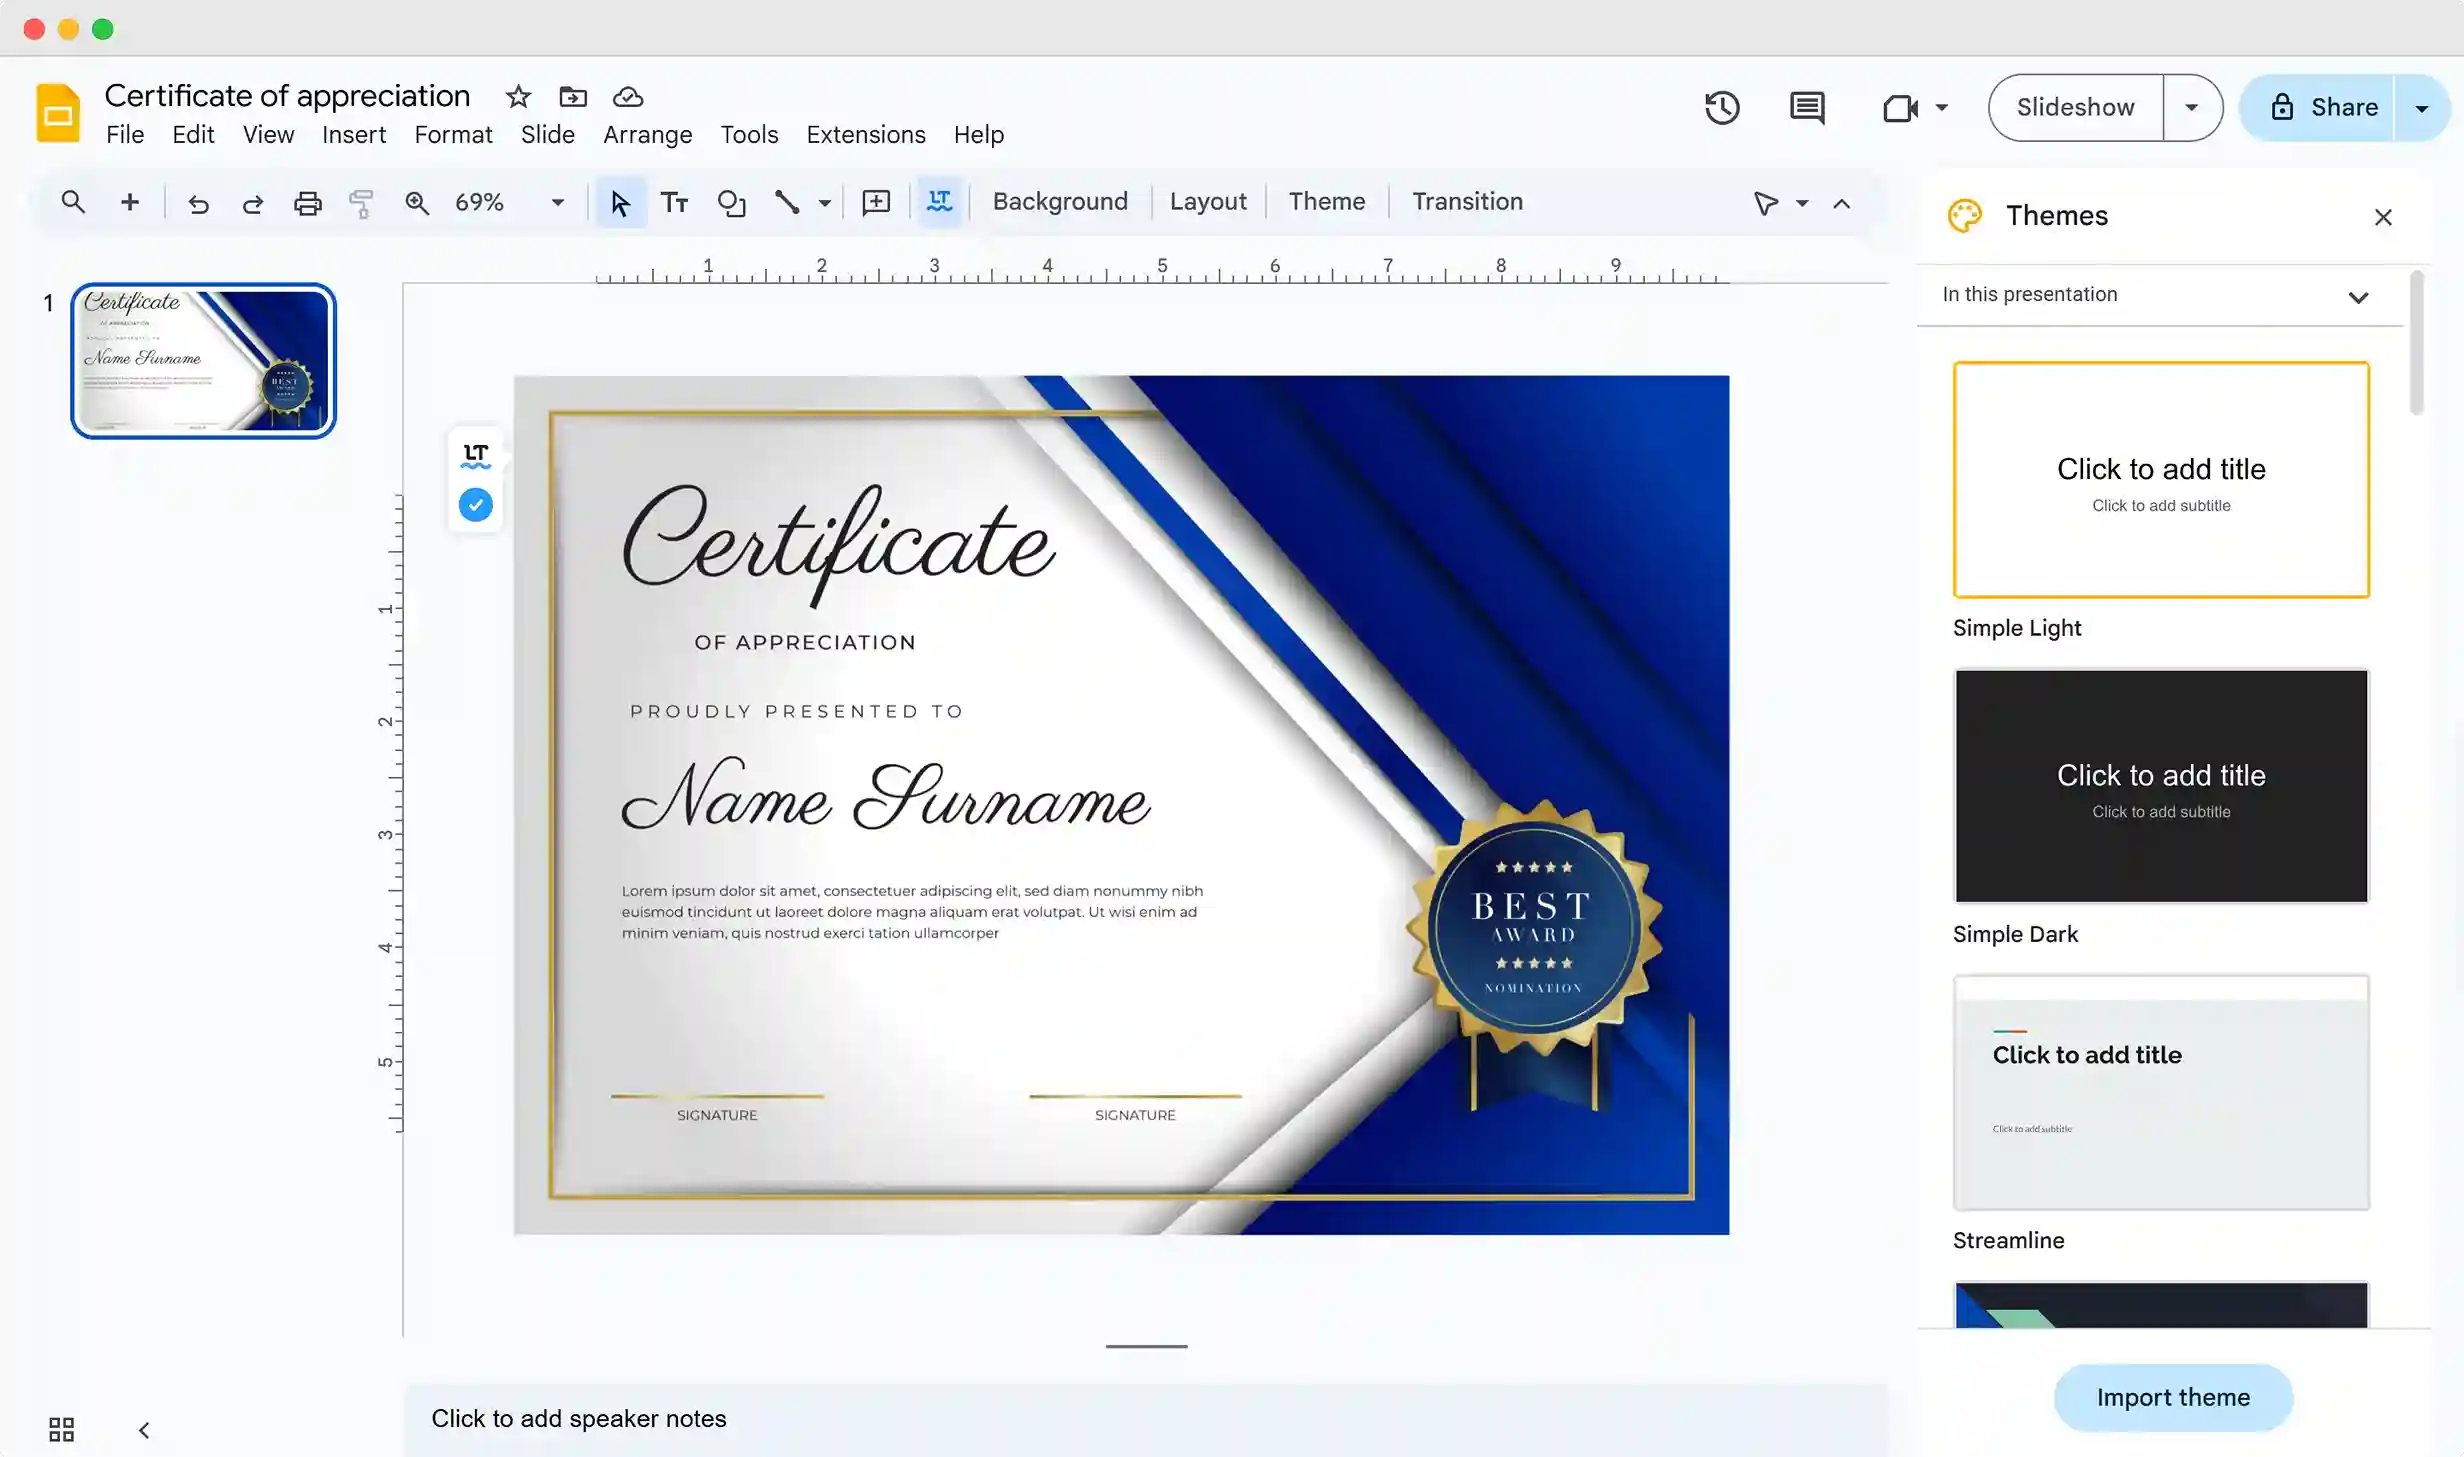
🛟 Read on: Here you can find our hands-on tutorial on how to generate certificates with Google Slides.
Step 3: Issue certificates from a Google spreadsheet
Once your certificate design is ready, create a Google spreadsheet containing all recipient information. Navigate to the Extensions > Add-ons section and select the AutoCrat add-on.
Please note: You have to install AutoCrat from the Google Maretplace first.
Choose Extensions > Add-ons > Get add-ons.
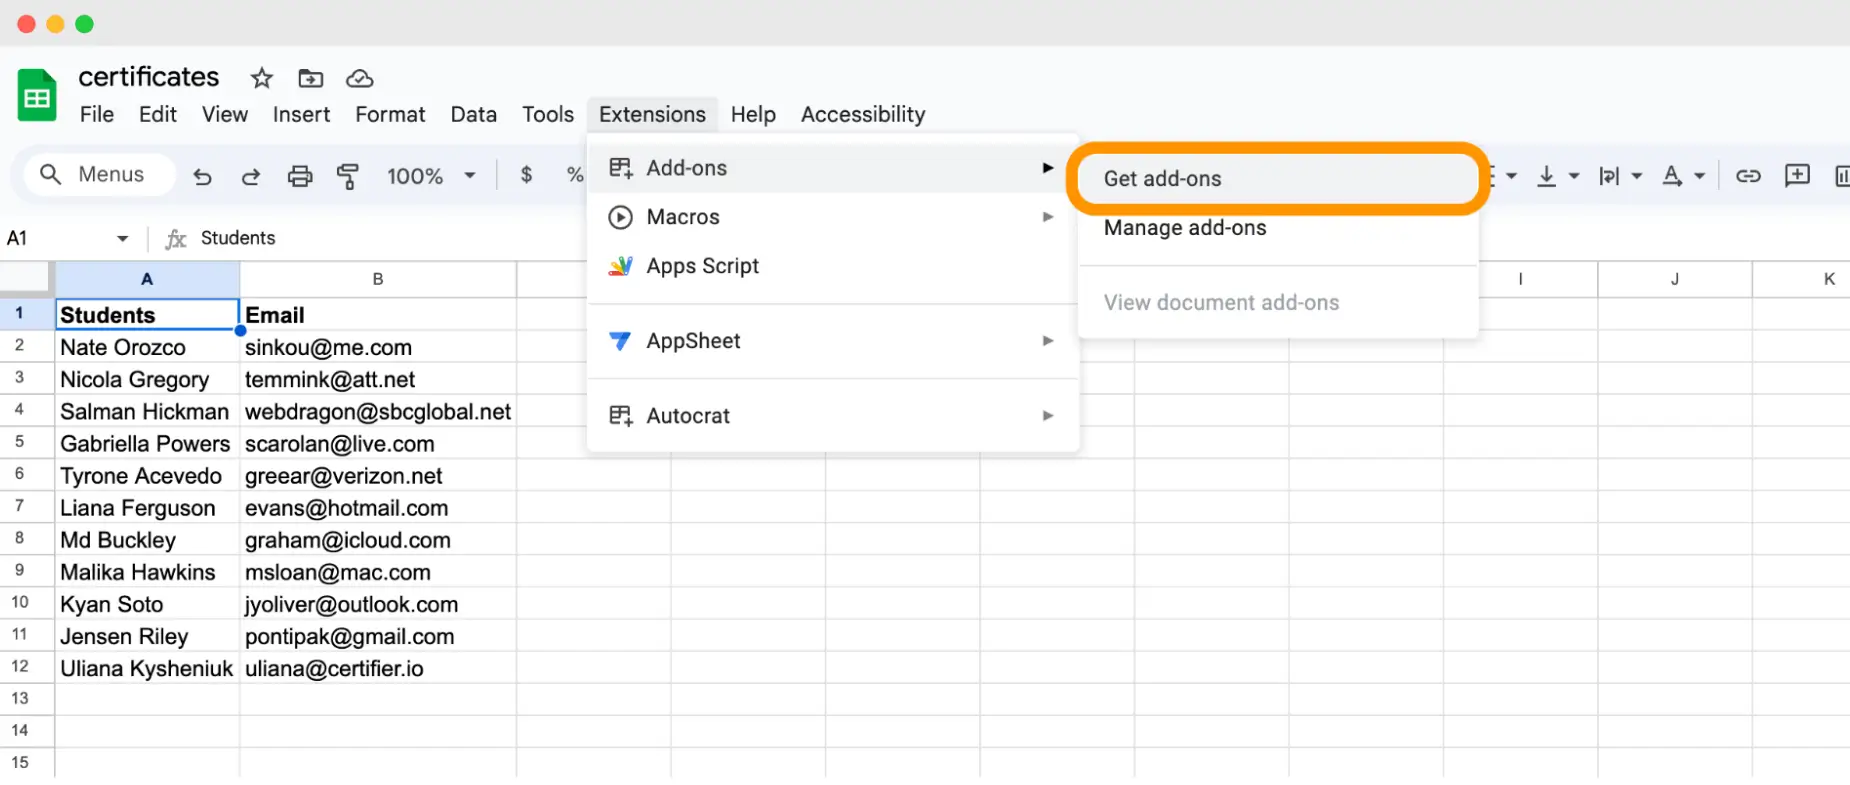
In the search bar, type AutoCrat.
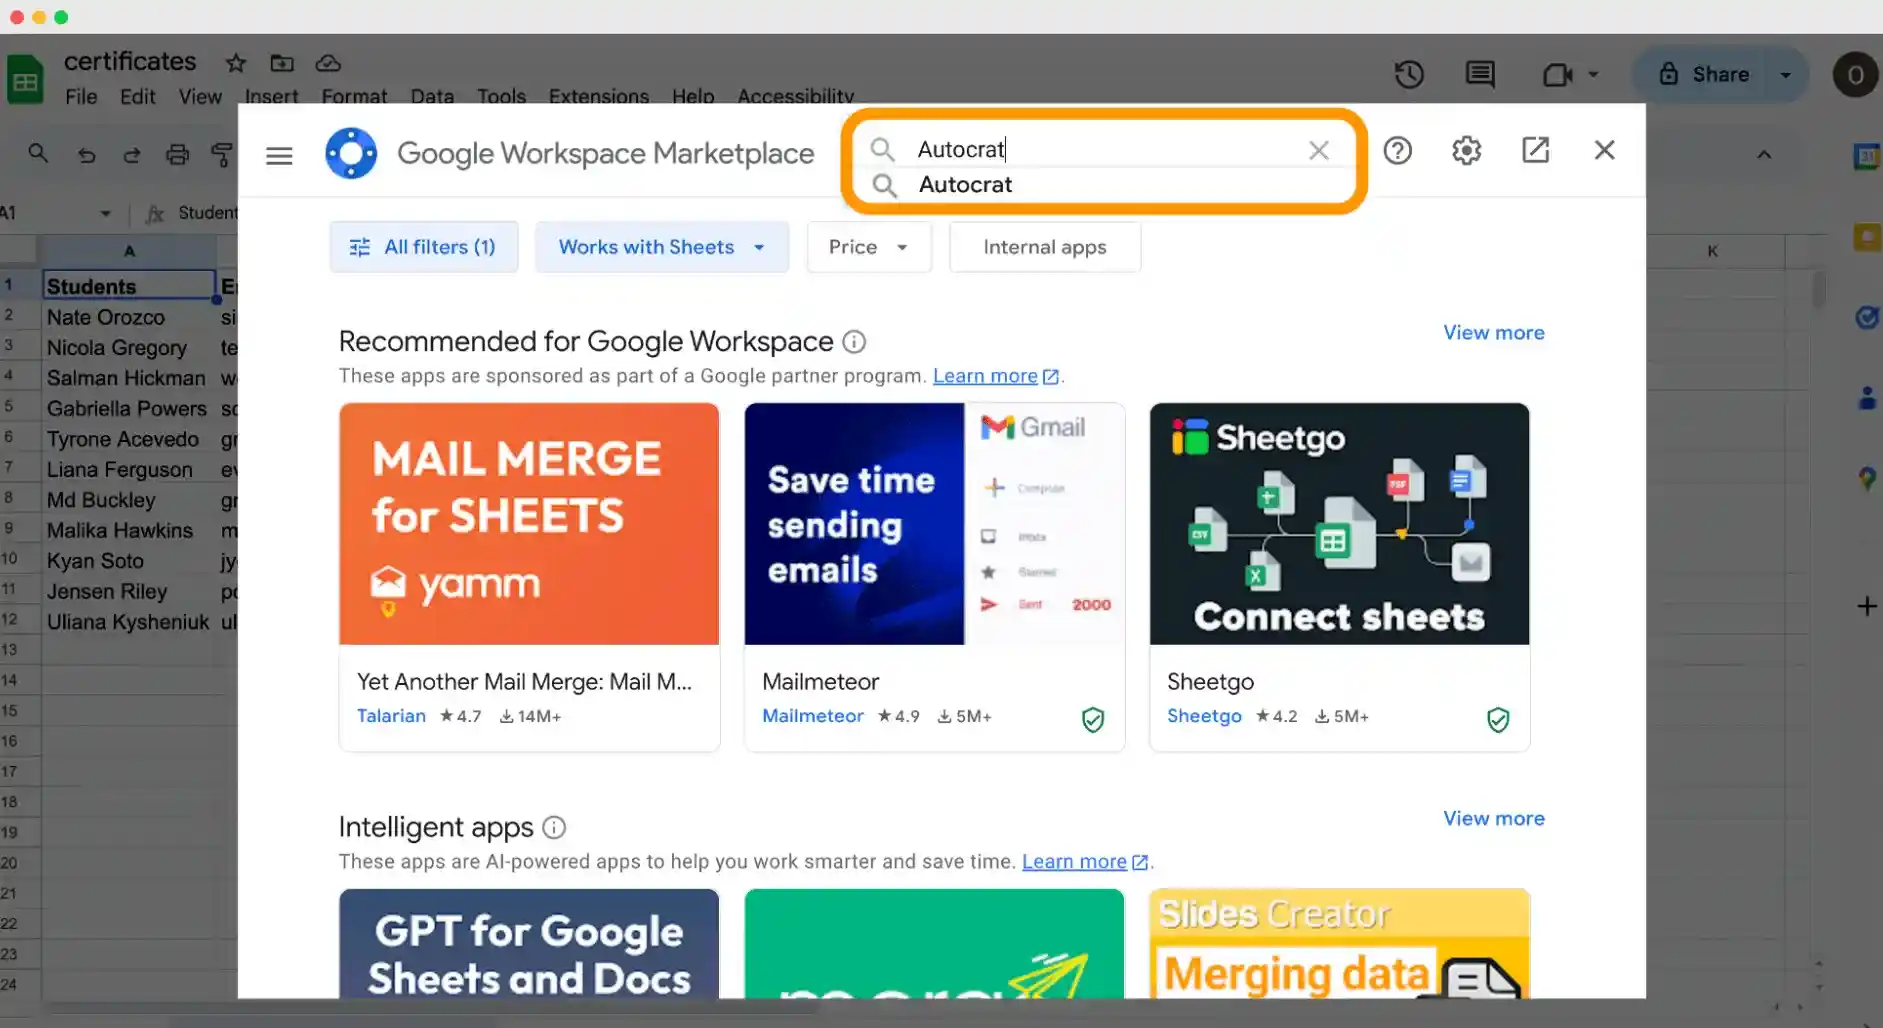
Choose the add-on and click the “Install” button.
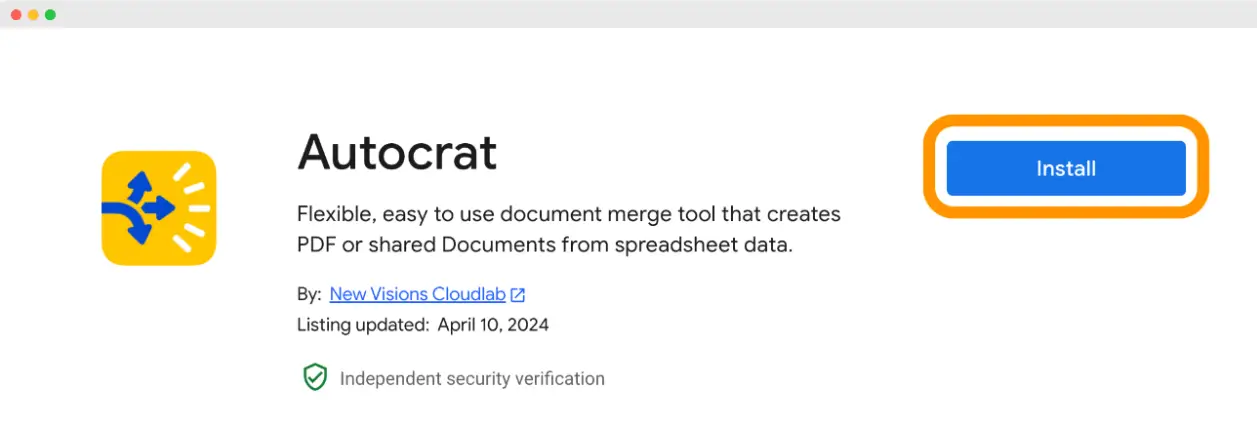
Follow the provided instructions to set up the AutoCrat add-on for sending certificates through a Gmail account.
Step 4: Create an AutoCrat Job
First, you need to configure Job triggers within AutoCrat to send certificates either immediately after a participant completes the form or at a scheduled time.
Go to AutoCrat and choose Open. Give your Job a name and go through these steps:
Choose the certificate template from Google Slides.
Map source data to the template.
Tell AutoCrat how to name each file it creates.
Choose the folder type (Google Docs or PDF).
Select the destination folder.
Step 5: Send certificates with AutoCrat add-on
Once everything is set up, click “Save.”
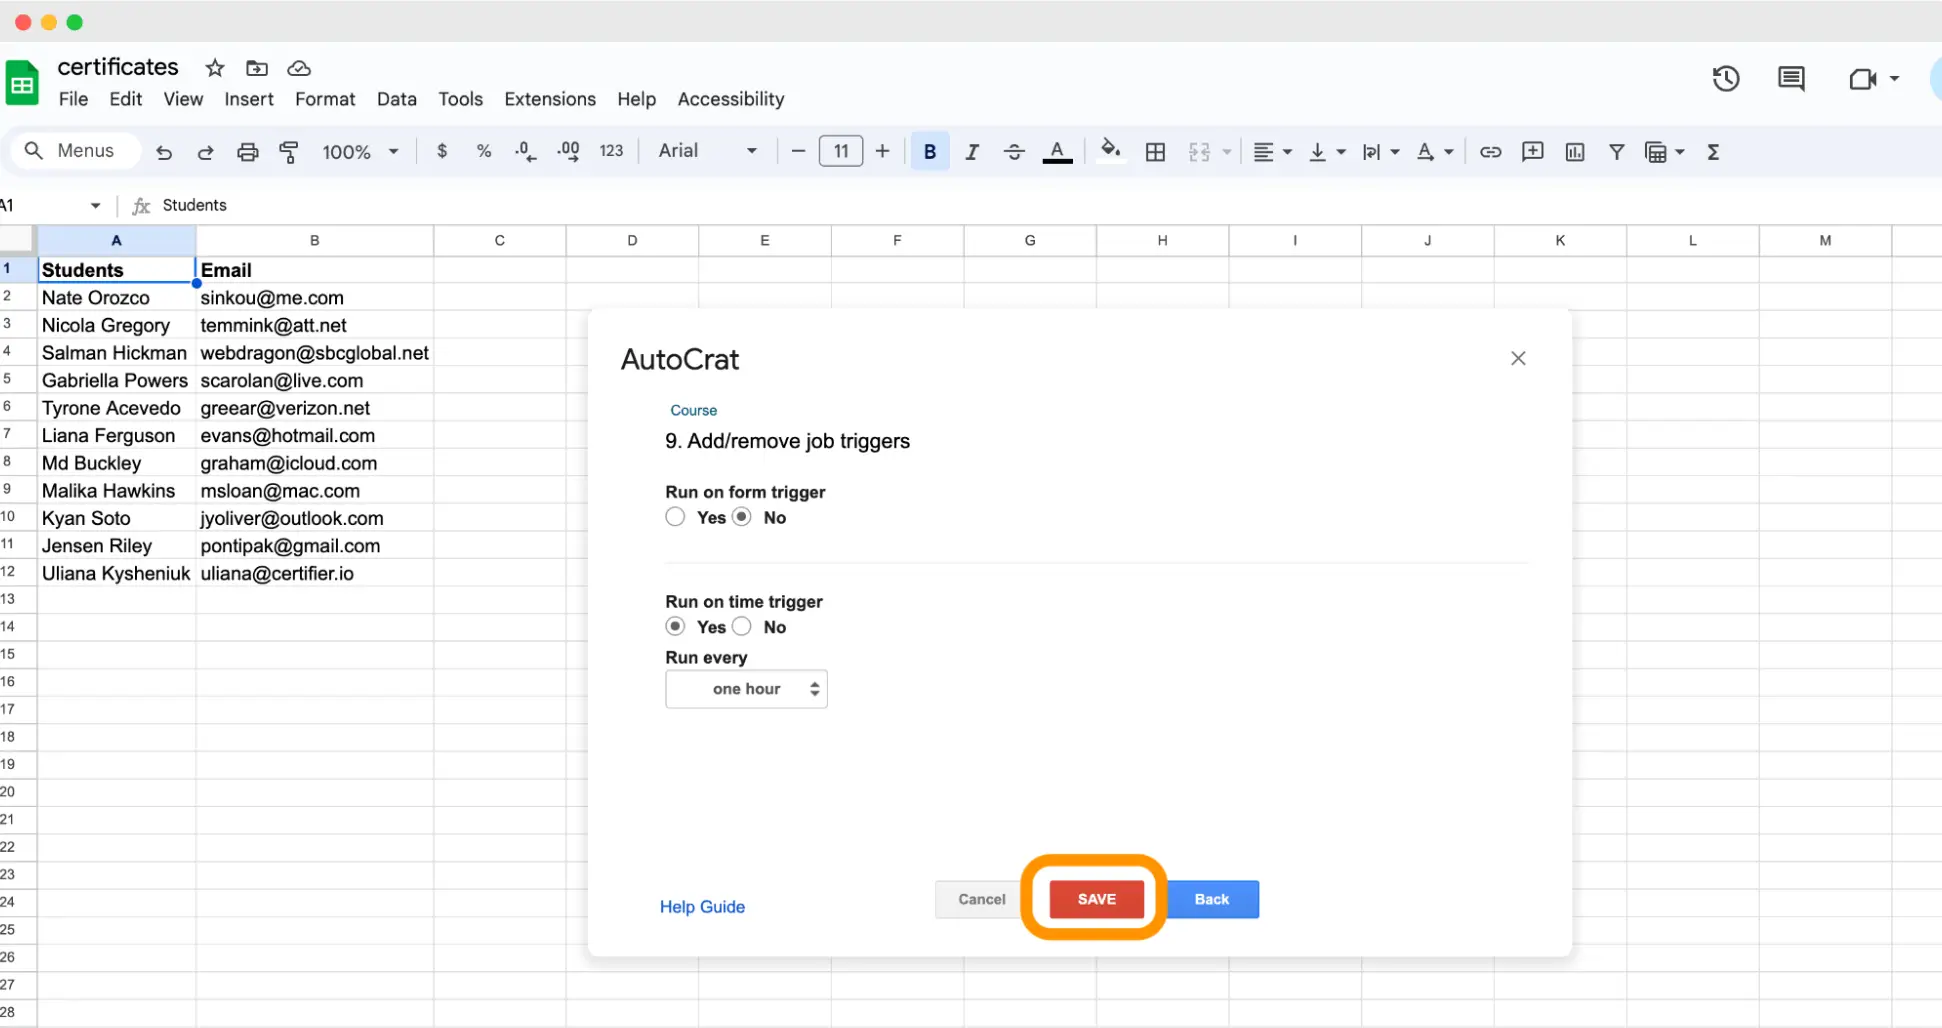
These steps detail how to use Google Drive Apps effectively to send certificates via email, combining convenience with efficiency in managing online event certifications. Although this method is not as hassle-free as the first on the list, it does involve constant reliance on Google Apps and add-ons like AutoCrat.
It's also important to note that these tools do not represent a professional setup for maintaining a certification program, so scalability can be a challenge. Management, resending, verification, analytics, and renewal are processes you might find difficult to handle with this setup.
04 Using an online design editor to send e-certificate to participants
There's a time-consuming way to send certificates via email in bulk, but it's really simple if you're only sending a few documents. How to send bulk certificate in email step by step?
Step 1: Create certificates online with Canva
First, create certificates using an online design tool like Canva.
Keep in mind that you must enter data manually, which can be quite tedious. However, one advantage of using Canva is the variety of certificate templates available. Plus, Canva is a popular design tool that's quite intuitive for creating designs without any additional design skills.
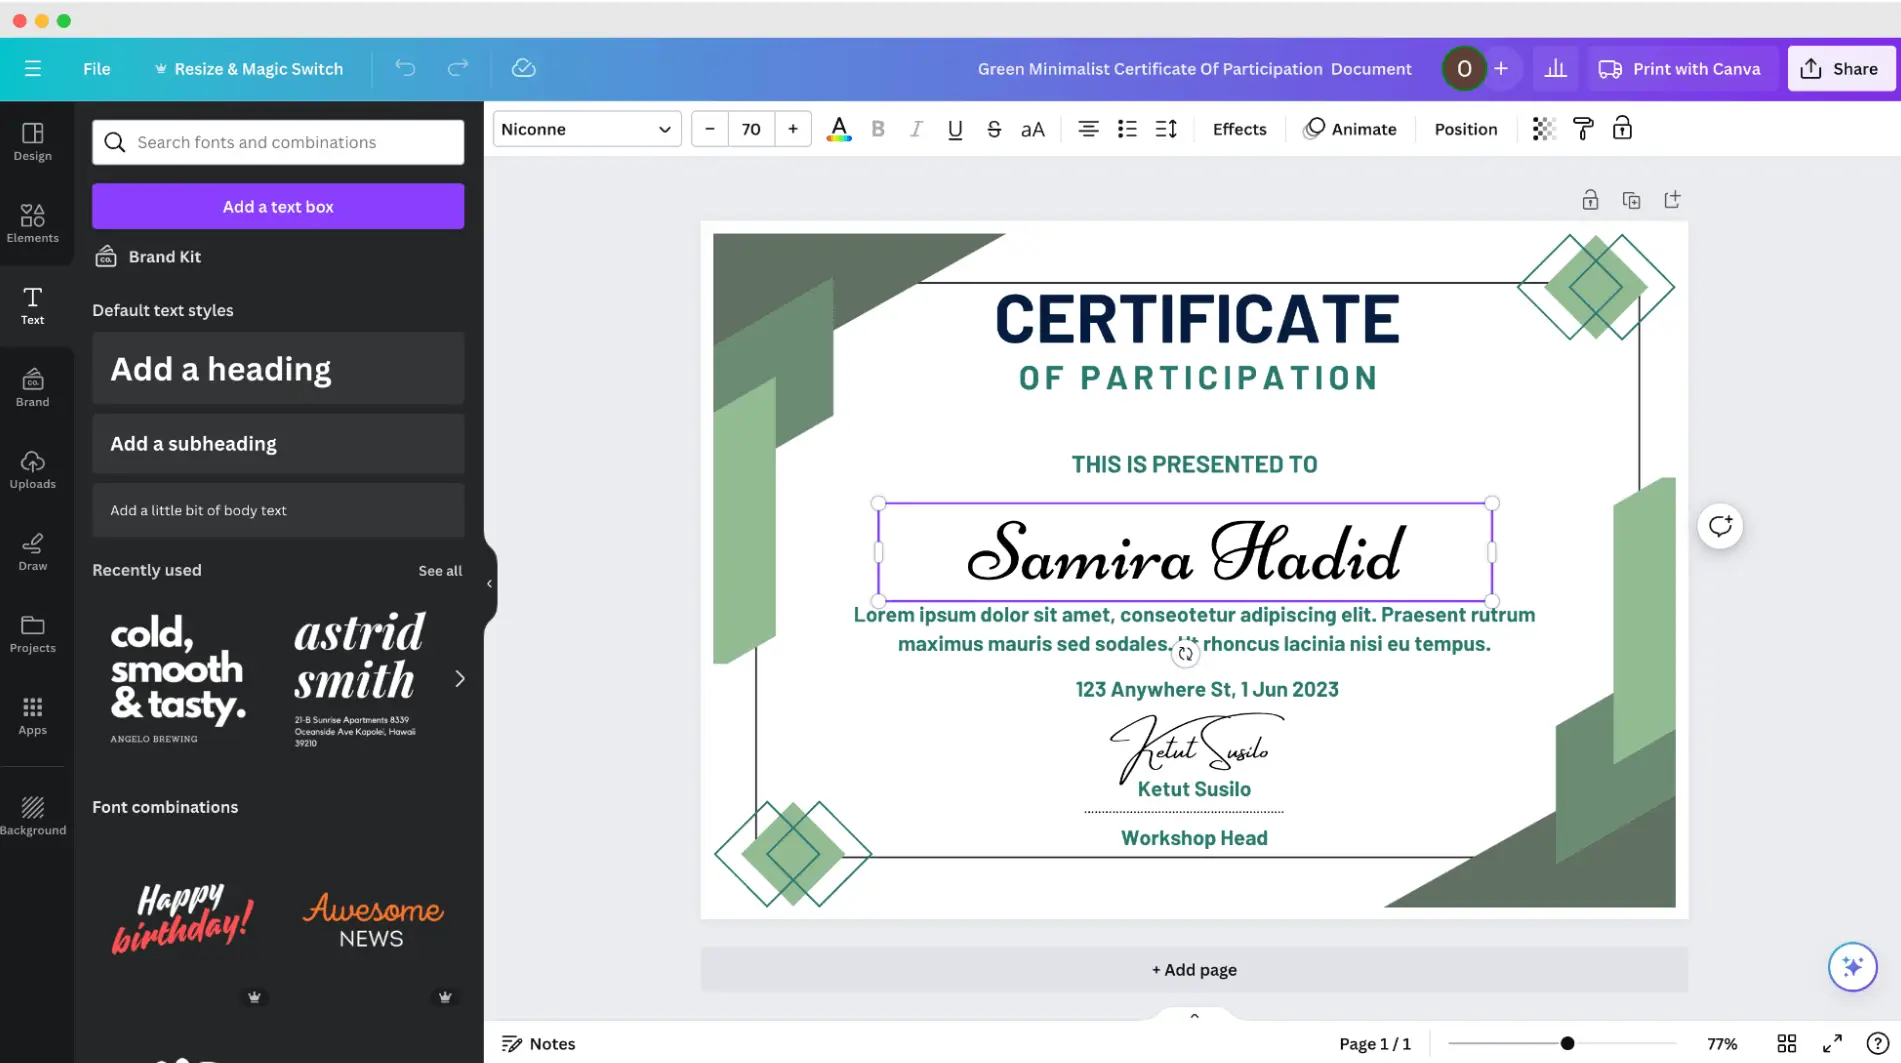
🛟 Read on: Here you can find our hands-on tutorial on how to generate certificates with Canva.
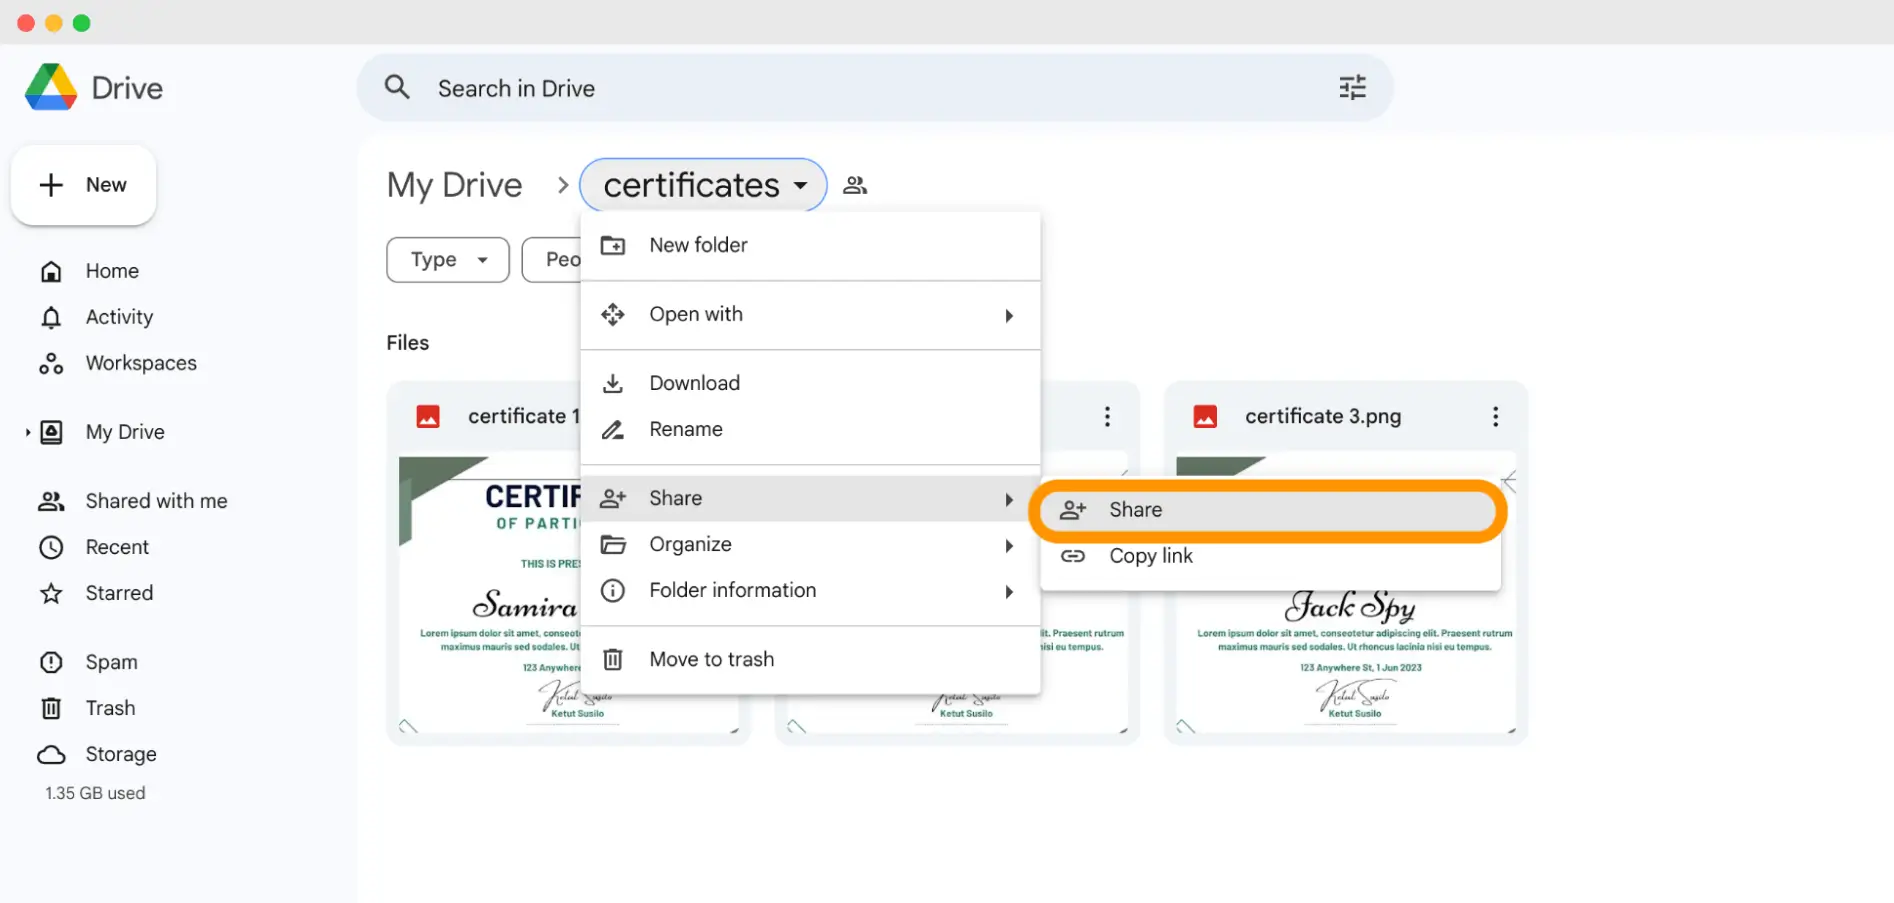
Step 2: Prepare the Google Drive file with the certificates
Once the certificates are ready, download them, create a dedicated Google Drive folder, upload the certificates to the folder, and make it publicly accessible via a link.
Step 3: Open Excel and prepare the spreadsheet
Paste the link to the first certificate in the first cell. Do so with every unique sharing link for each file. Add additional columns for the recipient's name and email address. Save your Excel file.
Step 4: Send emails manually, one by one
Open your preferred email that supports sending emails in bulk (such as Outlook or Gmail with extensions like Yet Another Mail Merge).
Write your email and include a placeholder where the link will be inserted.
Use the mail merge feature to upload your Excel file. The program will automatically insert the correct Google Drive link into each email.
Review your email and send it out to all the recipients.
✋ Please note: How to send e certificate to participants safely? When using email, it’s critical to keep your domain secure, which can be achieved by implementing SPF flattening.
How to send certificates through email in bulk? [comparison table]
After getting into the details, take a look at this comparison table to see what different options look like. It’s a quick overview of the most efficient methods if you want to know how to send a certificate via email at scale.
Certifier certificate maker is definitely the fastest and easiest way to send certificates to multiple emails at once.
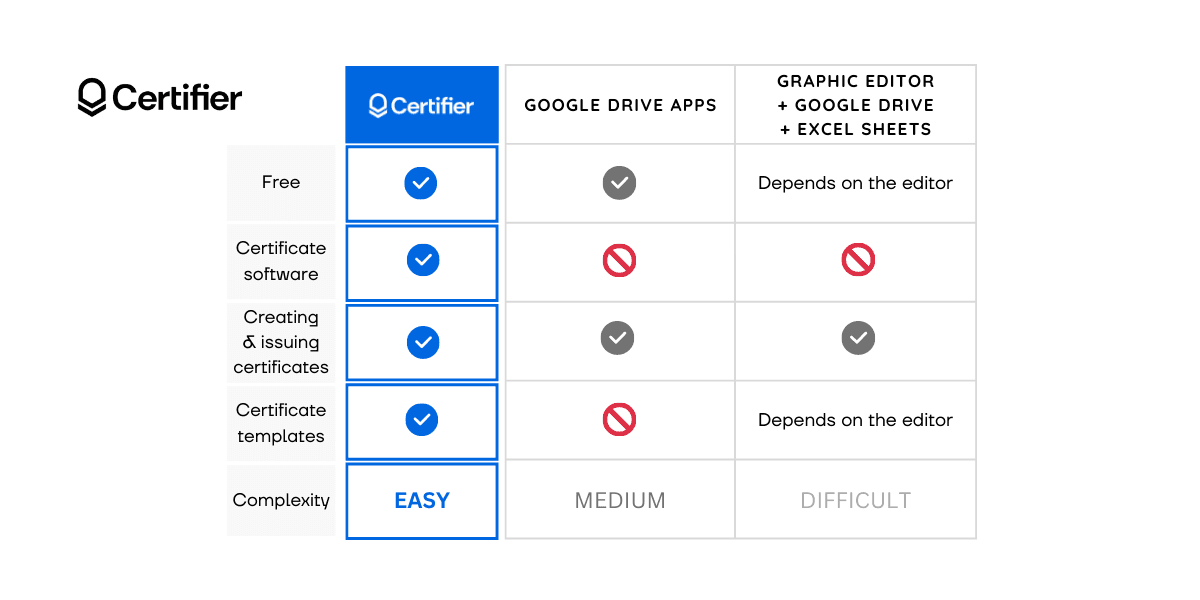
We can compare on different parameters, but one thing is certain – our platform is designed specifically for the mass sending digital certificates via email. It's not even a bit fair to compare us with other options because it's pretty obvious that the Certifier solution will be a free, better, and quicker option.
3 reasons why you should send a certificate via email
Many see email as the best way to deliver important documents to customers, students, and conference or webinar participants. The process itself is efficient, and intuitive – and requires just a few clicks. But that's not all.
There are more reasons why you should get the certificates immediately emailed instead of printing them out.
Using automated solutions that allow you to send certificates by email can save dozens of working hours for your business (hello, better employee productivity!). Automated mailing can improve your brand reputation, establish you as a professional, and help you serve your recipients faster. As a result, your recipients don’t have to wait in line for their credentials.
Users are impatient. They expect fast deliveries and obviously instant gratification. That's why you should do everything you can to send certificates to webinar attendees, online course participants, course alumni, etc., as fast as possible and in the most effective way.
By sending certificates manually and getting into a routine, you can overlook many things, including security requirements, usual human mistakes, and misspellings. However, if you use reliable certificate software that has many settings and sends certificates in bulk through email messages, you may already benefit from additional security options.
Send certificates by email in a flash
Now you know how to email a certificate! Just imagine how much time and effort you can save by using any of these three methods for sending batches of certificates via email.
Start for free and explore Certifier's certification capabilities.
As you can see, the number of certificates you need to issue does not necessarily increase the time spent on the issuing process since there are multiple ways to send several certificates efficiently via email.
Certifier: designed specifically for the mass sending of digital certificates via email, Certifier offers a streamlined, automated process that makes it the fastest and easiest method for sending multiple certificates to recipients simultaneously. It's highly scalable and secure, making it ideal for large-scale needs.
Google Apps & AutoCrat: this method requires a bit more manual setup and relies on Google Apps and the AutoCrat add-on. It's more time-consuming than Certifier but still more efficient than entirely manual methods. It offers moderate scalability and security.
Canva & manual email: this method involves creating certificates individually using Canva and sending them manually via email. While it allows for high customization, it is the most time-consuming and least scalable method. Security features are also minimal as it relies on manual processes.
We highly encourage you to select the most suitable method for sending certificates via email and start issuing them up!
FAQ: How to send certificates through email?
Below, we try to address the most popular questions we receive in our chats with users, in comments below our YouTube videos about the certificate-sending process, and respond to them.

- SaaS Growth
- Digital Credentials
- APIs
- Product Marketing
- Company Operations
CEO and Co-Founder
Sergey is CEO and Co-Founder of Certifier, a Forbes 30 Under 30 honoree building digital credential infrastructure for 2,000+ organizations worldwide and shaping the future of credentialing.

