Trusted by:
Updated: January 19, 2026
16 min read
How to Generate Certificates from Google Sheets and Excel in 2026?
How to auto generate certificate from Google Sheet or Excel? It should be as easy as sending emails. Turns out, it is even easier! In this blog post, we will show you how to generate certificate from Excel sheet, Google Sheets, or any other spreadsheet in minutes. The 2026 way.
Bulk certificate generation doesn’t have to be a headache—and in 2026, it’s easier than ever. Gone are the days of manually creating and sending certificates one by one.
With Certifier, you can take a simple Google Sheet or Excel file, map your data once, and let the platform handle the rest. Certificates are created and delivered automatically, so you can fully focus on your course, event or program—not spreadsheets. This guide will walk you through the best ways to turn spreadsheet data into professionally branded certificates.
We’ll cover quick manual methods for one-off batches, plus the new native Google Sheets and Excel integrations—the fastest way to automate everything.
TL;DR
For quick, one-off batches, export a CSV and upload it to Certifier.
The most recommended solution is to connect Google Sheets or Excel directly to Certifier. Certificates get issued the moment new data appears.
For offline setups, you can still use Excel + Word Mail Merge, but expect more steps.
But first, how to generate certificates in 5 minutes?
Creating a certificate might seem a tedious task at first. But trust us – with Certifier – a certificate generator from Excel, you can create, send, and manage verifiable certificates in one place. Certifier is your hub for professional and efficient certificate management.
Use Certifier now to drive your learning programs, courses, webinars, and events. With our fully-automated certificates workflow, you can finally focus on what matters most – your business growth.
From Google Sheets or Excel to certificate generation
An automatic certificate generator using Excel is useful to award webinar participants, praise conference attendees, or students upon course completion.
Generating a large number of certificates in bulk with only a list of names and then sending them to recipients may seem like a hard task. However, in fact, it is a simple process. There are several proven ways to create certificate from Excel data. Let’s learn more about them.
Method 01: Certificate generator from Excel + Certifier
This easy process takes minutes to complete. You need to prepare a list with recipient names, emails, and other values in a spreadsheet (MS Excel or Google Sheets). Once done, use professional software to auto-generate certificates from Excel like Certifier.
Here's the video that shows you how to auto generate certificate from Excel sheet:
When to use CSV uploads? If you run certificate issuance only occasionally, manually exporting and uploading a CSV might actually be faster and more predictable. It gives you full control over when certificates are generated.
For example, if you host a quarterly webinar or issue certificates every few weeks or months, building an automation might be unnecessary—CSV uploads get the job done with minimal setup.
Method 02: Native Certifier integrations (recommended path)
If you want to skip manual CSV uploads, Certifier now has native integrations with Google Sheets and Microsoft Excel. Before, you had to prepare your spreadsheet and upload it to a certificate maker by hand.
Now, since most tools like Google Forms, Microsoft Forms, Typeform, or SurveyMonkey already send responses into Sheets or Excel, Certifier can use that data directly.
Method 03: Bulk certificate generator + Word + some email sender
How to auto-generate certificate from Google Sheet or Excel with this method? It’s also a free, but semi-manual, amateur way to generate certificates from Excel. These tools are not designed for professional certificate issuing, but you can use them if they meet your certification needs. Read the step-by-step tutorial for this method below.
How to prepare a spreadsheet with your certificate recipients?
First things first, it's time to prepare a list in MS Excel, Google Sheets, or another tool.
You'll need to add information like recipients’ names and email addresses. Your spreadsheet can include advanced recipients' information like grade, teacher name, number of hours, and issue date.
Psst! Spoiler: the second method on how to generate e certificate from Google Sheet skips this spreadsheet preparation step.
01 Download all the necessary data
As a rule, you already have recipients’ information in your LMS, CRM, or video-conference tool like Zoom. Download it in CSV or XML format.
02 Open your draft data in Google Sheets
First, separate the columns (if needed): Data > Split text to columns
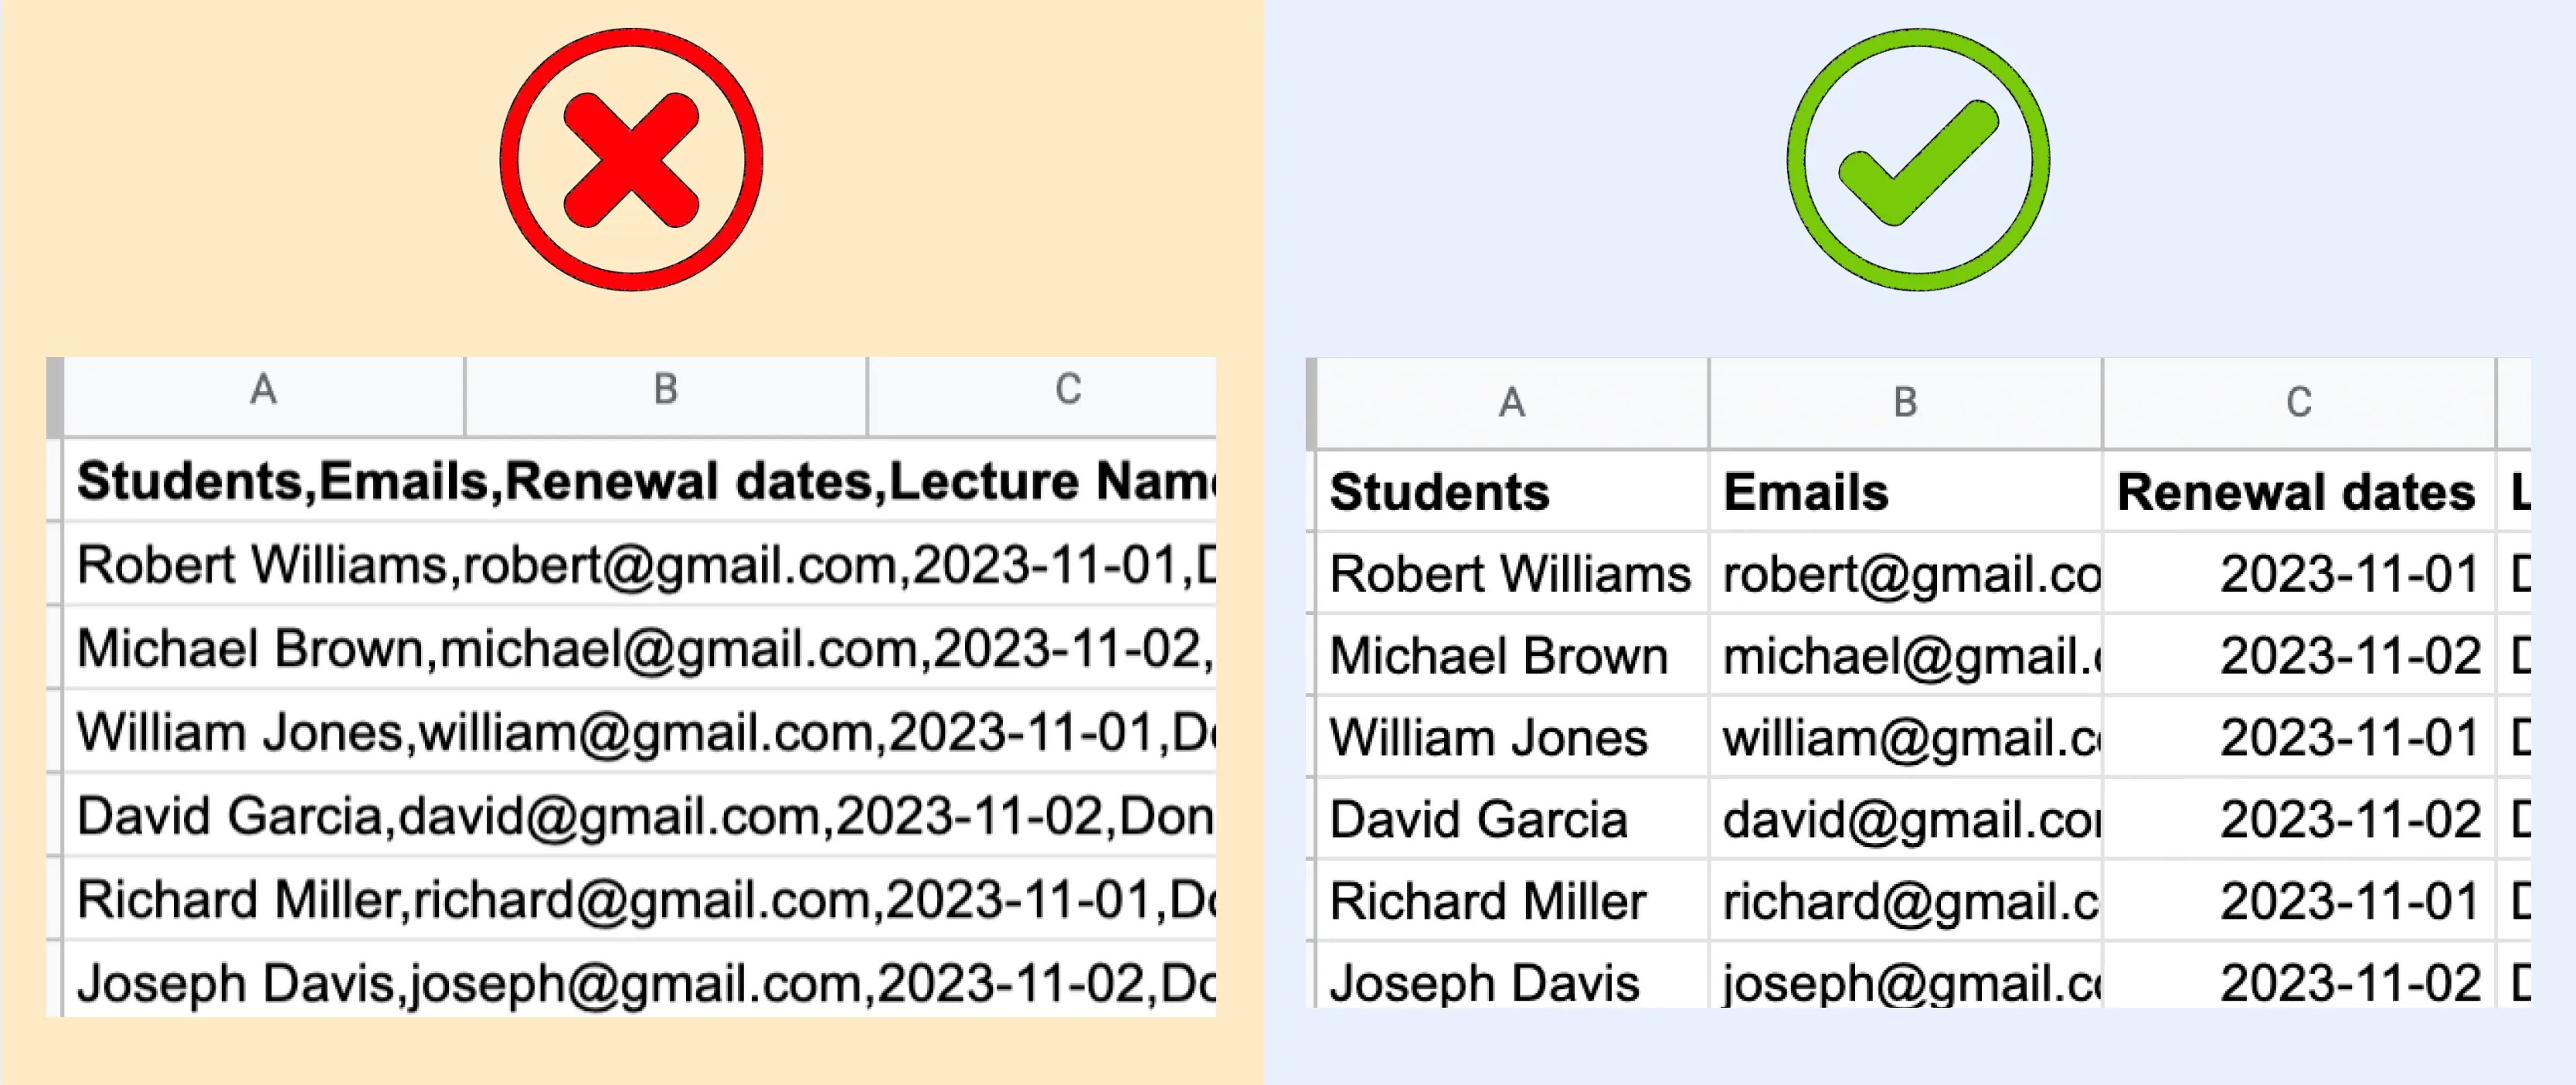
Read more about how to merge first and last column together in Google Sheets.
03 Delete unnecessary columns, rows, and data
Remove the unnecessary information from the spreadsheet before issuing certificates (as a rule, exported spreadsheets include a lot of information and columns). Prepare as accurate list as possible to simplify the certificate generation process.
04 Download the completed spreadsheet in CSV (comma-separated values) format
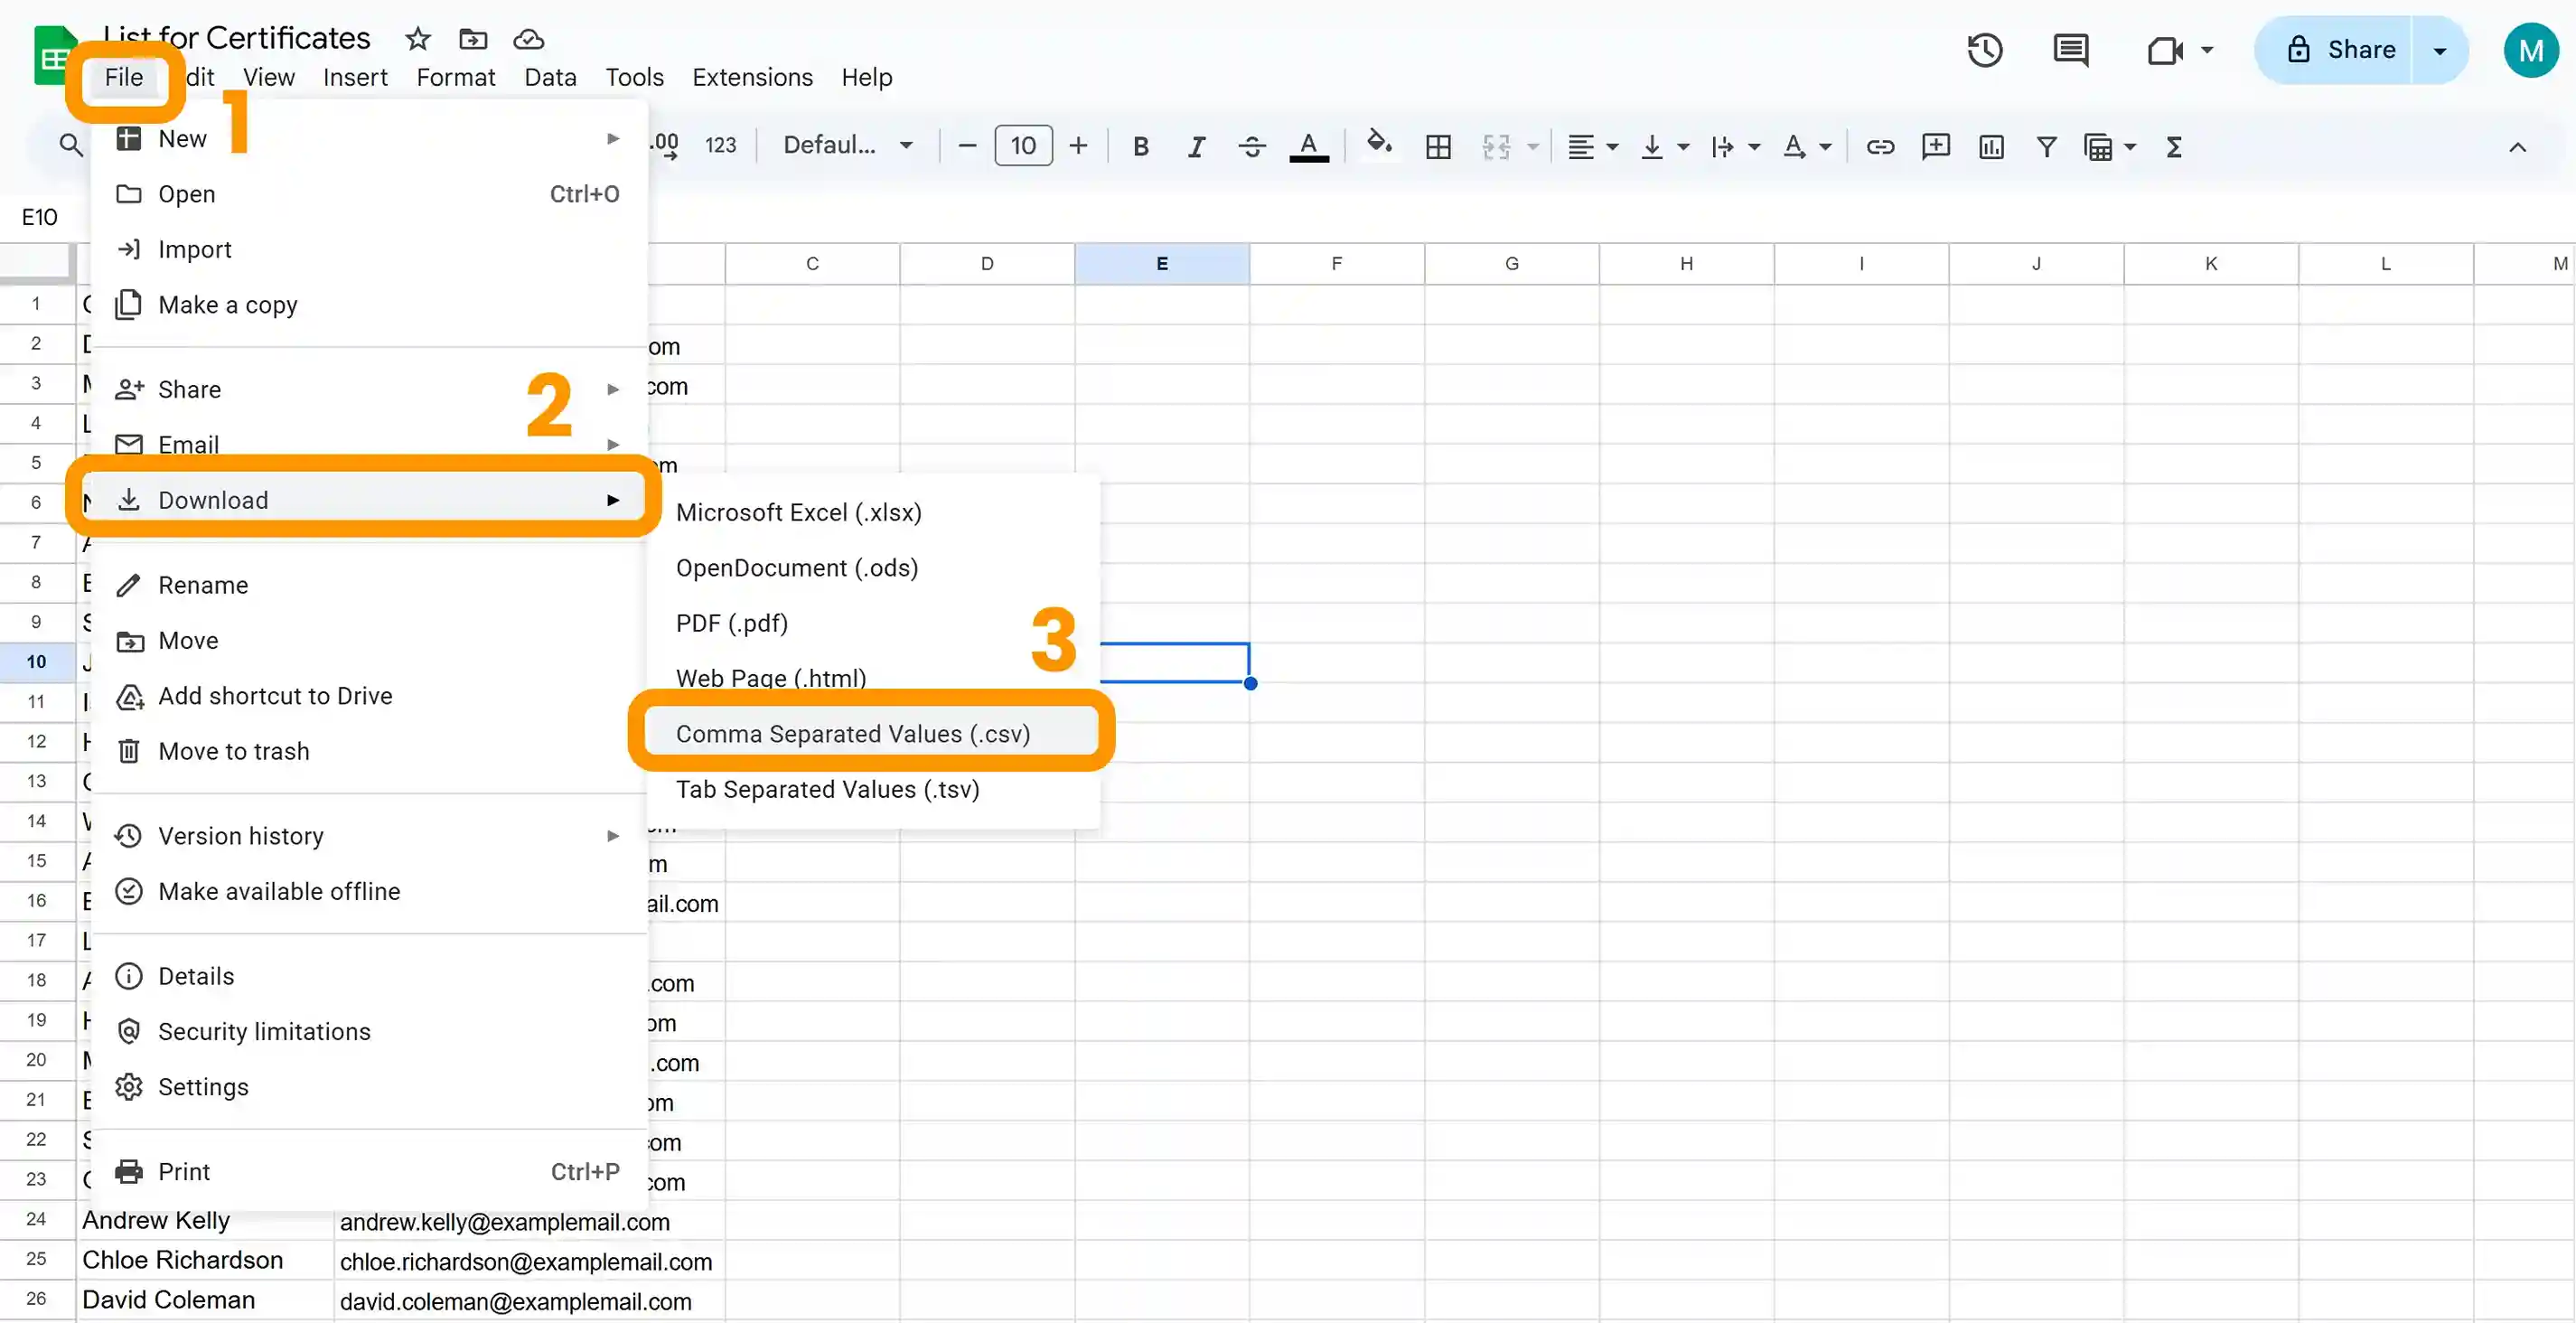
That’s it. Your spreadsheet is ready for mass certificate generation! Follow the next instruction to create and send certificates via Certifier or other tools.
Method 01: How to generate certificate from Excel sheet (or Google Sheets) with Certifier (4-STEPS TUTORIAL)
As we mentioned at the beginning of the post, this is a free, easy, and professional way to resolve the problem of how to auto-generate certificate from Excel sheet. More than 1000 companies, educators, and organizations use Certifier to generate certificates, diplomas, and credentials for their recipients every month. Follow this instruction and be among them.
⚠️ Important: You need a prepared recipient list to get started. Combine first and last name in Excel together so that the Certifier certificate generator from Excel correctly transfers the spreadsheet data to the certificates.
Before you get into details, here's how to auto-generate certificate from Excel sheet:
Log in to your Certifier account or create a new one for free
Customize the certificate's template
Upload CSV list to auto-generate certificates
Send bulk email to recipients
01 Log in to your Certifier account
First, log in to your Certifier account. If you don’t have a Certifier account, register for free on a Sign-up Page. A Free plan is available forever for each registration.
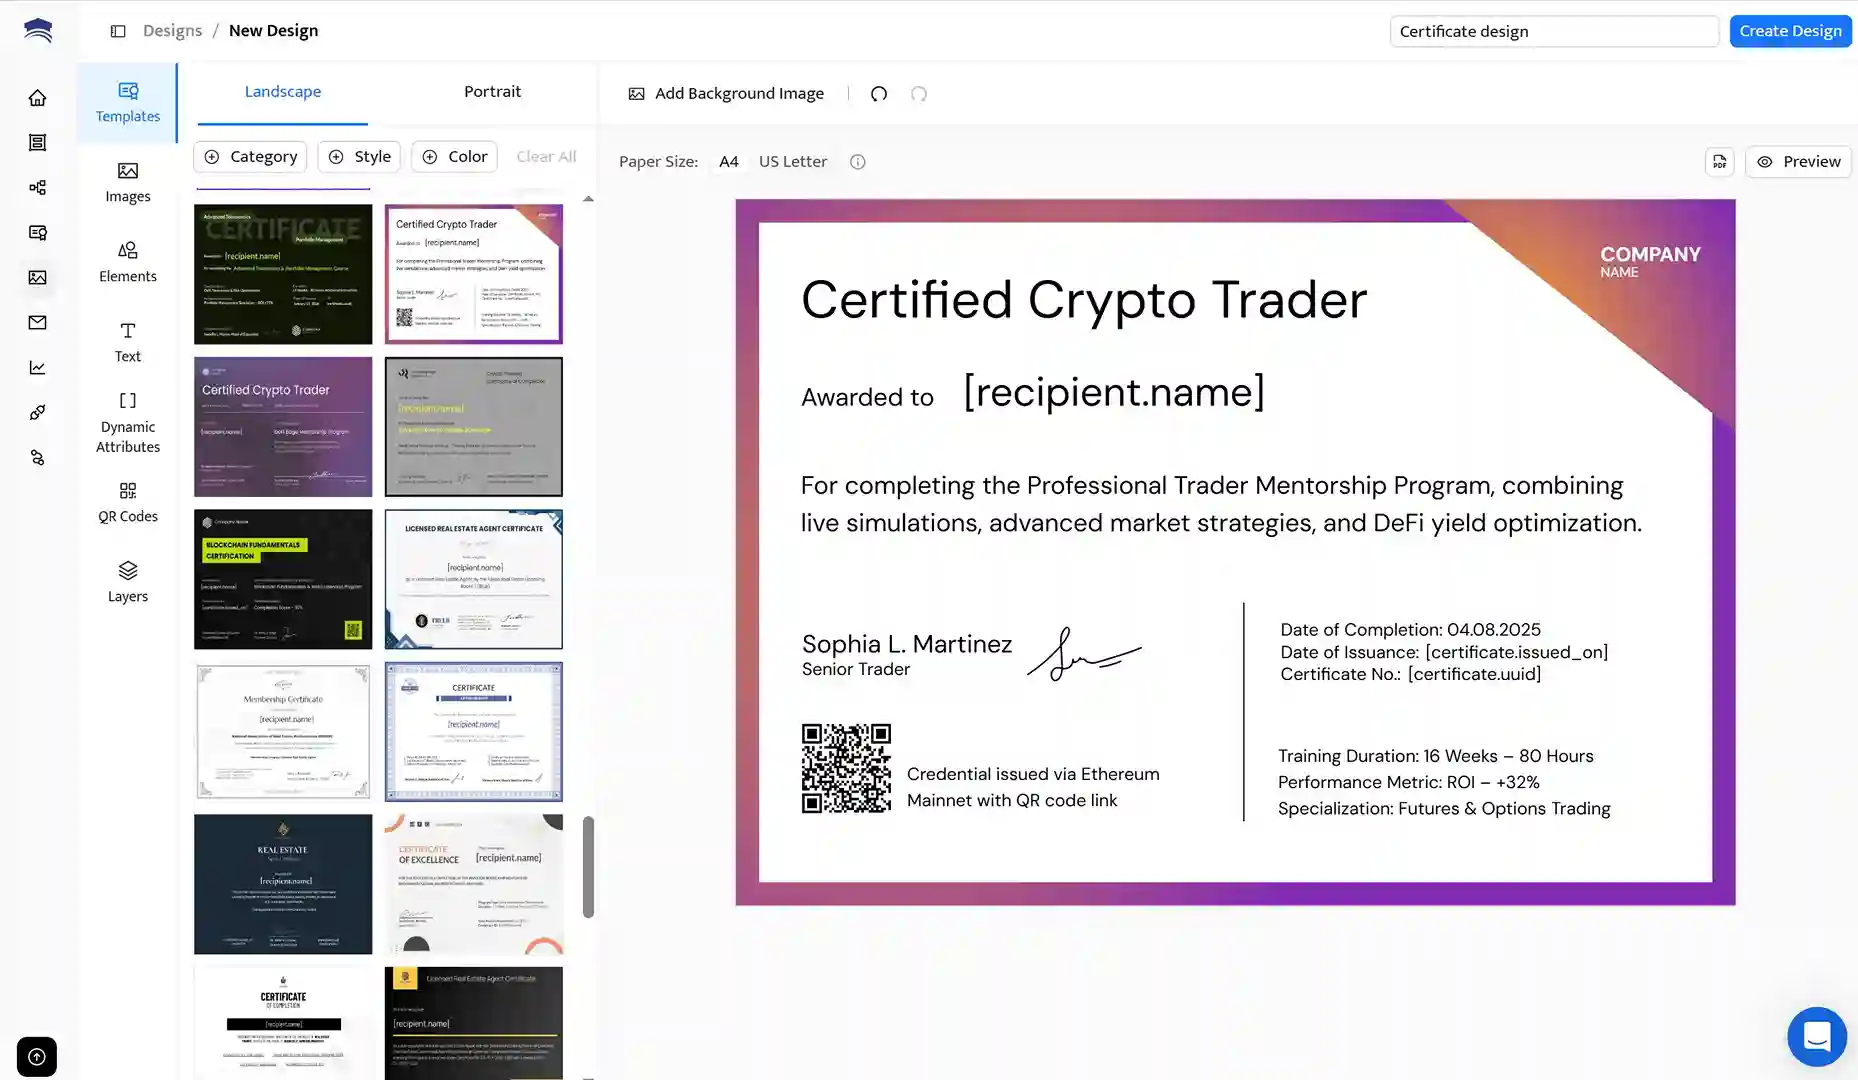
02 Customize the certificate’s template or design it from scratch
Certifier includes thousands of ready-to-go templates. You can use, customize, and edit them for free. Also, you can create a new design from scratch in our e-certificate generator from Excel. You can upload certificate backgrounds, frames, and elements. Make sure to customize your certificate design to match your brand identity. Choose the elements for your design: upload the logo, signatures, etc.
03 Upload CSV list to generate certificates in bulk
At this step, you’ll need a prepared CSV file with the certificate recipients’ list. If you skipped these steps, get back to the instructions above.
In this step, you need to do the following:
Create a group
Upload Recipients’ List
Manage columns
Review the setup
Finally, save certificates as drafts (prepare them for future sending), or move on to the next step and send generated certificates.
👋 Note: At first, you may be scared about this part of the process, but don’t worry; most users complete it in less than 5 minutes. What is more, you can upload lists automatically using direct integration with your app or software via a connector tool..
04 Send bulk emails with certificates to the recipients
You're at the finish line. In this step, you need to send certificates. Click on Save and Publish Certificates.
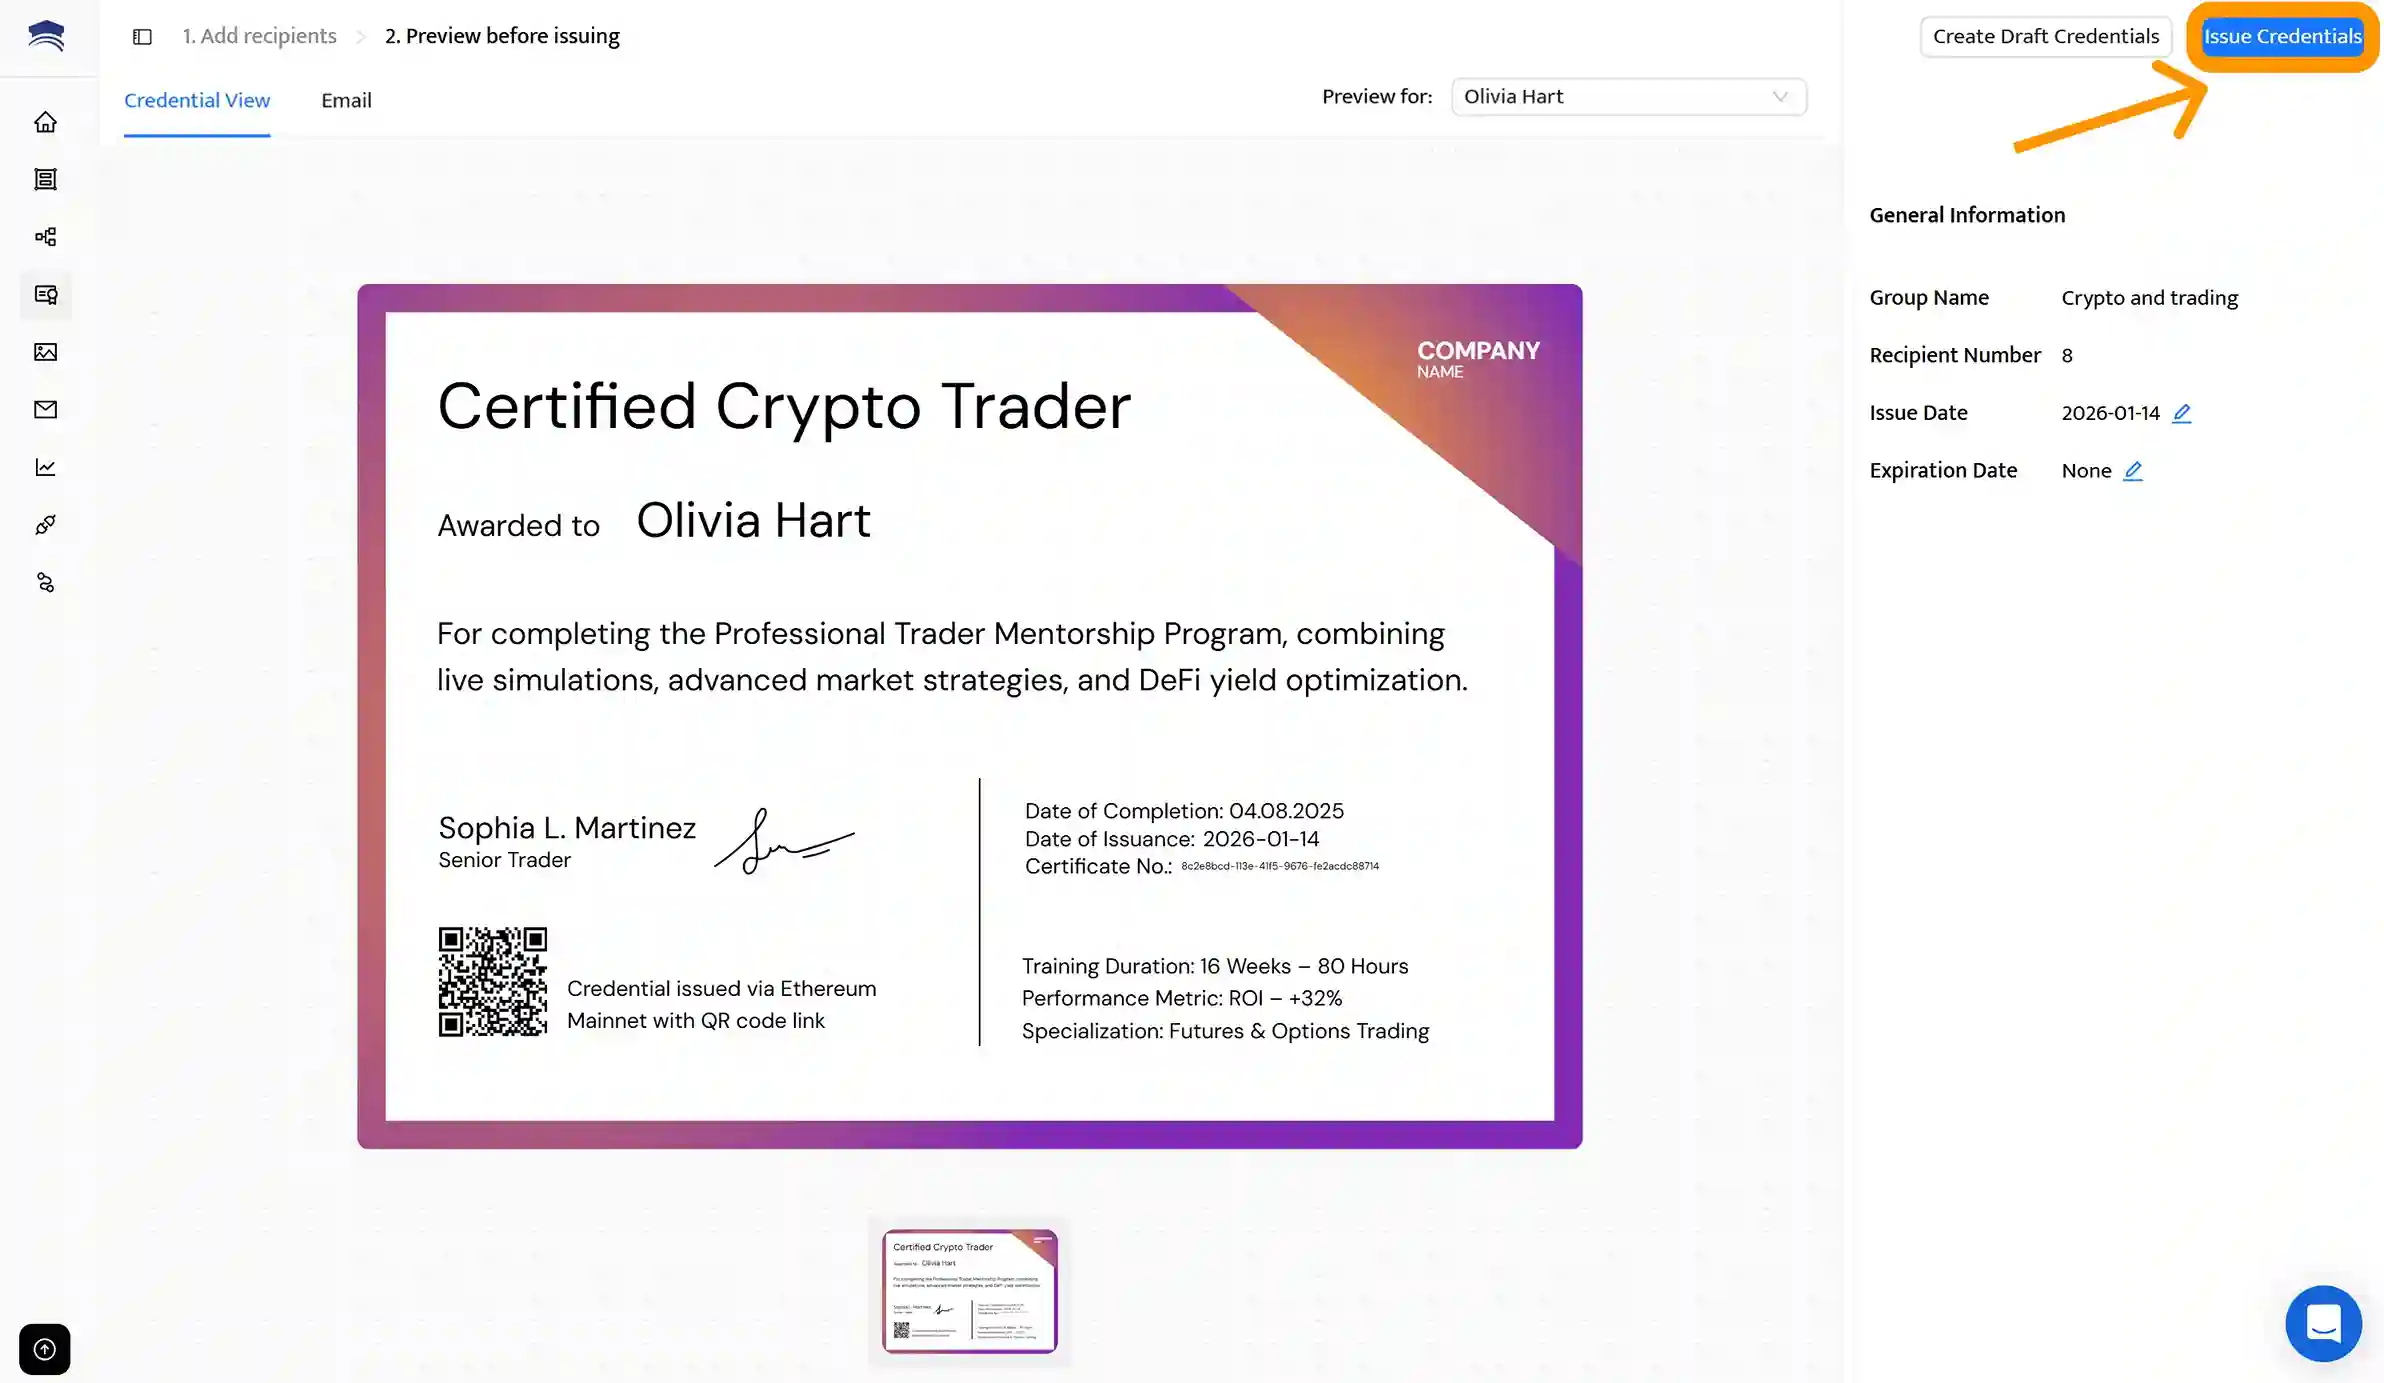
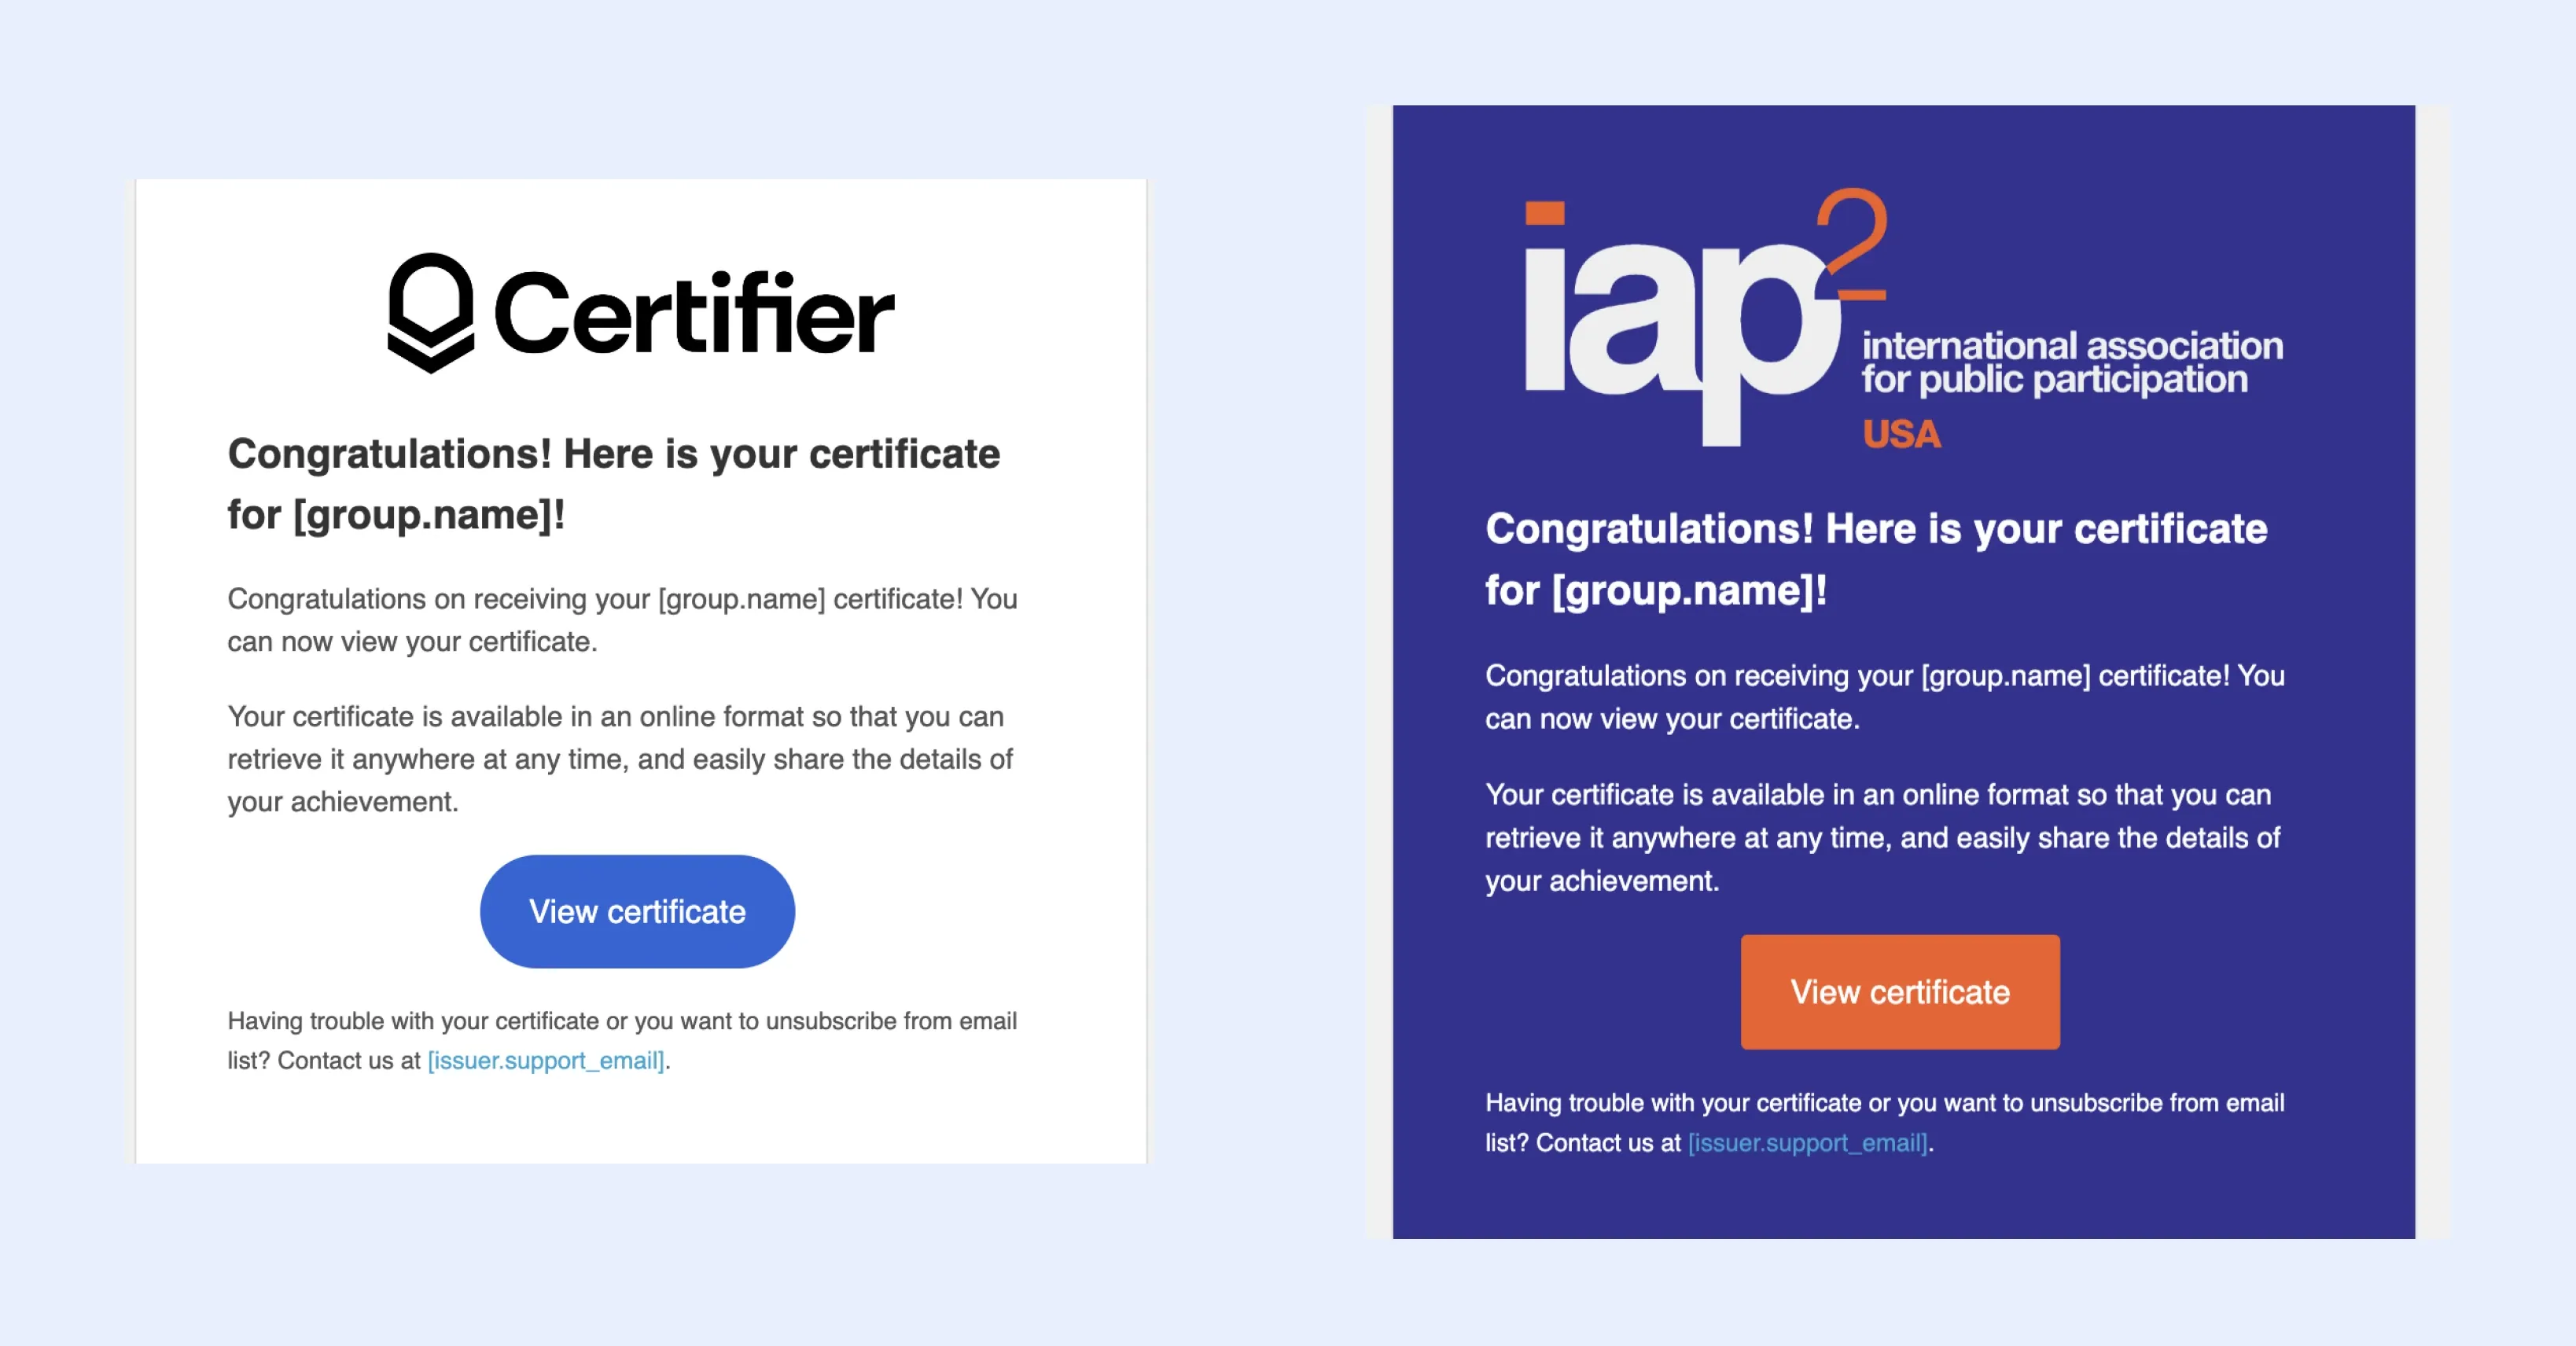
When you click on it, Certifier build-in mail system emails all new certificates to recipients' Inboxes. By default, our system sends emails with a basic template (without your logo, branded colors, and text). However, you can create a custom email template, set up your email as a sender, etc. If you want to customize your email templates, go to the Emails section > Create Email Template.
That’s it. Your certificates are published and sent to all recipients via an online certificate generator from Excel. If you need more insights on how to generate e-certificate from Excel sheet, simply schedule a call to discuss your questions in person.
Method 02: Use the native Certifier integration to automate certificate generation from Excel sheet or Google Sheets
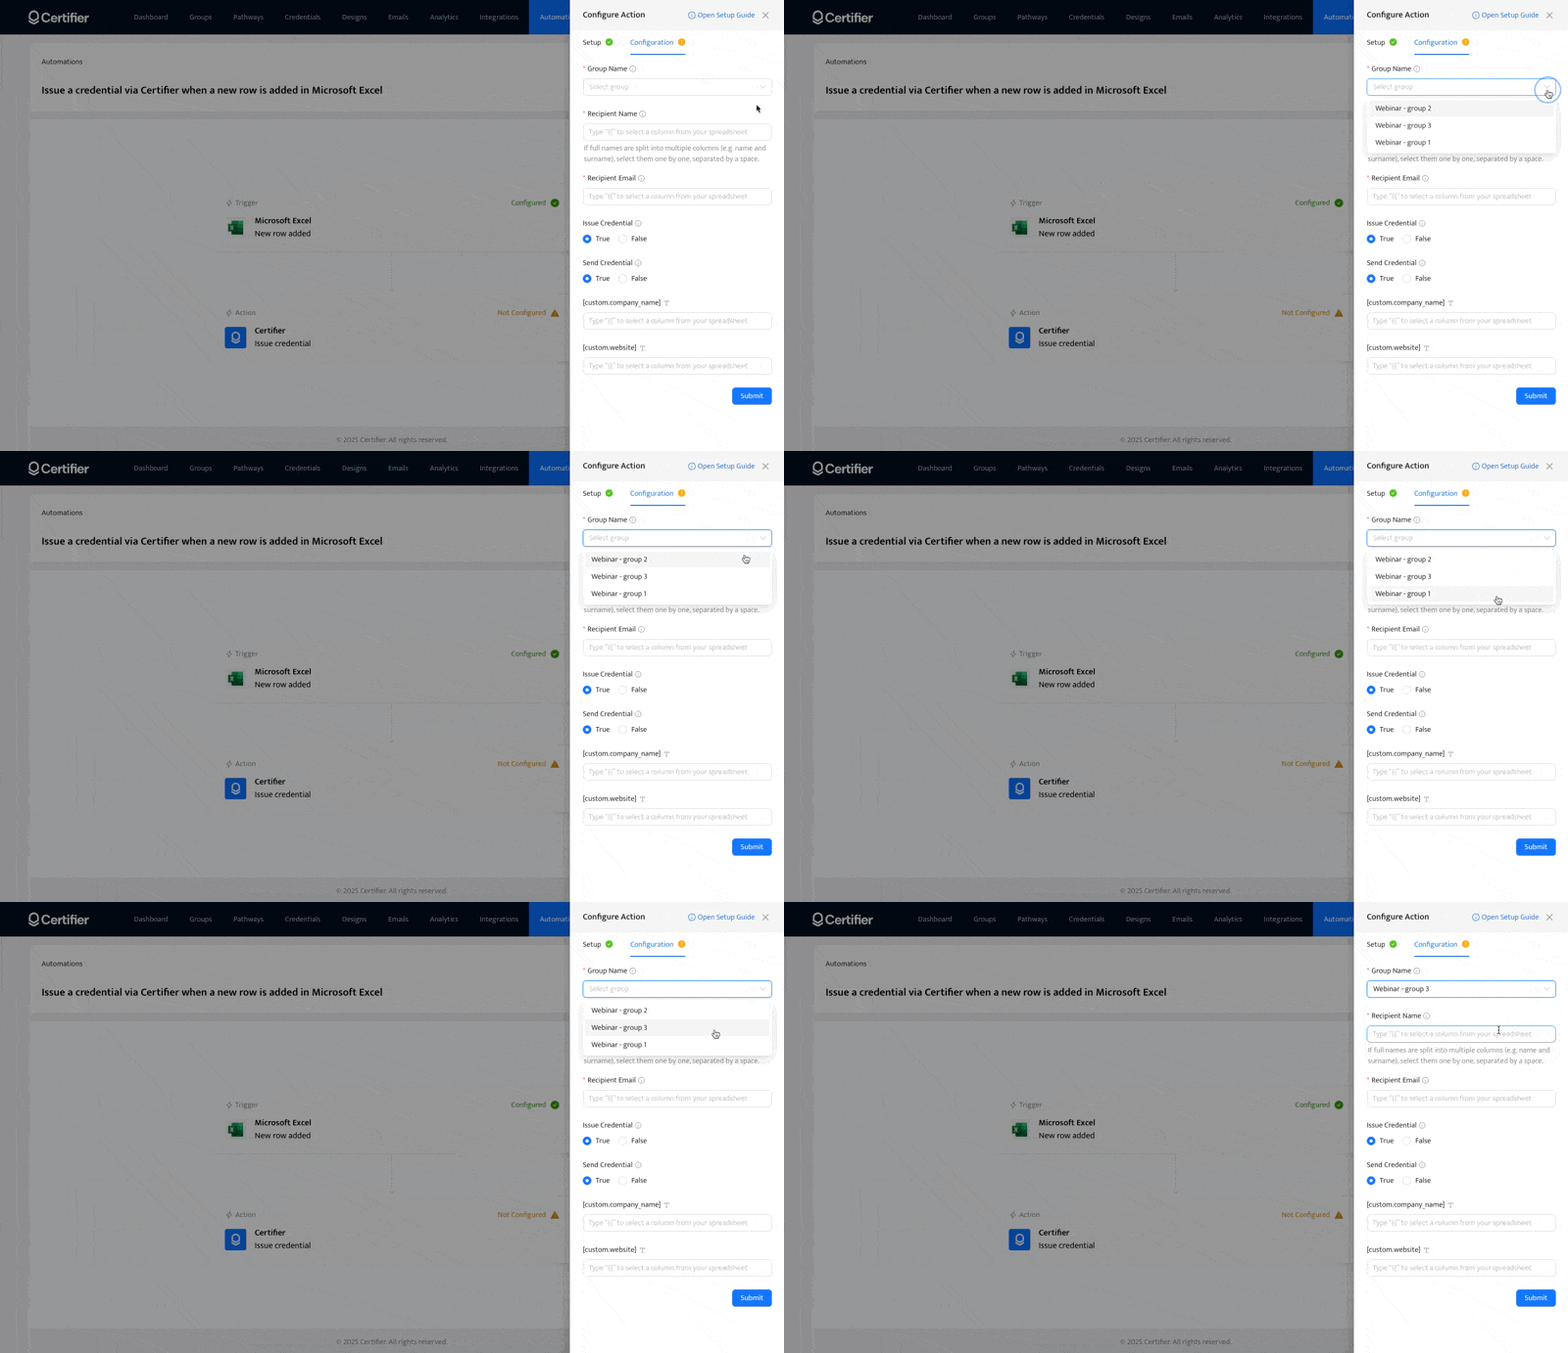
Certifier now connects directly to Google Sheets and Microsoft Excel, so certificates get issued the moment new data appears. This method is ideal if you run ongoing courses or want a continuous, no-code workflow without CSV uploads or Zapier.
Unlike the CSV method, you don’t need to prepare or clean your data in advance—Certifier uses the live information already stored in your spreadsheet. Follow these steps to set it up:
01 Open Automations in Certifier
First things first, log in to your Certifier account.
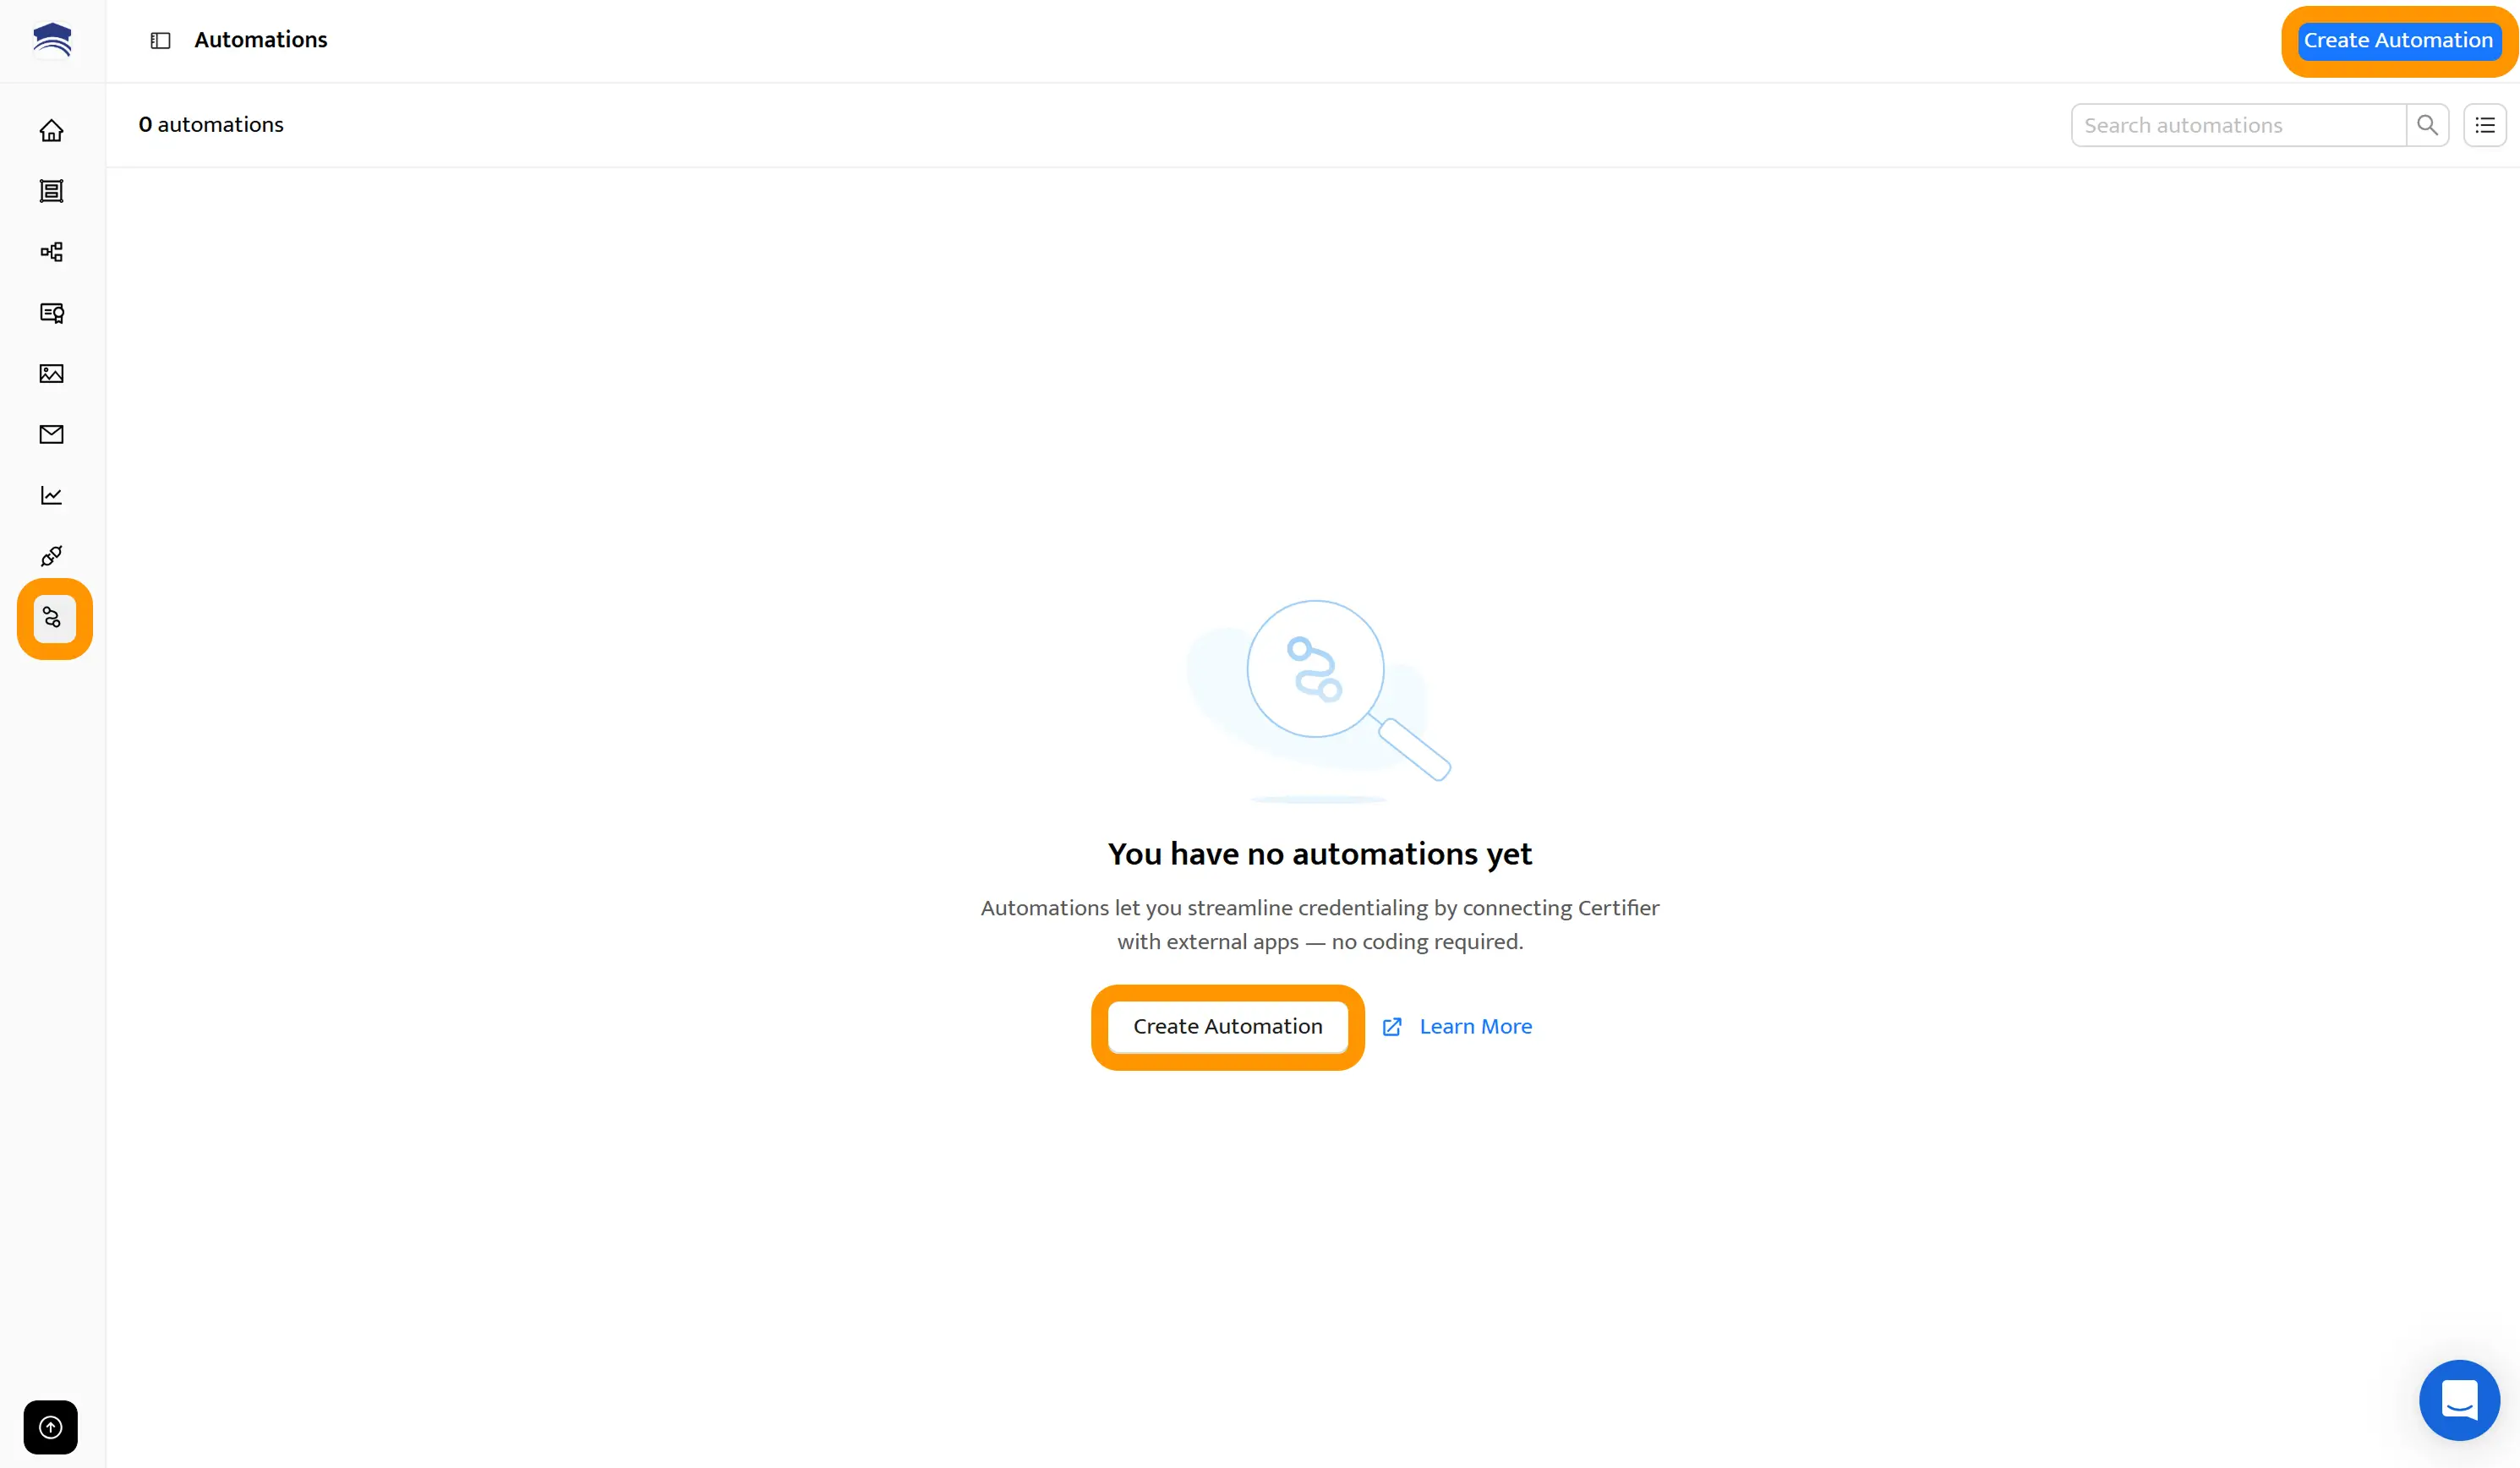
Then, head to the Automations tab. Click +Create Automation to start.
04 Activate the automation
Once mapping is complete, turn the automation on. From this point, Certifier keeps an eye on your spreadsheet. Every time a new row appears, whether from a form response, sign-up, or manual entry, a certificate is generated and sent automatically.
Method 03: Generate certificates with Excel + Word and send them manually
Now it's time to describe an ALTERNATIVE way to send certificates in bulk – using MS Excel, MS Word, and Mail Merge. This method is more like a workaround than a professional way to create certificate from Excel data. Still, we believe it’s useful to know about the pros and cons of it.
This method, without a professional bulk certificate generator Excel, requires a bit more time. Follow the instructions below to proceed.
01 Open Excel & Word in Microsoft 365
First, log in to your Microsoft 365 account. Once you're logged in, open Microsoft Excel Spreadsheet and Microsoft Word program.
02 Chose certificate design from MS Word Templates Library
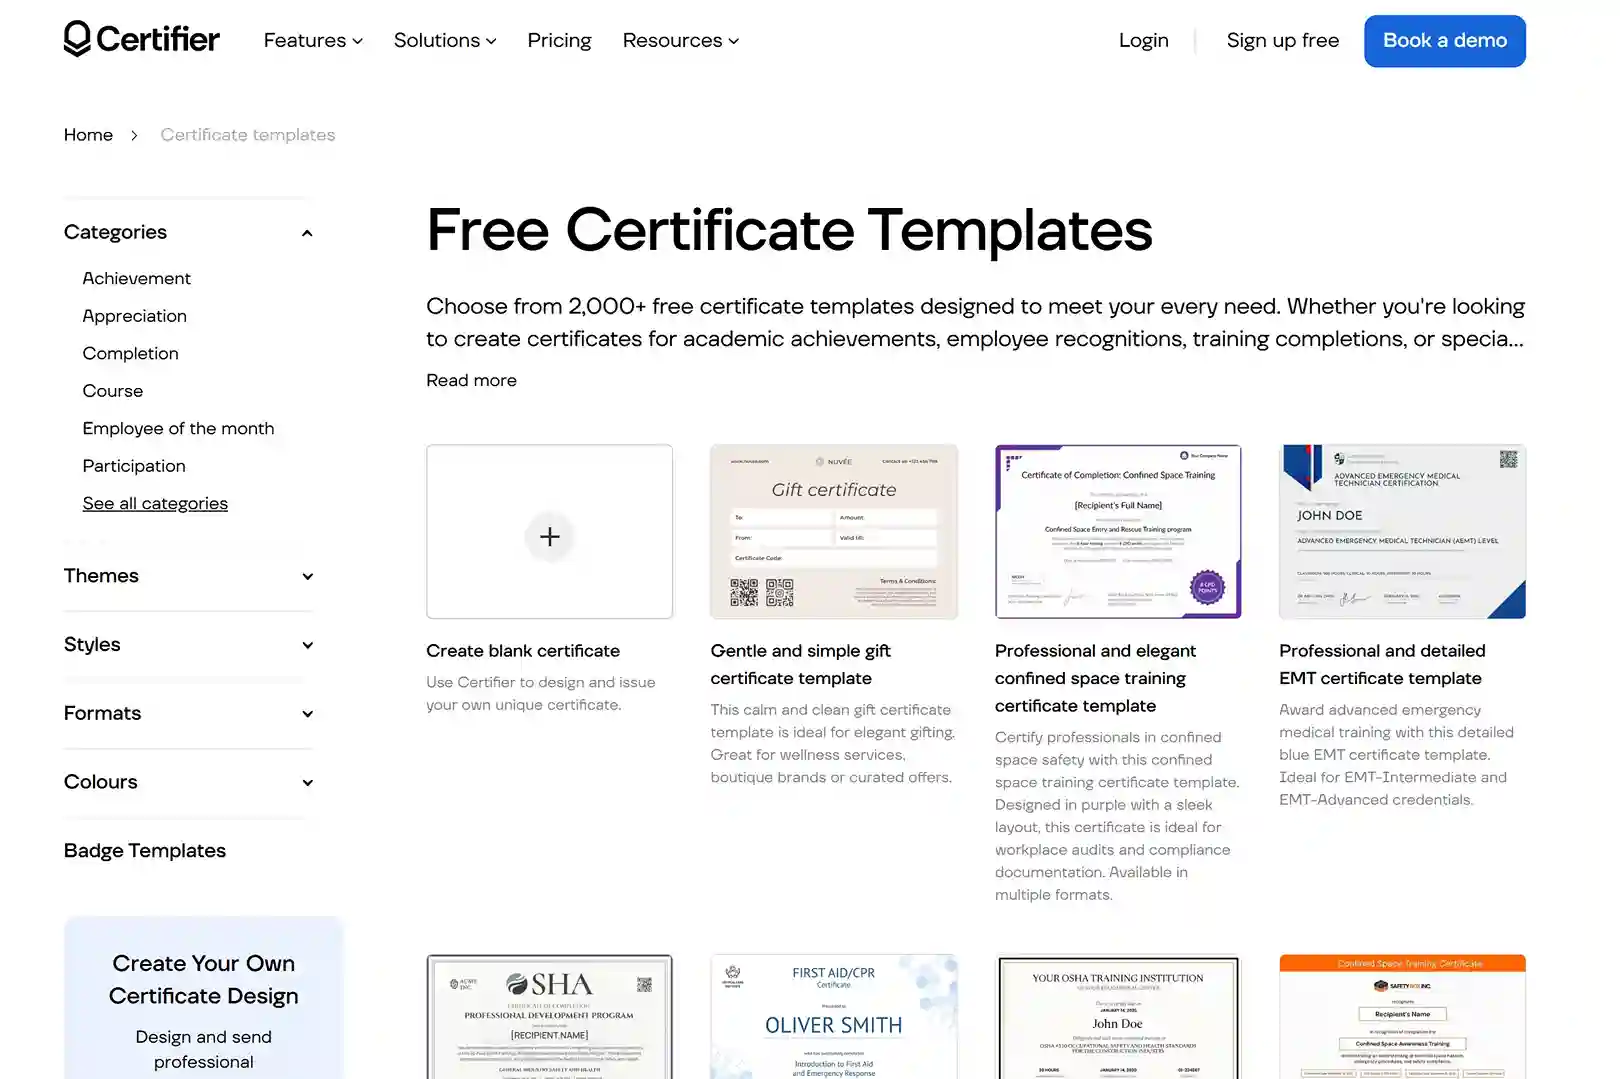
Microsoft Word has a huge library of free DOC templates including certificate templates, you can check them here. If you don't find the template that you need in the Word Templates Library, you can create your own one in MS Word from scratch or create a certificate design with our certificate maker here.
👉🏼 Do you want to know how to print certificates from Excel? With Certifier help, it's possible. Check out this guide about certificate printing.
03 Merge the design, recipients spreadsheet, and Mail Merge
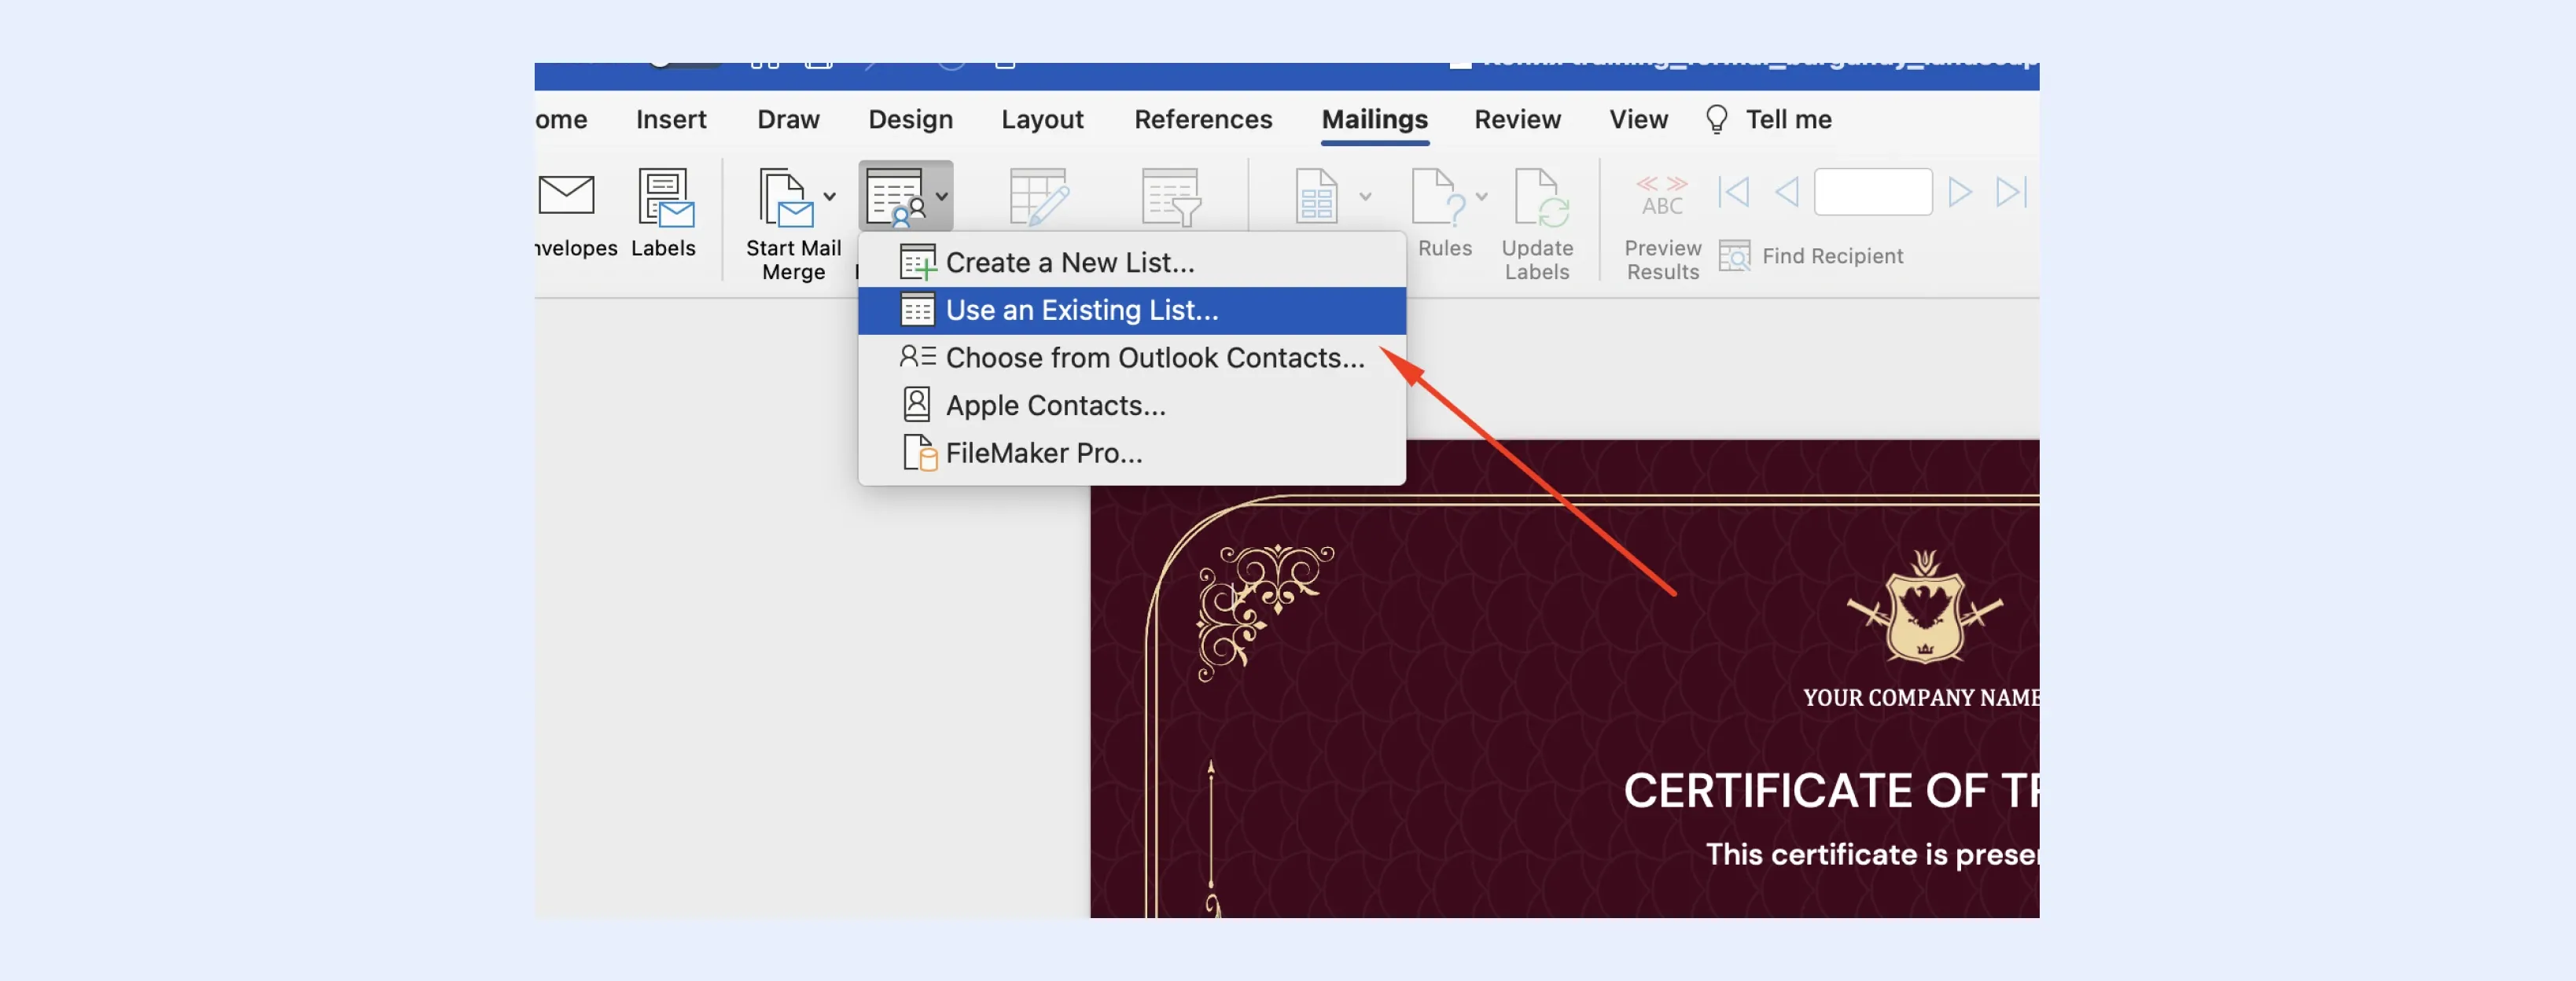
When the template is ready, you can add the logo, text, and style that aligns with your branding. After that, add a dynamic element in MS Word, and merge the spreadsheet file in MS Excel with the recipient name. Go to Mailing > Start Mail Marge > Select Recipients > Select the list with your prepared spreadsheet
04 Place variables like name and others into certificate design
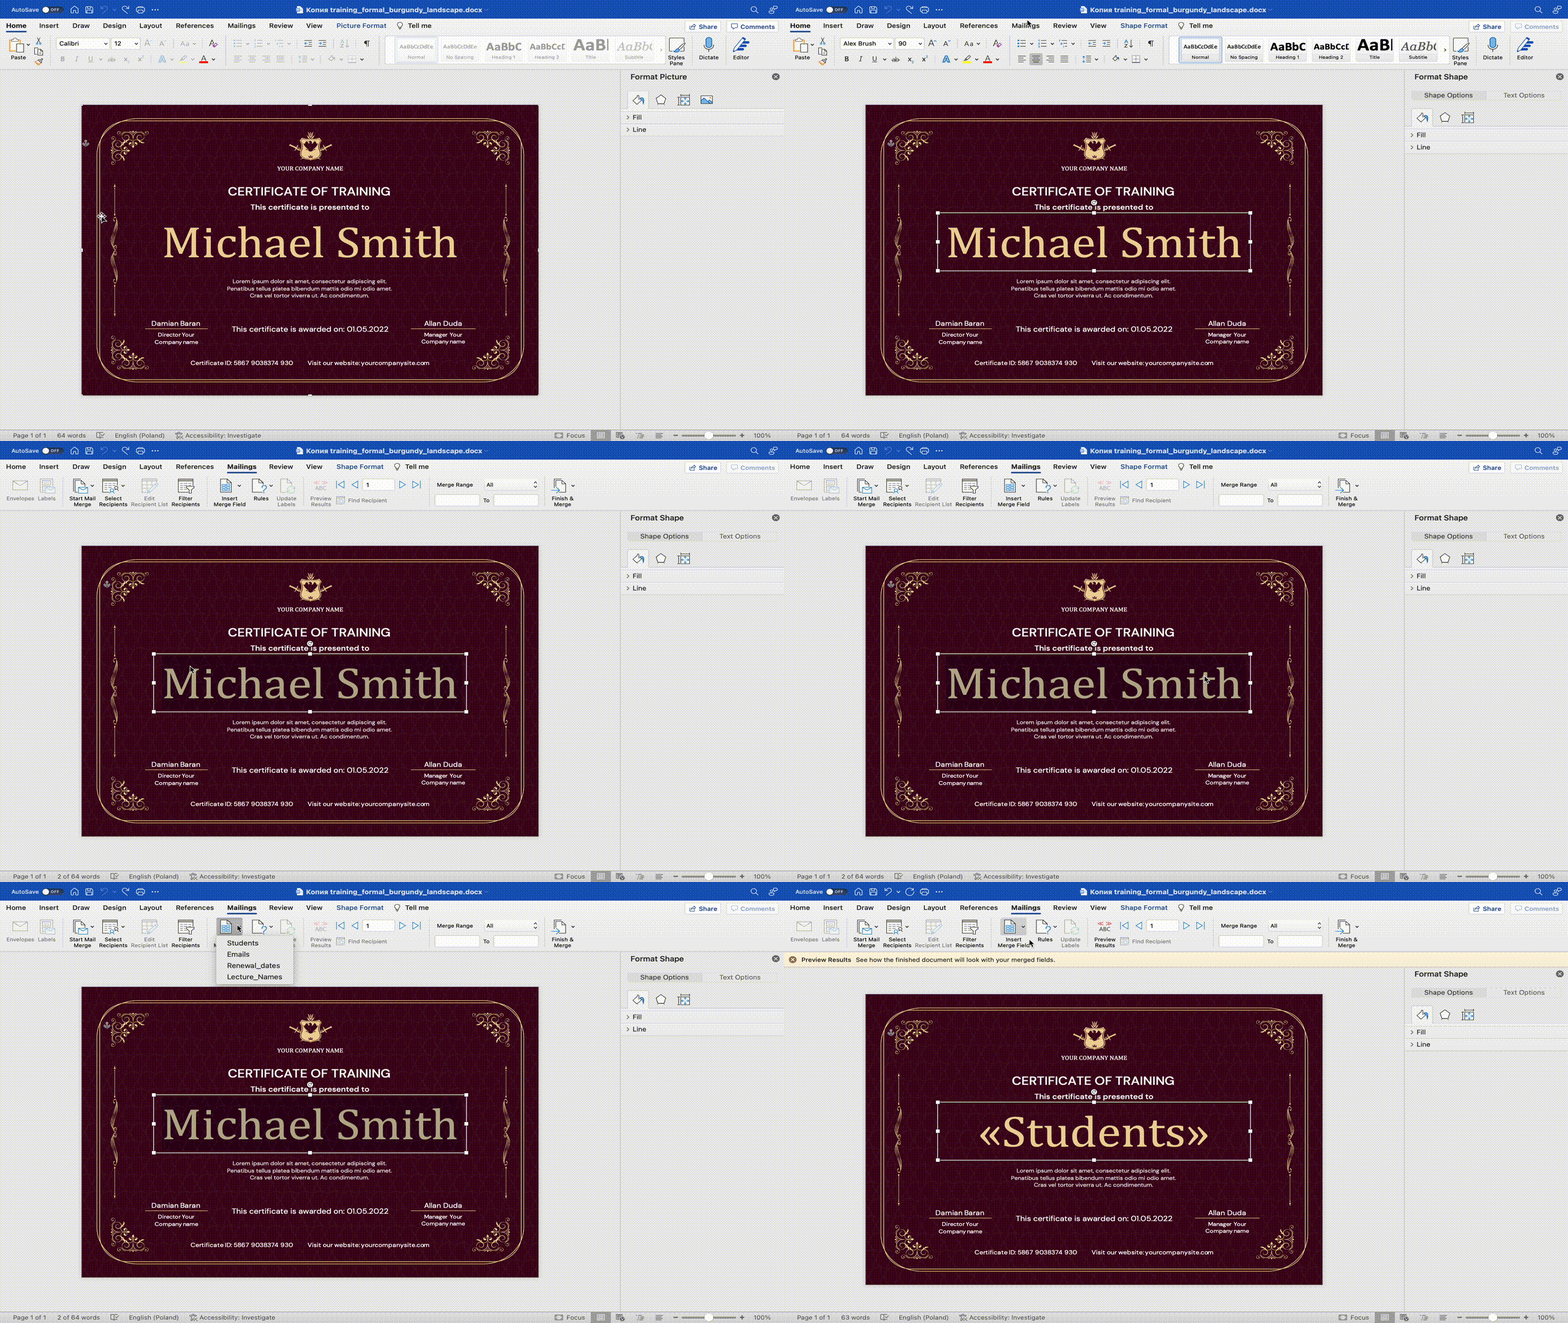
Select a place on the design where you want to insert the dynamic element, e.g., the student name. In the Mailing section > select the Insert Mailed Field. You should specify a column for each variable from the recipient's spreadsheet merged before.
05 Generate a certificate and complete the process
Staying in the Mailing Section, click on the Fining & Merge button > select All options to generate certificates from Excel.
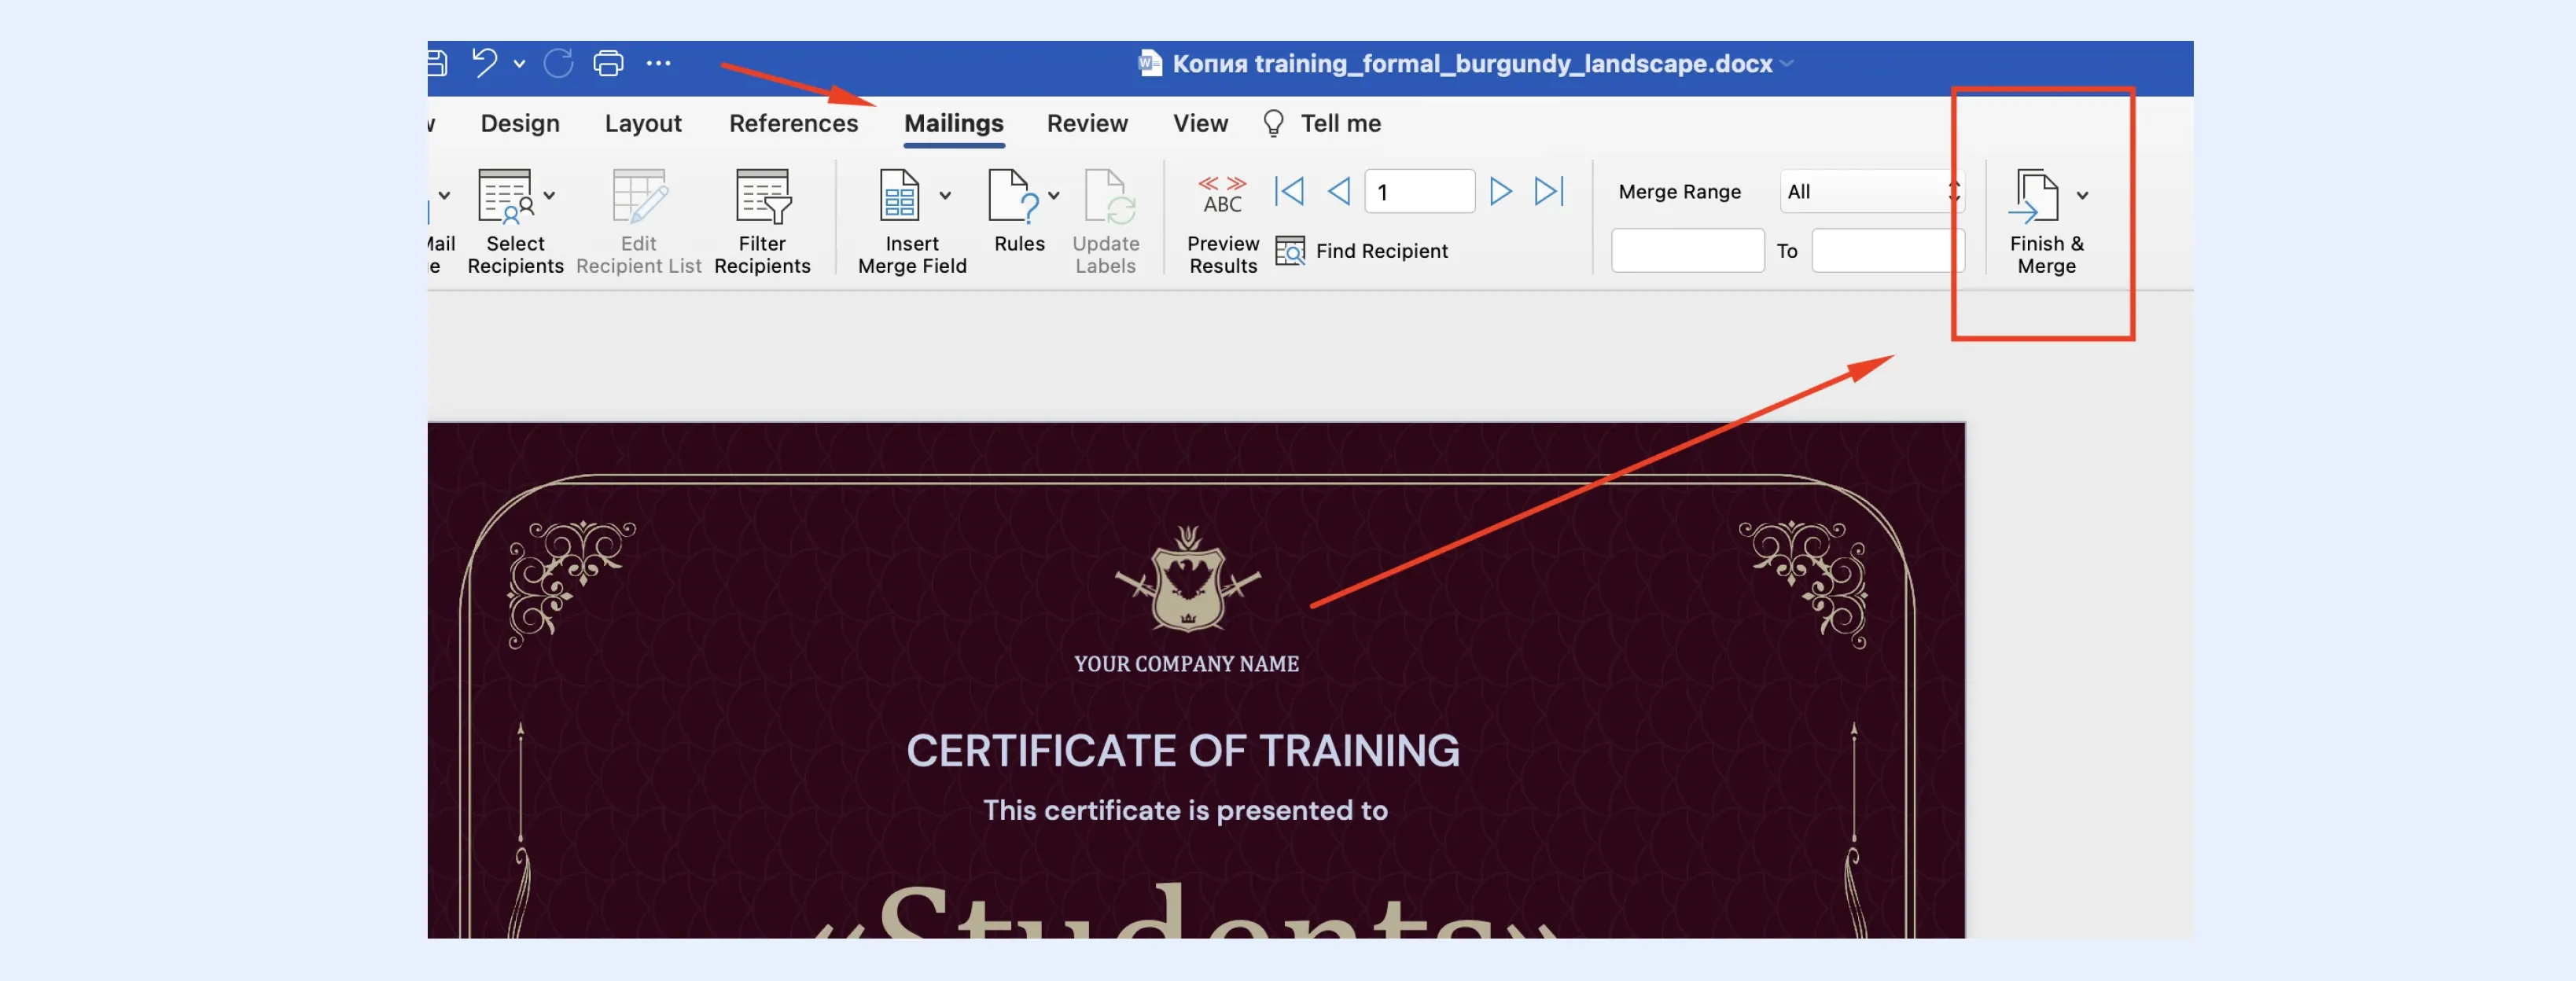
That’s how to make certificates from Excel in a nutshell. You have generated certificates in one MS World file. Now, you can keep them in one file, split them into multiple ones, prepare them for printing, or send them via email.
06 Send certificates via Outlook
If you use the full version of Office 365 Suite, you can send a simple automated email through MS Word by selecting the button Send Email. Make sure to select Current Records so that each recipient receives only their certificate.
Pros of using Certifier certificate generator from Excel or Google Sheets
Low (or no) costs. Google Sheets (or similar spreadsheets) are completely free. Certifier bulk certificate generator Excel also provides a free plan that includes all the main features.
Professional outcome. Using Certifier and Excel or Google Sheets, you can generate certificates like a professional. It’s a method proven by thousands of companies, universities, and organizations.
Easy start. A complete first-time setup takes from 10 to 20 minutes, including design creation and feature adoption. Further certificate generation processes will take up to 10 minutes or can be fully automated.
Analytics and reporting. With Certifier, you can analyze all the data about issued certificates: clicks, downloads, social media shares, etc. You can use this data to improve your marketing processes.
Flexibility. You can download generated certificates from Excel as a spreadsheet with unique IDs or as a .zip archive with PDF files.
Integrations. Using Certifier and spreadsheet tool, you can integrate all your current apps and software within one workflow and automate the issuing process. No extra hassle.
Cons of using Certifier e-certificate generator from Excel
Certifier + spreadsheet tool method is less suitable for a single certificate or a small number of them. If you do not need to generate certificates in bulk, consider using a simple online tool like Canva. You can also create a design manually in Photoshop. After that, create separate files and manually send them to your recipients.
If you need to issue a large number of certificates using Certifier + Spreadsheet (250 or more), it is necessary to upgrade to the paid version of Certifier. Package prices start from $49/month, and our customers are happy with the value/cost ratio. Still, it’s fair to mention it as a disadvantage. Read the Certifier review here.
So, how to generate e-certificate from Google Sheet or Excel?
The world changes, and so do students' needs! The optimized certificate-issuing process is crucial for your business’s success.
The best way to win engaged students or webinar visitors is to give them a good-looking professional certificate. By doing so, you will increase the value of your learning event, webinar, or masterclass.
Remember to use professional tools like Certifier for convenient certificate generation from Excel. Certifier – free bulk certificate generator Excel or Google Sheets, includes such features as LinkedIn certificates, socia media shares, verifiable credentials, and professional designs.
Sign up for Certifier and generate credentials with ease.
FAQ on how to generate certificate from Google Sheet or Excel
Here’s the list of the most frequently asked questions on how to generate certificates from Excel data (or Google Sheets).

- SaaS Growth
- Digital Credentials
- APIs
- Product Marketing
- Company Operations
CEO and Co-Founder
Sergey is CEO and Co-Founder of Certifier, a Forbes 30 Under 30 honoree building digital credential infrastructure for 2,000+ organizations worldwide and shaping the future of credentialing.

