

Trusted by:
University of Southern California
Warner Bros.
Volvo
Amazon
Stanford University
September 27, 2026
5 min read
A QR code on your webinar's final slide can open a Certifier Form and email each attendee a certificate without an attendee list export. See how the flow works, when a scan is enough evidence, and when Zoom attendance data should decide.
Research with AI:
Save time (and precious mental energy) by automating webinar certificate issuance with a simple QR code added to your final slide.
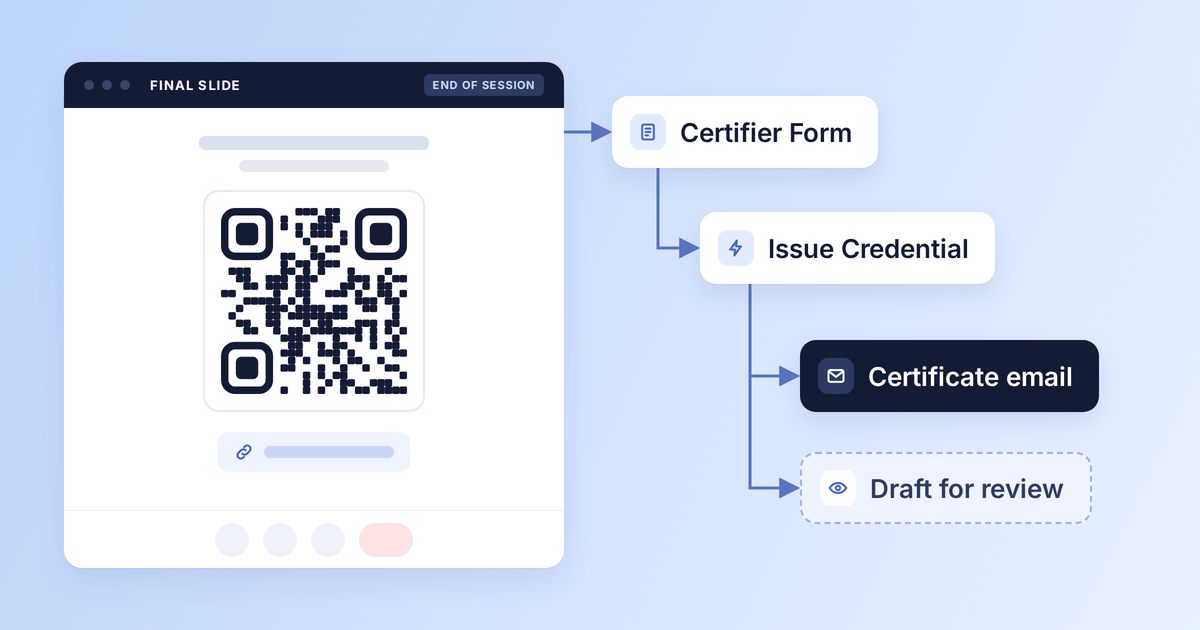
Attendees scan it during the last few minutes and fill in a short Certifier Form. A configured Certifier automation uses that data to issue the certificate, then emails it to each participant.
The entire process from scanning to certificate delivery stays in Certifier, without a separate form app, attendee list export, or connector. It works the same on Zoom, Teams, Webex, or any other webinar platform because it doesn’t depend on the platform's data.
The QR code you add at the end of your webinar presentation is a certificate request, which is different from the verification QR printed on a certificate you've already issued. And despite what some may think, scanning it isn't the ultimate proof of webinar attendance.
TL;DR
A QR code on your webinar's final slide opens a Certifier Form, then the Issue Credential action turns each response into a certificate email.
You choose whether attendees get their certificate right after they submit or whether each request waits as a draft for review.
A final-slide scan is a certificate request, not webinar attendance proof, so you must match the route to what the certificate claims.
Show the QR during the closing Q&A, paste the link in the chat, and deactivate the form before the replay goes out.
The slide QR requests a certificate, whereas the QR printed on the certificate verifies it.


Any tool can put a QR code on a slide. What makes a difference is how many handoffs sit between the scan and a certificate arriving in the attendee's inbox.
Certifier Forms is a native tool that lets you collect submission data through forms with a direct link and a QR code you can drop onto your closing slide. The forms you create live on your issuer portal and include a GDPR consent checkbox by default.
Attendees don't need a Certifier account to access the form or view their certificate. An Automation built from the "Issue a credential via Certifier when a new form response is received in Certifier Forms" template runs the Issue Credential action, which maps the submitted name and email to your webinar's Credential Template.
Two settings decide what happens next. With Issue Credential and Send Credential actions both set to True, attendees get their certificate by email after they submit. With both set to False, each response becomes a draft, so nothing is emailed until you review it.
That's a shorter path than the one many webinar teams run after every session: export the attendee list from the webinar platform, clean it in a spreadsheet, or point a QR at Google Forms, collect responses in a linked Google Sheet, and connect that sheet to a certificate tool directly or through Zapier.
Each handoff is another mapping to maintain and another place to check when an attendee comes back to ask where their certificate is.
Fewer tools isn't automatically better, though. If your webinar platform, registration tool, or LMS already holds the data that decides who qualifies, keep it in the chain.
You still build the form, create the Automation, map fields, and choose whether to issue, send, or save drafts. That setup now happens in one place, plus you can reuse it for every session in a webinar series.
An external stack still earns its place when you need a scored post-webinar quiz with a pass/fail rule or a form that also feeds your CRM. In that case, see how to generate certificates from Google Forms.
Stage | Typical Webinar Stack | Native Certifier Forms |
|---|---|---|
QR or link | Third-party QR generator pointing to an external form | QR and public link generated from the Certifier Form |
Form | Google Forms, Typeform, Tally, or similar tool | Hosted Certifier Form with your branding |
Data handoff | Linked response sheet plus an integration or connector, or a post-webinar attendee list export | Response stored in Certifier and available to the New form response received trigger |
Certificate action | Certificate tool receives fields mapped by the connector | Issue Credential action maps form fields to your webinar's Credential Template |
Sent by the certificate tool or a separate email step | Sent by Certifier when Send Credential is on | |
Monitoring | Form, sheet, connector run history, and certificate tool | The form's Results tab, the Automation's run history, and All credentials |
Showing the QR code only at the end of the webinar reduces access for attendees who dropped off after ten minutes.
But a code on screen can be photographed, posted in a team chat, or scanned from the recording a week later. A form submission tells you someone entered a name and email when the form was open, while revealing nothing about who watched the webinar or for how long.
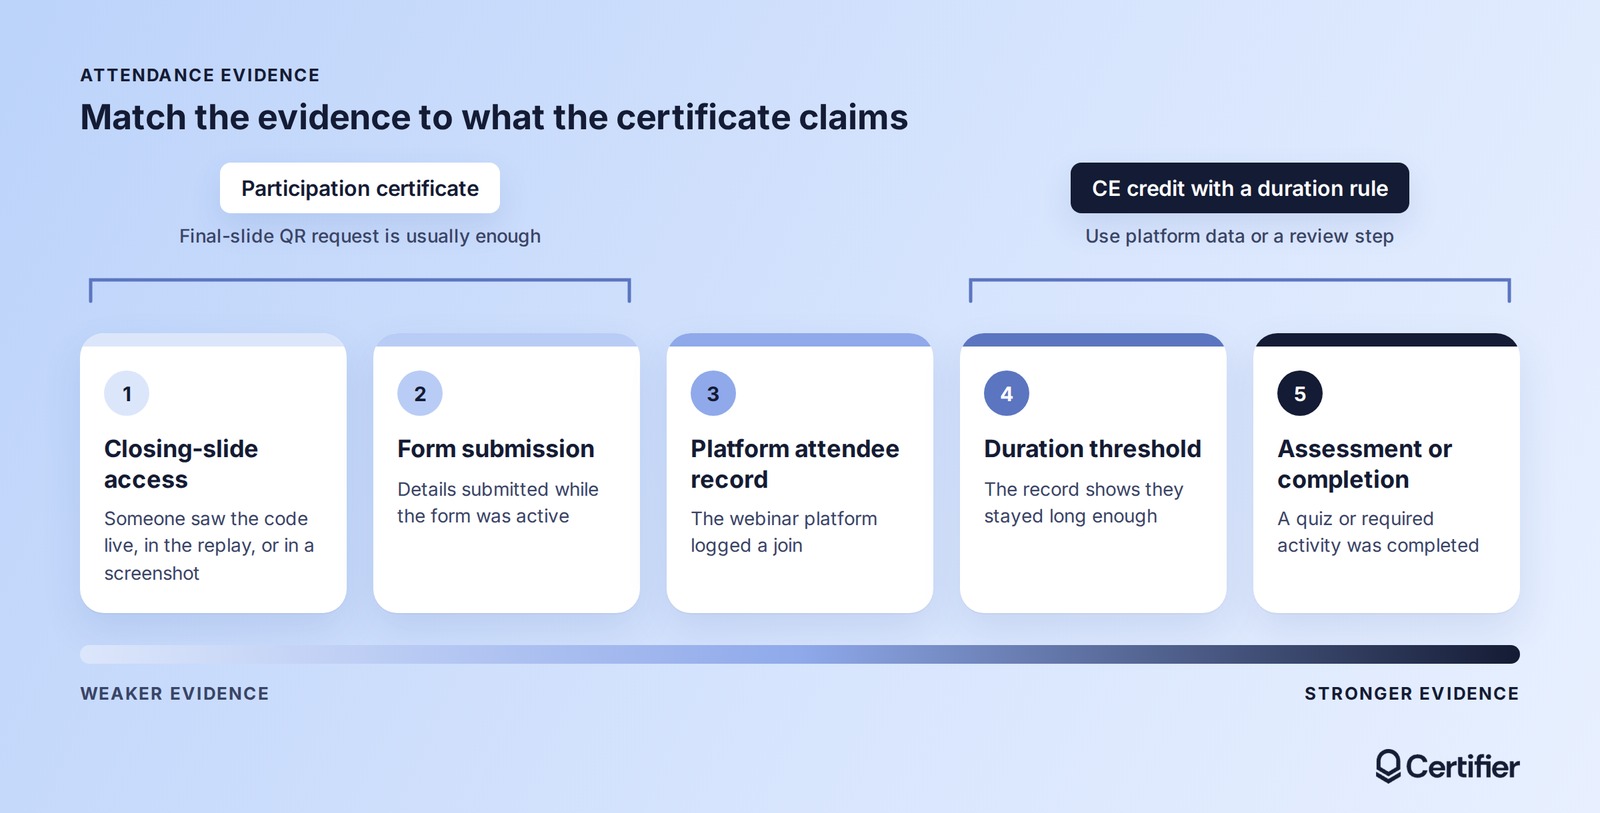
Webinar attendance evidence sits on a spectrum, from weakest to strongest:
01Access to the closing slide: Someone saw the code live, in the replay, or in a screenshot.
02Form submission: Someone submitted details while the form was active.
03Platform attendee record: The webinar platform logged that the person joined.
04Duration threshold: The record shows they stayed for a set amount of time.
05Assessment or completion record: They passed a post-webinar quiz or completed a required activity.
Example: A 45-minute webinar can trigger two certificate types. The closing slide shows a Form QR for the last five minutes, during Q&A.

Participation certificate. Issue Credential and Send Credential are both set to True. Attendees who submit the form get their certificate by email. The team deactivates the form once the Q&A ends.
Controlled CE credit. Both settings are False, so every submission becomes a draft. After the webinar, the team compares drafts against the Zoom attendance report and issues only the drafts that meet the duration rule.
Pick the route based on where your webinar's eligibility evidence lives. For in-person or hybrid events run on Eventbrite, check-in data can play the same role. Certifier's native Eventbrite integration can issue a certificate when an attendee checks in.
Route | Best Fit | Recipient Data Source | Evidence Strength | Setup Burden | Review Point | Main Limitation |
|---|---|---|---|---|---|---|
QR code request | Participation certificates on any webinar platform, including hybrid sessions | Attendee submits their own details | Low to moderate | Form and Automation, then reuse across the series | Optional, through drafts | Code can be shared or scanned from the replay; relies on the attendee typing their email correctly |
Certifier's native Zoom trigger | Zoom webinars where the platform record should decide | Zoom attendee data when the webinar ends | Moderate to high: the platform's join record, plus an optional minimum attendance threshold in minutes or percentage | Connect Zoom and map fields | Optional, through draft mode | Zoom only, and webinars need the Zoom Webinars add-on; attendees without an email in Zoom, such as phone dial-ins, don't receive a certificate |
Reviewed roster or CSV | CE credit, strict rules, any webinar platform | Exported attendee report | High, with a human check | Manual work after every webinar | Before issuing | Slowest; someone has to own it after each session |
Use a QR Code Request When Submission Is Sufficient. Pick this route when the certificate acknowledges participation or when your series runs on more than one platform, and you want one flow for all of them.
Use Zoom Attendance Data When the Platform Record Should Trigger Issuance. If Zoom's record should decide who qualifies, automate Zoom attendance certificates with the Webinar Ended trigger instead of a self-submitted form. You can set a minimum attendance threshold, in minutes or as a percentage of the session, so a brief join doesn't qualify.
Review a Roster When a Human Checkpoint Matters. For credit-bearing webinars, hold form submissions as drafts or skip the form and issue from a reviewed attendee export.
This section follows the webinar timeline. For the full form and Automation walkthrough, see how to let recipients request their own certificate. For exact step-by-step screens, see how to set up and share a Certifier Form QR code.
Prepare the webinar's Credential Template. Add the session’s title and date on the webinar certificate template.
Create the Form and connect the Automation. Start from the Credential request template and ask only for full name and email. In the Automation, leave the issue date blank so it's set when the credential is generated, then save and activate. Each plan includes a set number of forms, so many teams reuse one form across a series. If you do, add a required session Dropdown and map it to a custom attribute on the template.
Test it signed out. Scan the QR code from your phone and submit with an internal email. Check that the credential shows up in All credentials, the name renders correctly, and the email doesn't land in spam.
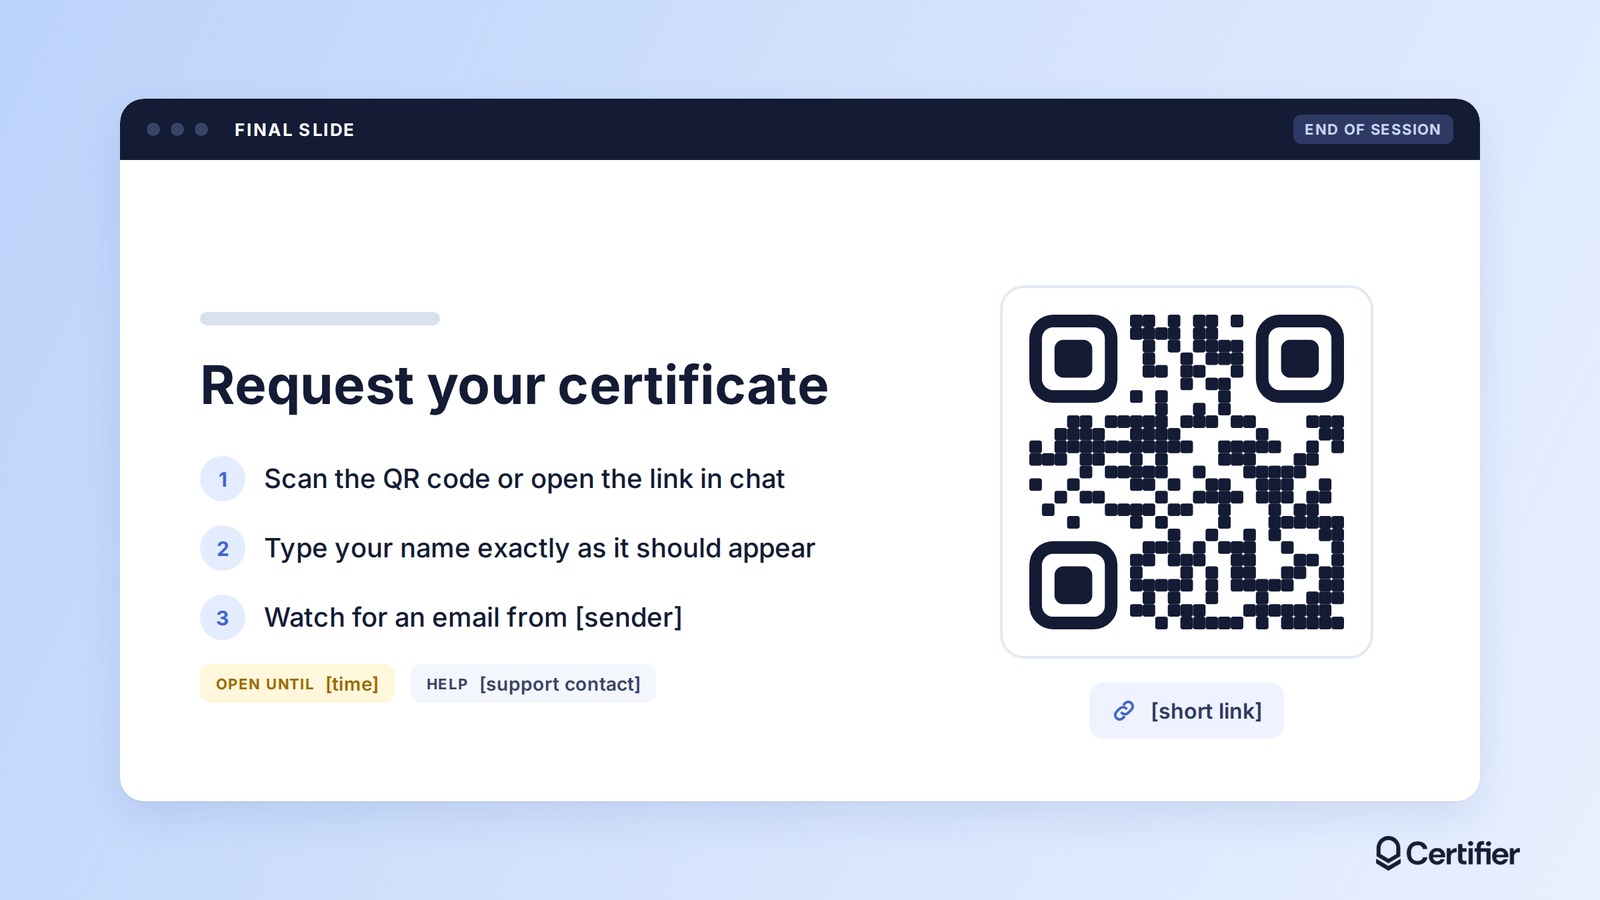
Add the QR code and a short link to your final slide. Make the code large enough to scan from a laptop screen.
Show the slide during Q&A segment of the session. Attendees need a minute or two to scan while you're still on screen.
Paste the link in the webinar chat. Attendees watching on a phone can't scan their own screen.
Say what happens next. For example, you could say: "Scan to request your certificate. Type your name exactly as it should appear. It'll arrive from [sender] within [timeframe]."
Close the request window before the replay goes out. Deactivate the form when your policy says the window ends or decide whether replay viewers qualify. Existing responses stay on the form's Results tab.
Keep the certificate link out of the post-webinar follow-up email, unless registrants who didn't attend should be able to request one too.
Create and Send Digital Credentials
Most problems show up after the webinar ends. Settings can reduce them, but they can't prevent all of them.
Failure | What Happens | How To Reduce It |
|---|---|---|
Forwarded QR code, link, or screenshot | A non-attendee submits | Show the QR only on the final slide; use a short window, then deactivate; drafts or roster check for high-stakes certificates |
Replay viewer scans the QR code | Someone who didn't attend live submits days later | Deactivate the form before the replay is published or exclude the final slide from the recording |
Typo in name or email | Wrong name printed or no delivery | Use draft review option. After issuing, recipients can use Contact Issuer on the credential page and your edit applies without resending |
Duplicate response | Each submission is a separate request, so the same person may receive two certificates | In draft review, duplicates show side by side and you issue just one |
Shared screen or conference room | Only one person in the room submits | Link in chat; say "everyone watching together should submit their own request" |
Wrong webinar in a series | Request lands under another session | Required session Dropdown; add session title on the certificate; deactivate between sessions |
No email received | Spam filter or typo | Name the sender on the slide; correct the email and use Resend email; point attendees to the credential retrieval page |
Pro Tip: Put one support contact on the final slide and in the certificate email, so recipient requests and questions reach one person.
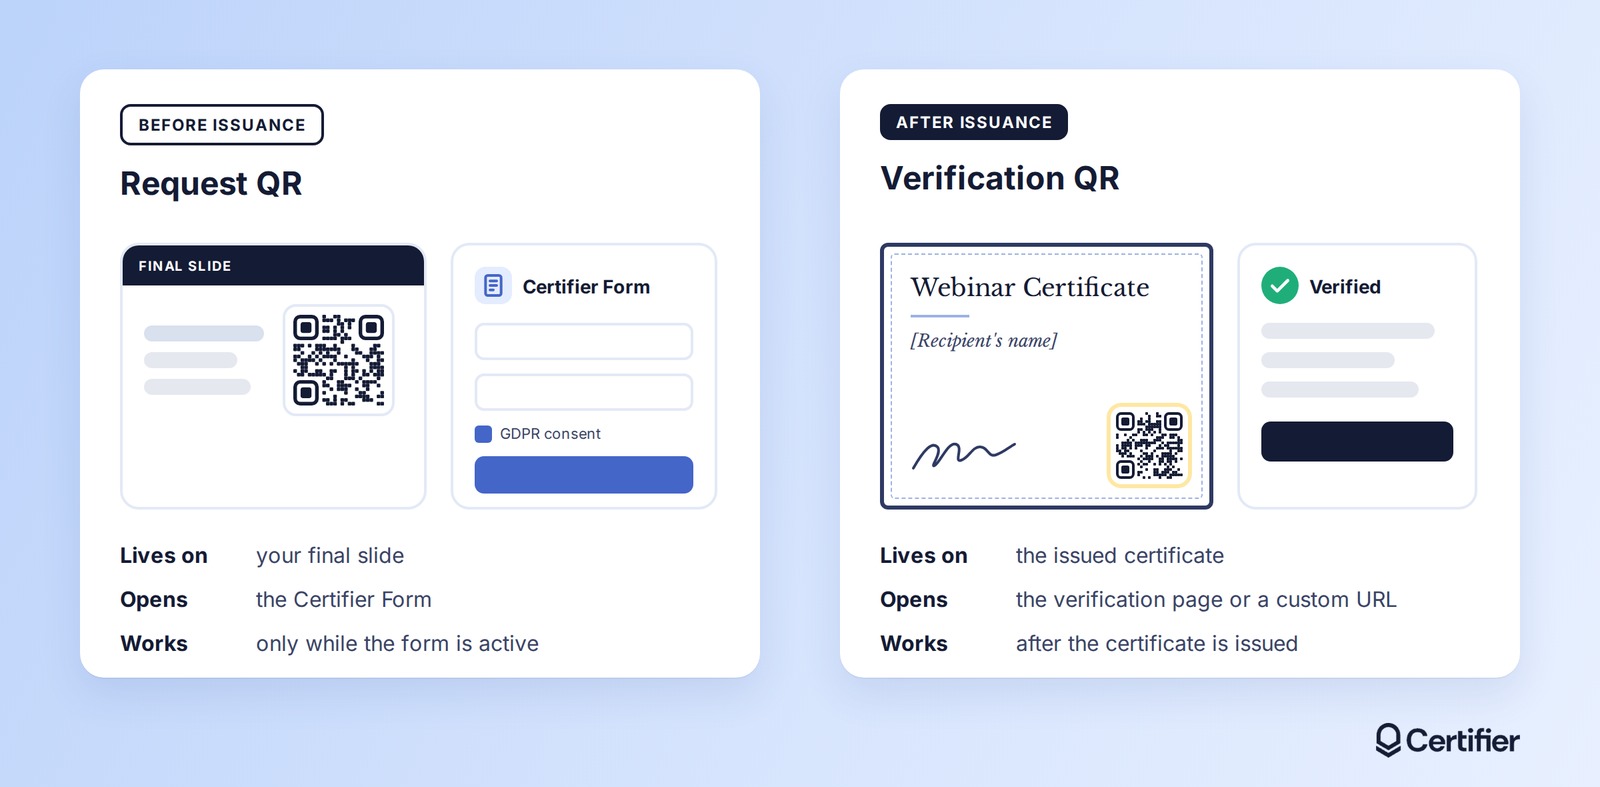
There are two QR codes in this story, and each one does a different job:
Request QR (before issuance) - Lives on your webinar's final slide and opens the Certifier Form. Works only while the form is active.
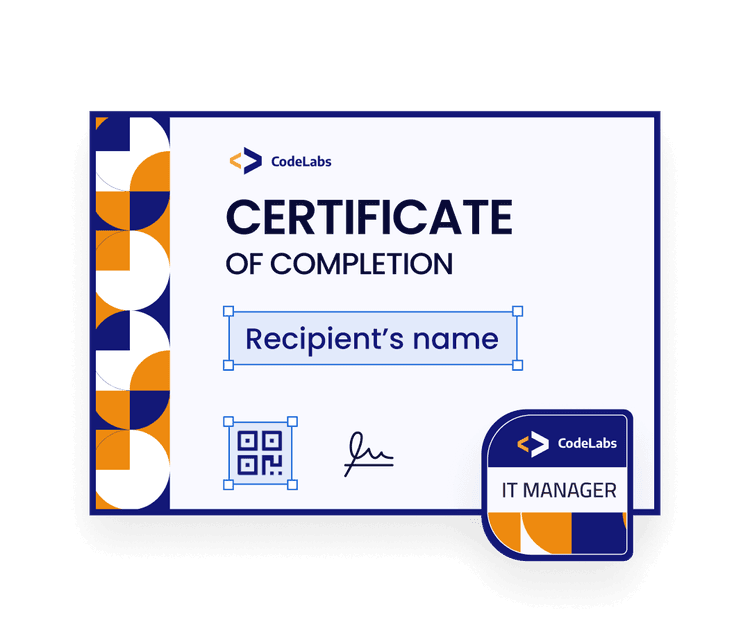
Verification QR (after issuance) - Printed on the issued webinar certificate and opens the credential's verification page, or a custom URL you choose. You can add a verification QR code to an issued certificate in the Design Builder.
Put simply, the request QR gets you a certificate while the verification QR proves an existing one is genuine.
Start from what the certificate claims. If a submission is enough evidence, let the final-slide QR issue and send. If a platform record or a person should decide, use Zoom data, drafts, or a reviewed roster.
Want to try it before your next webinar? Create a Certifier Form, connect it to your webinar's Credential Template, and test it with your own email. It takes one form, one Automation, and a test scan.
Try Certifier Forms for free or see how built-in forms fit into webinar certificates.
Yes. Put a Certifier Form QR code on your final slide and connect the form to an Automation with the Issue Credential and Send Credential actions set to True. Each attendee who submits their name and email then receives a certificate by email. Whether every submission should get one depends on your eligibility rule.
No. A final-slide scan shows that someone saw the code and submitted the form while it was open. However, that person might have seen a screenshot or the recording instead of the live session.
For attendance or minimum-duration rules, check submissions against your webinar platform's attendance report or issue directly from that data.
Not for a straightforward webinar. The form, certificate action, and email all run in Certifier, so there's no connector to set up or spreadsheet to clean after each session. Keep an external tool when it holds something you need, such as a scored post-webinar quiz or a CRM update.
Yes. Set the Issue Credential and Send Credential actions to False, so each form submission becomes a draft. After the webinar, compare the drafts with your attendance report, then filter your credentials by Draft status and issue the ones that qualify.
Use Certifier's Zoom integration when Zoom's attendee record should determine who gets a certificate. That usually means CE or CPD credit with a duration rule. A final-slide QR code fits better when the certificate acknowledges participation or when your webinars run on more than one platform.
No. The QR code on the webinar’s final slide opens a request form before anything is issued and stops working when you deactivate the form. The QR code printed on an issued certificate opens its verification page, where an employer, HR leader, or auditor can check the certificate.

- copywriting
- B2B content marketing
- content strategy
- on-page SEO
- storytelling
Growth Marketer (Freelance)
Anita Coltuneac is a freelance B2B SaaS marketer with 5+ years helping tech companies grow organic visibility, build authority, and support pipeline. She uses storytelling to turn product expertise into useful content.


