Trusted by:
Updated: January 16, 2026
9 min read
How To Automate Zoom Certificate of Attendance in 2026?
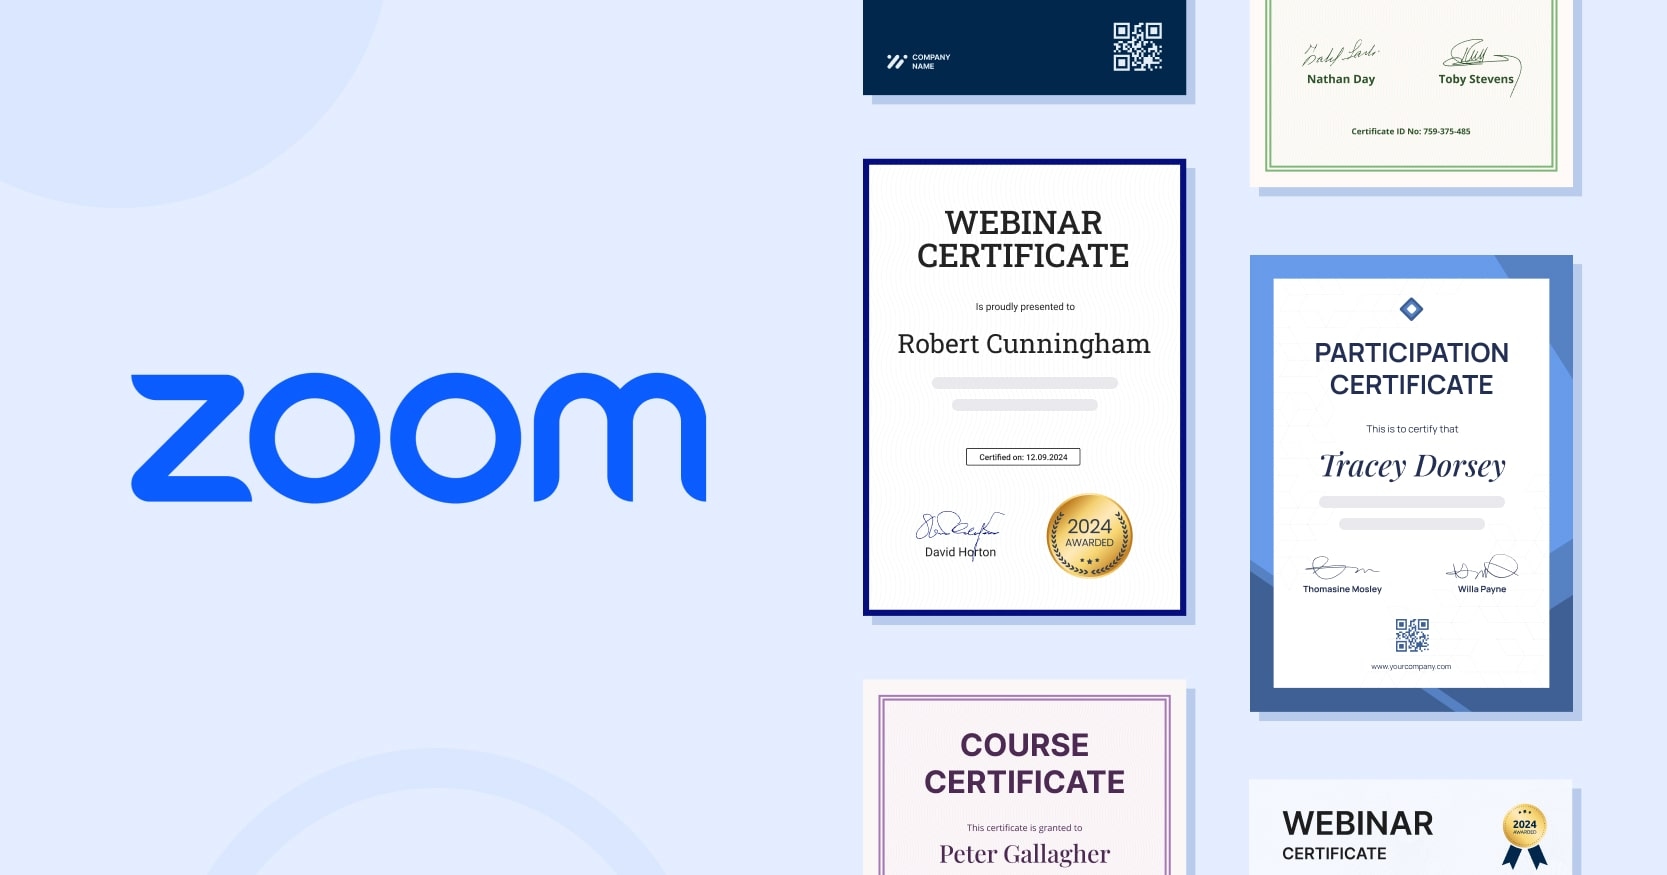
There are many popular webinar tools, but Zoom is one of the best. But what is a webinar without a certificate? See how to make it, and provide an outstanding experience to your attendees in 2026.
Sometimes, Zoom webinars are so important and valuable that you just can’t let recipients leave without any proof of attendance.
Think about it: you’ve just delivered a packed session, whether it's a comprehensive training course or an insightful series of discussions. Now, imagine ending that experience by rewarding registrants with a certificate. Not just any certificate, but the Zoom certificate that they're proud to display and share.
With the help of Certifier, you can end your amazing Zoom webinars with a bang and reward your audience with a meaningful and beautiful keepsake.
Today, we will take a look into how to create beautiful certificates for Zoom webinars, why you need them, and how to automate the process with Certifier and Zapier. Ready to learn how certificates can elevate your webinars and keep participants coming back for more? Let’s get started.
Scroll down to get a free Zoom certificate of attendance to download or customize online.
TL;DR
You can create Zoom certificates of attendance quickly using Certifier.
Certificates can be issued in bulk by uploading attendee data or fully automated via Zoom + Zapier.
Certifier offers ready-made Zoom certificate templates with dynamic attributes for personalization.
Attendees receive certificates by email and can download or share them on LinkedIn and social media.
You can track opens, downloads, and shares of certificates to measure webinar engagement.
What is the fastest way to create Zoom certificates?
Typically, offering Zoom certificate of attendance scares webinar-makers. It might seem daunting. Imagine creating and issuing hundreds of certificates by hand.
However, some tools can help you streamline the process.
One of them is Certifier. It has everything you need to design, manage, and send Zoom certificates in two ways:
Semi-automatic: Upload the registrants’ list and issue certificates in bulk.
Fully automated: Certification process based on the Zoom registrations via Zapier integration.
Plus, Certifier connects with other popular webinar tools like GoToWebinar, ClickMeeting, and WebinarJam.
Here are step-by-step instructions on how to issue Zoom certifications in a semi-automatic way. But if you want to, scroll down to the fully automatic way via Zapier integration.
How to make Zoom certificates automatically with Certifier?
The digital certificate creation process automation can enhance your webinar experience by instantly rewarding registrants. This guide shows how to use Certifier to design, manage, and distribute digital certificates efficiently.
Step 1: Download webinar registrants’ data from Zoom
First, log in to the Zoom tool.
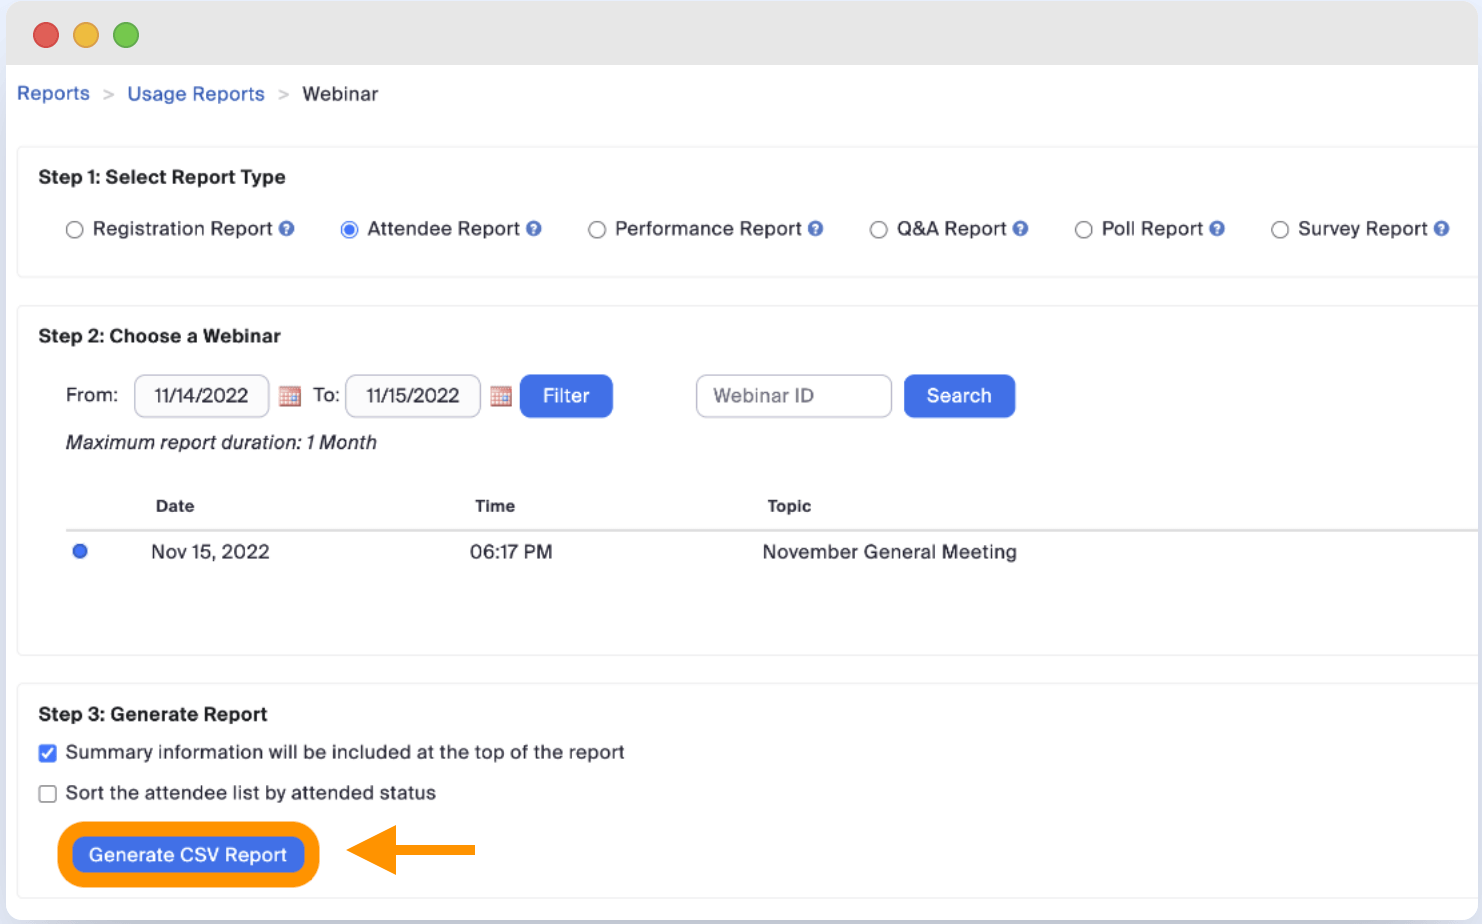
After you get into the system, you should have a list of meeting participants. Zoom app provides you with such a list in the Reports tab. How do you export the participant list from Zoom? Just choose the Usage Reports and select the report type you wish to find. When you are ready, click Generate CSV Report.
Step 2: Go to the Certifier tool
First, you need to log in to your Certifier account. Certifier offers a free version that allows you to draft, generate, schedule, and send up to 250 Zoom certificates to your attendees.
Certifier has tons of templates to choose from, which makes it super new-user-friendly. After the webinar is done, recipients automatically get an email with their Zoom certificate. From this email, they can navigate to the link at the bottom and easily share or download their certificates.
If you haven’t created a free account yet, you can get started here.
Step 3: Design the Zoom certificate of attendance
If you're short on time, you can use our ready-made templates. Just click on the Design tab and select Create a new design.
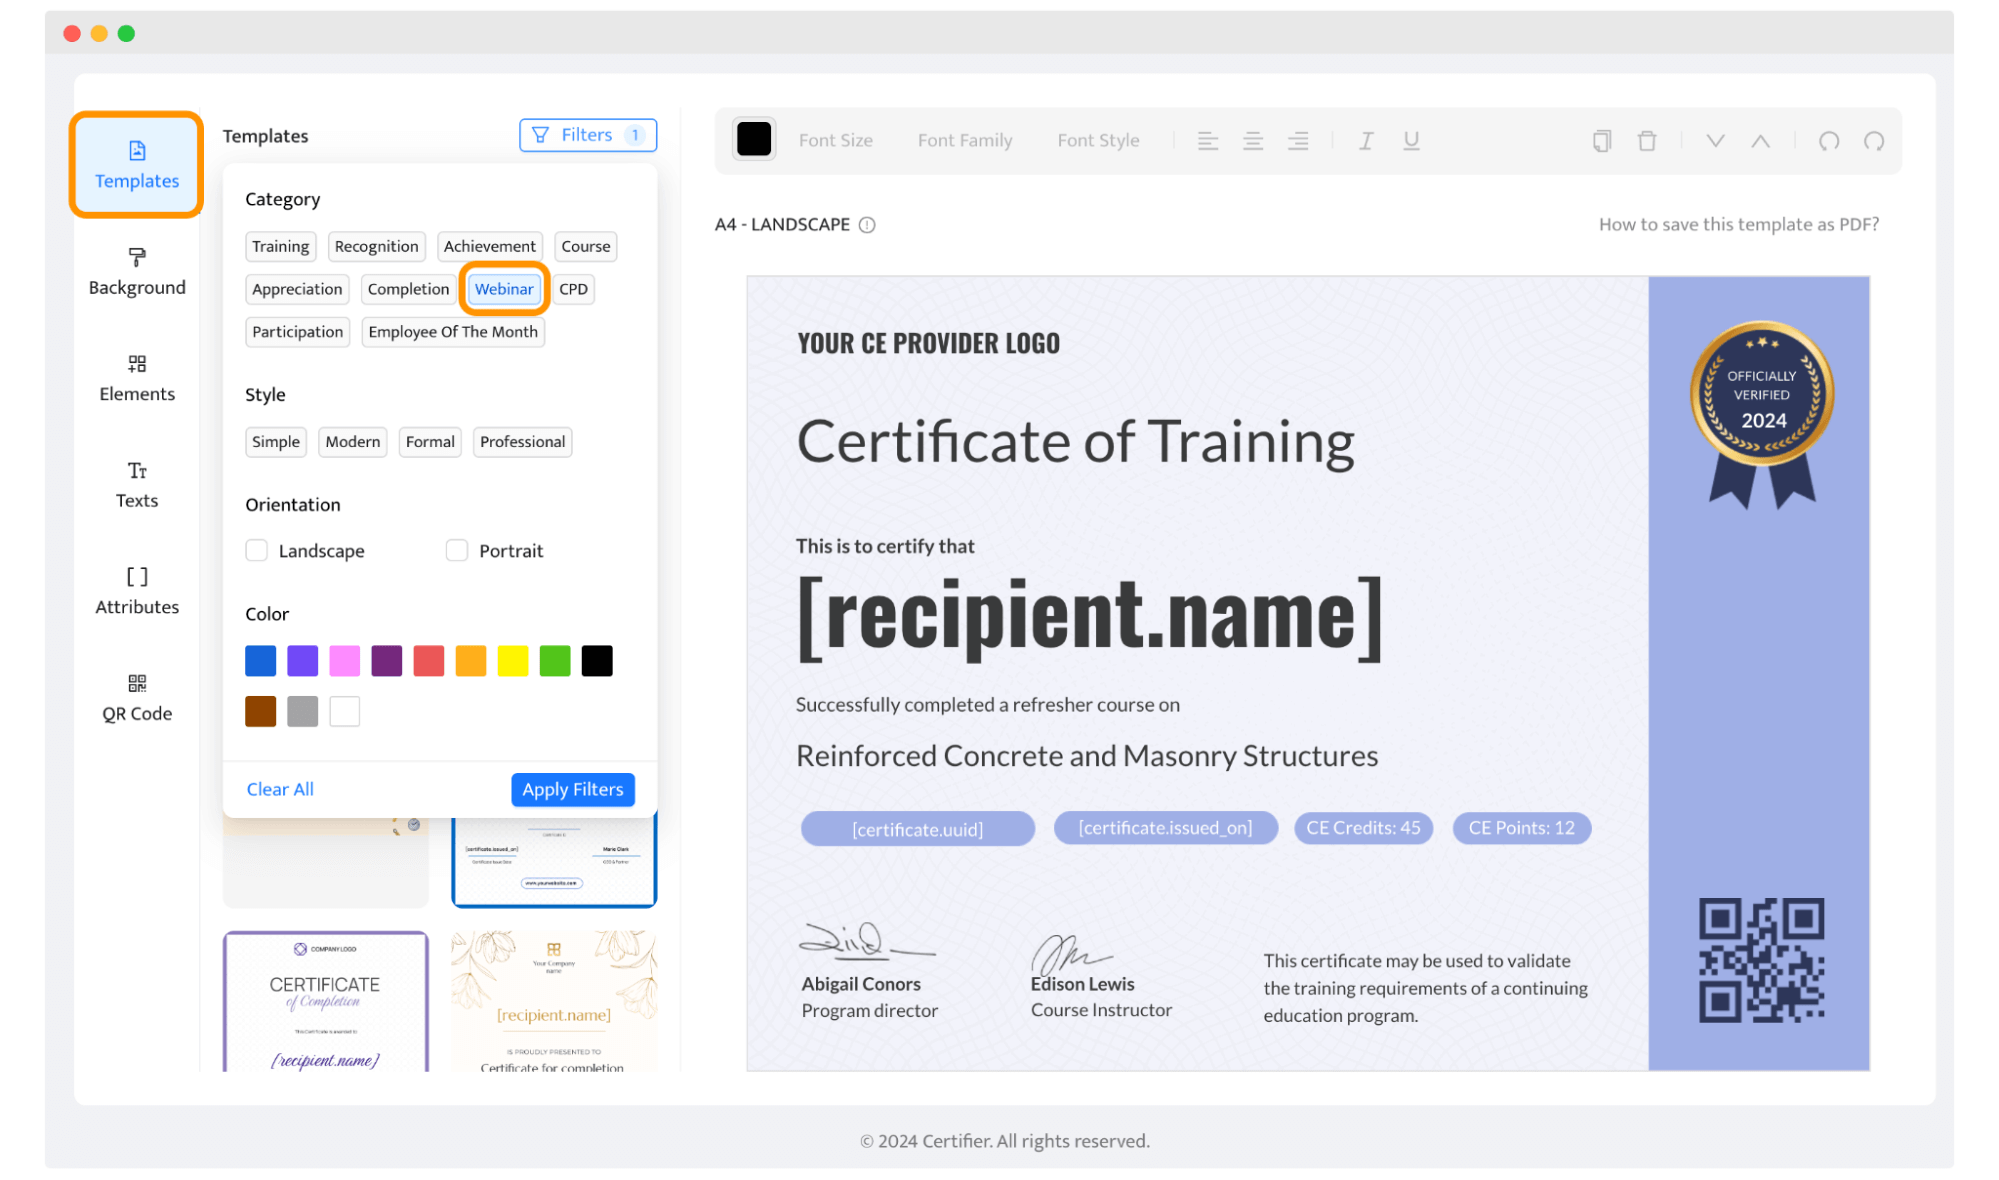
Then, a library of free webinar certificate templates will open, and you can use any certificate template you want and customize it. For example, add unique text and attributes, change the orientation, or whatever you want.
Add background, text, and QR code or blockchain credentials (for an extra layer of verification). Choose size, fonts, colors, dynamic attributes, and images. Feel free to edit and adjust them. You can save the project so you won't lose it.
Please note: Certifier has a feature called dynamic attributes with automatic content adjustments. Those elements will be filled out automatically with the uploaded recipient’s data. For example, if the recipient has a longer name, they will still get a professionally designed Zoom certificate tailored to the name size.
Step 4: Upload the spreadsheet with data
Once you click the “Save” button, a pop-up window will appear with a prompt to upload registrants data. You can do it either by manually entering them one-by-one, or use a spreadsheet (recommended).
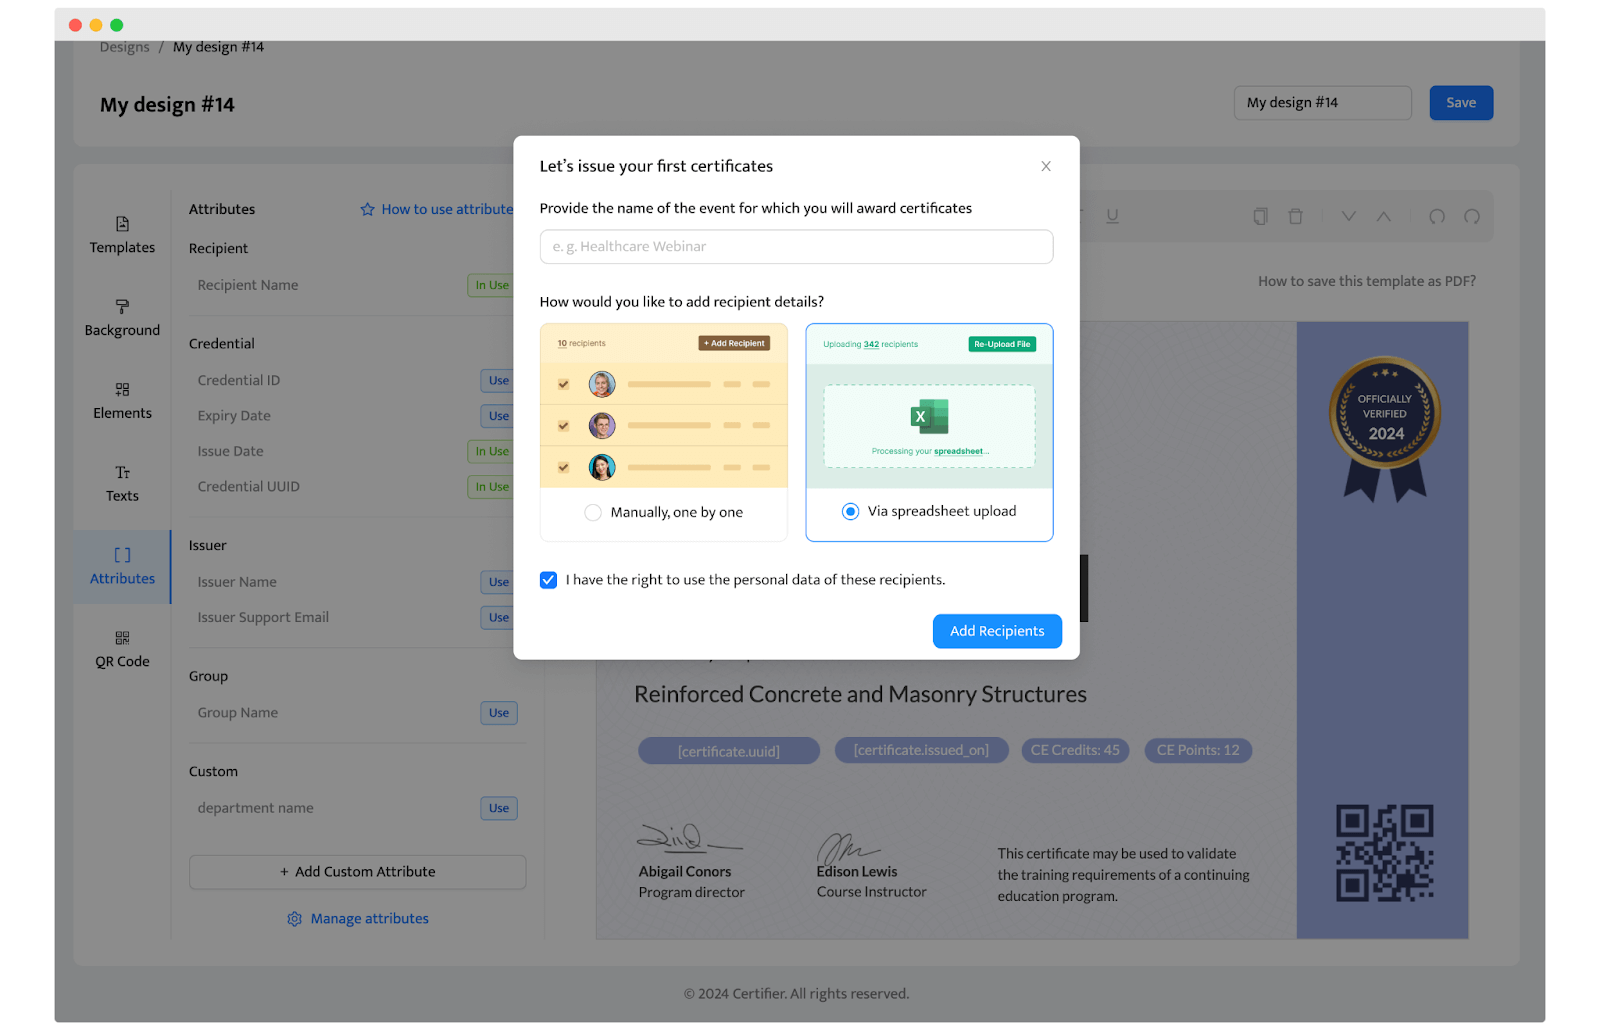
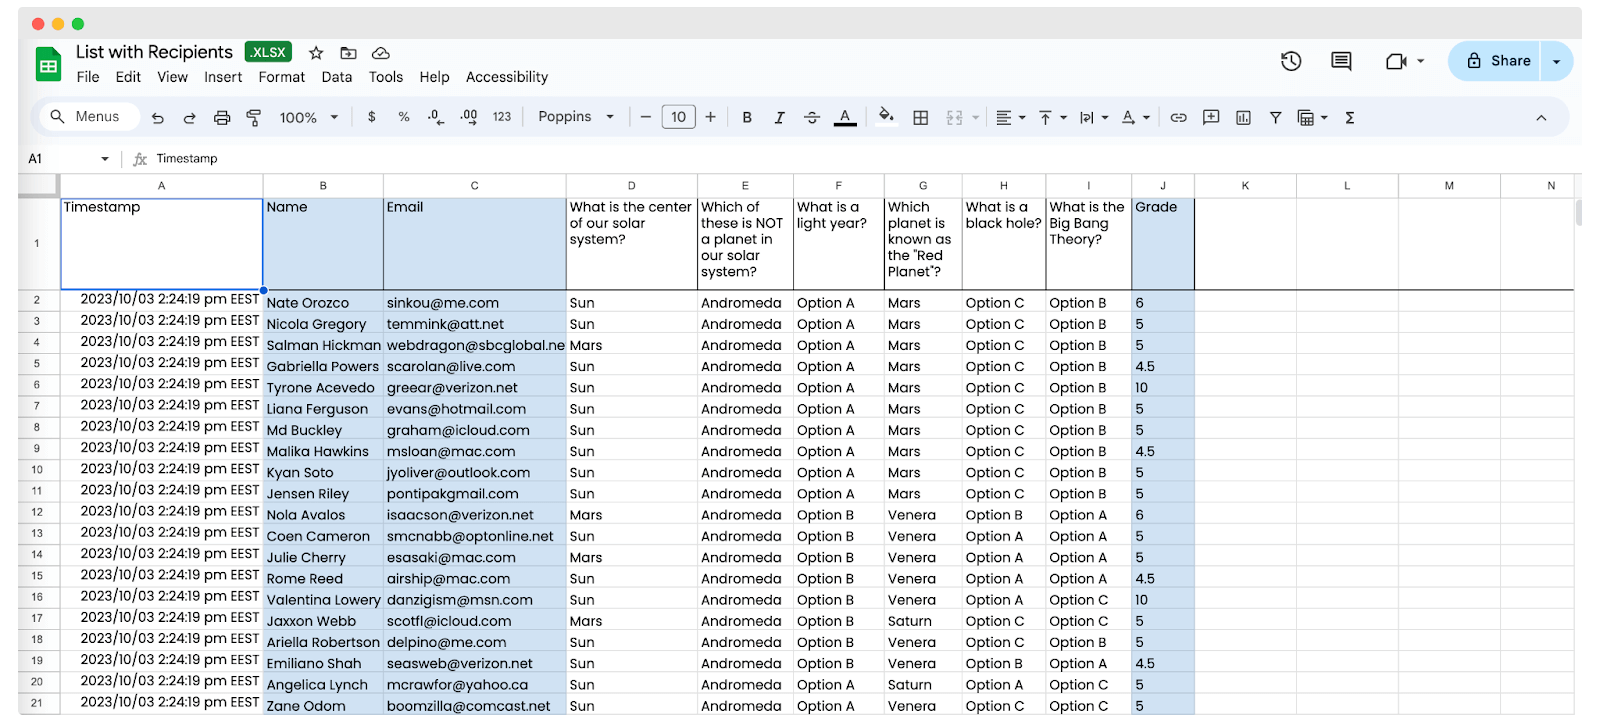
If you decide to use the spreadsheet, it should contain all the necessary data to personalize the certificates. Create columns with the names of the attributes, and Certifier will automatically pull the information. You can use our free ready-made spreadsheet data template (download here).
Here’s what such a spreadsheet should look like:
Learn more: Read our article on sending and automating webinar certificates and get to know how to automate webinar certificate delivery.
Step 5: Map out the attributes
Now, match each column in your spreadsheet to the correct attribute in Certifier. This ensures that names, emails and any other important information line up right on the certificate.
The mapping dashboard will open automatically once you upload the spreadsheet. Click on each attribute and select the corresponding column. If a column doesn’t fit, simply skip it.
Double-check your work to make sure all matches are correct.
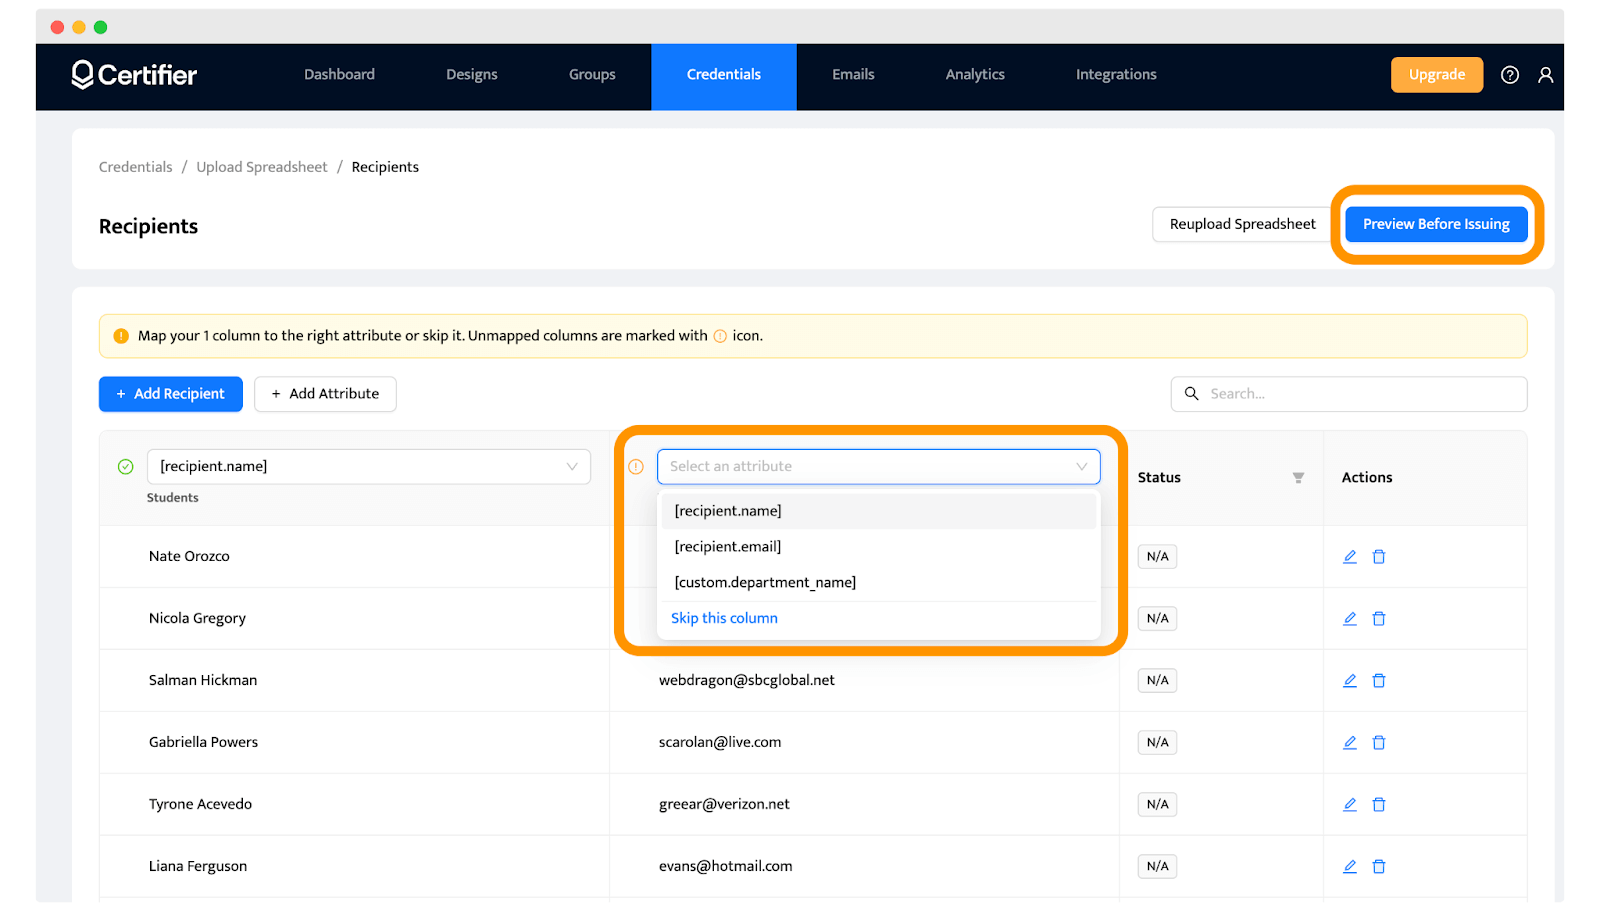
Watch for errors and fix them. Use the filter option to find and correct any mistakes in your data.
If everything looks good, you’re all set to move on!
Please note: Certifier can also connect with Zapier for quicker automation (scroll down). This setup triggers automatic certificate creation when new registrations occur in Zoom. Integrating Certifier with Zapier streamlines your process and guarantees immediate attendance certificate delivery to participants.
Step 6: Generate all Zoom certificates at once
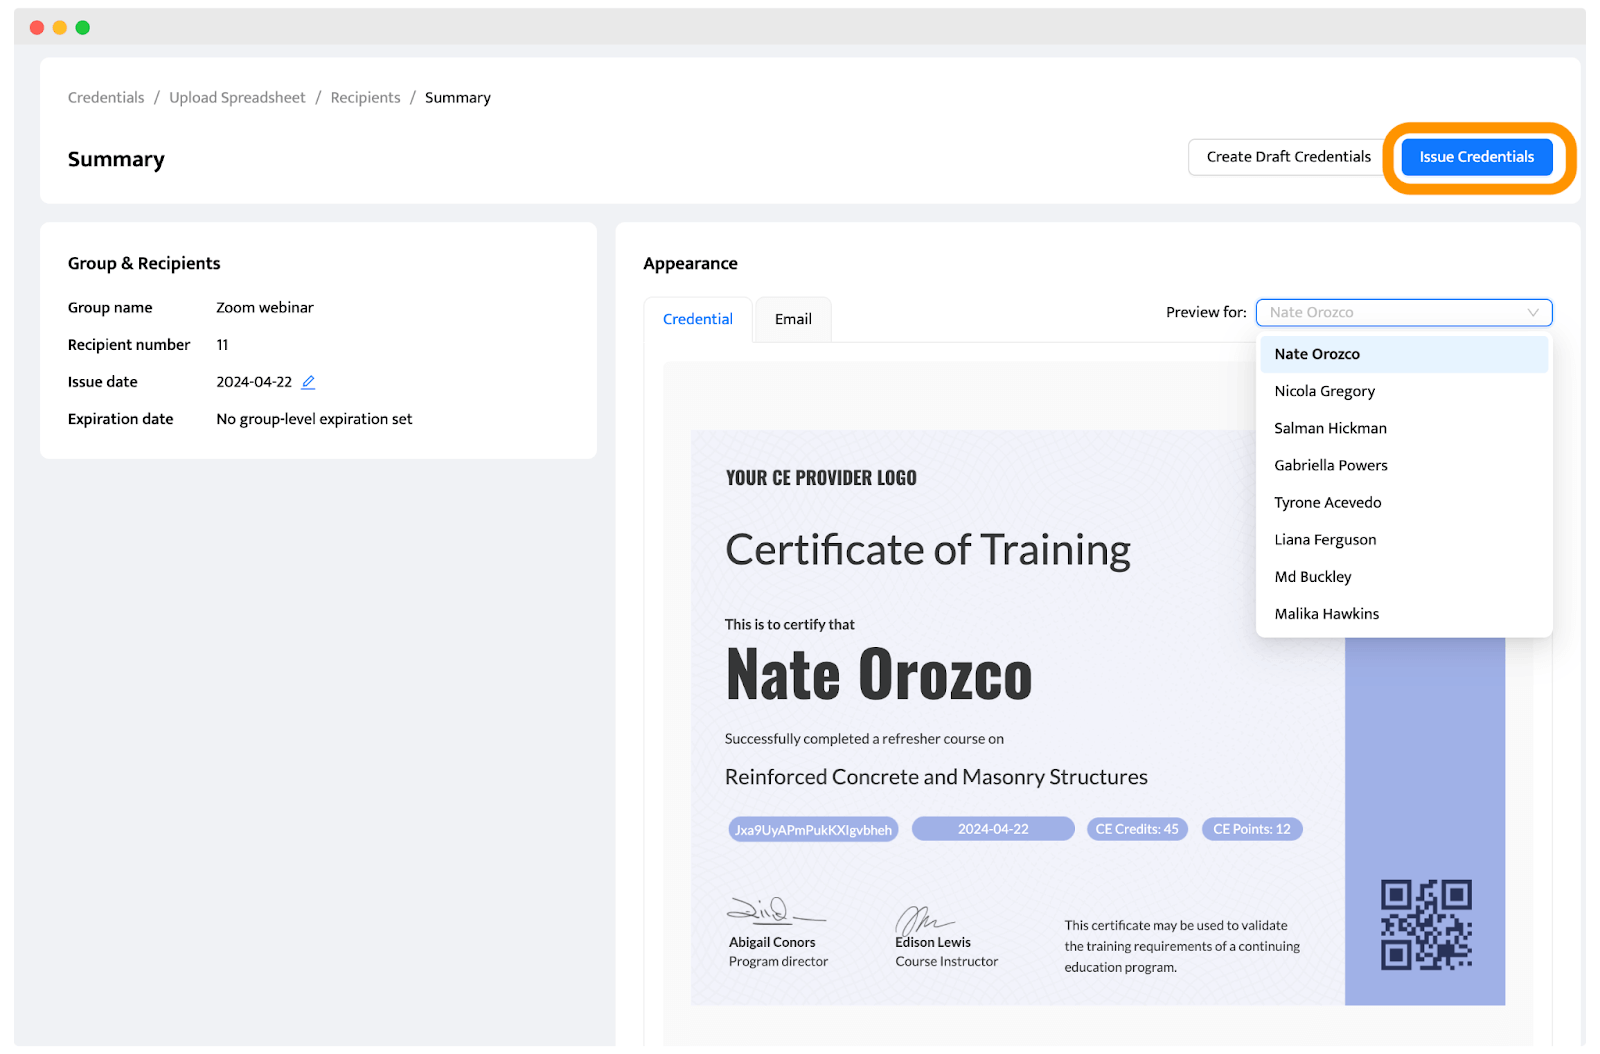
Click “Preview Before Issuing” to use the preview option. This lets you see the email and certificate from the recipient's point of view. It's a key step to make sure everything looks right.
Please note: In Certifier, you can also customize your email branding through the Emails tab. This makes your email aligned with the company’s image – you can change colors, the CTA button, and even upload your logo (no Certifier’s watermark).
Once you're happy with how things look, you can send the certificates in bulk.
Step 7: Send Zoom certificates of attendance in bulk
Now, send out all the certificates. Click "Issue Credentials" to email them to every attendee. This saves time and ensures everyone gets their certificate quickly.
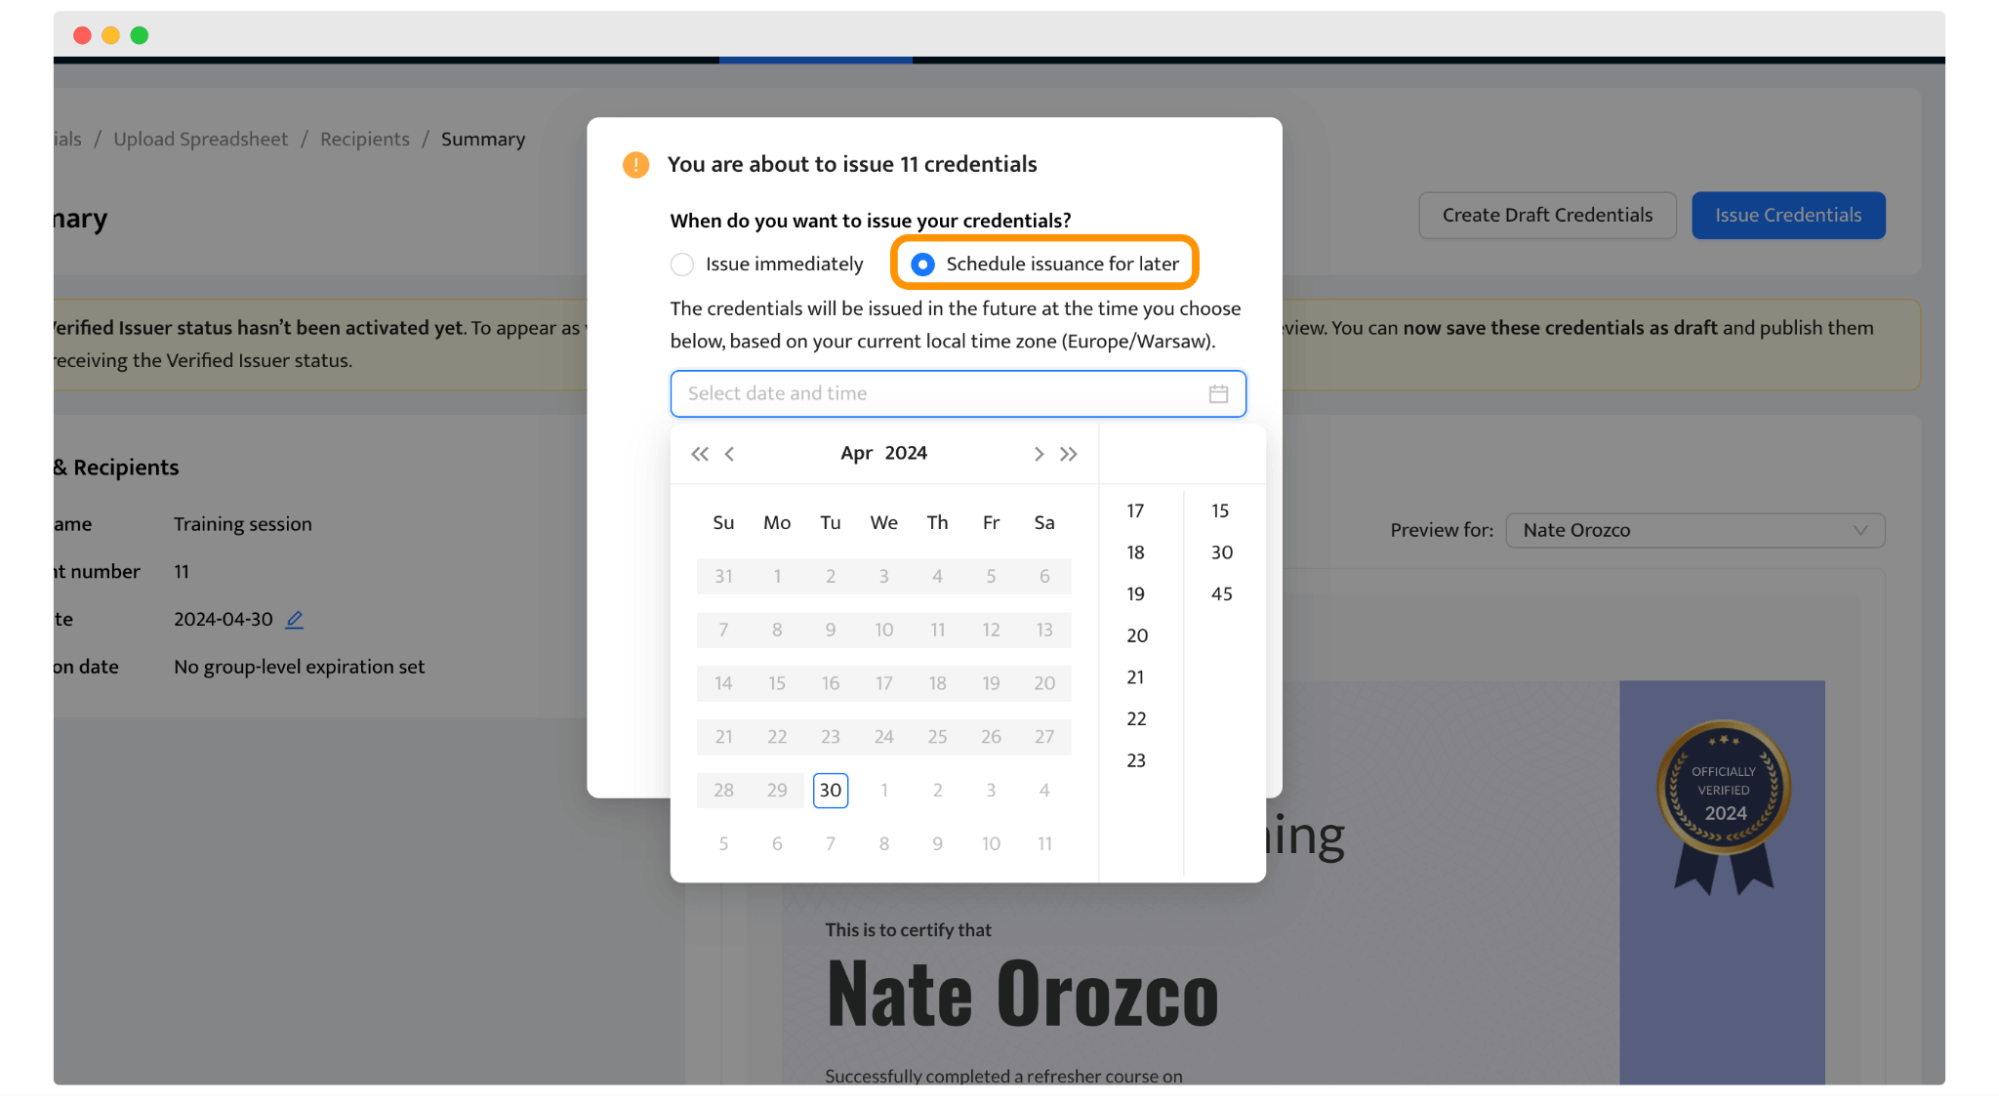
Schedule issuance for later: Now, you can schedule your certificates to be sent later on. For example, if you know your webinar ends at 8 PM, you can schedule the issuance of Zoom certificates for 8:15 PM. As a result, all webinar participants receive their certificates immediately after the webinar.
You can also download a zip file of all the PDF certificates. Why? It's handy for record-keeping and if registrants ask for a hard copy.
All set! Your attendees now have their certificates, and you have copies for your files.
Please note: Certifier offers automatic email delivery. After your webinar has ended, all webinar attendees will receive an automatic email containing their perfect certificate of attendance.
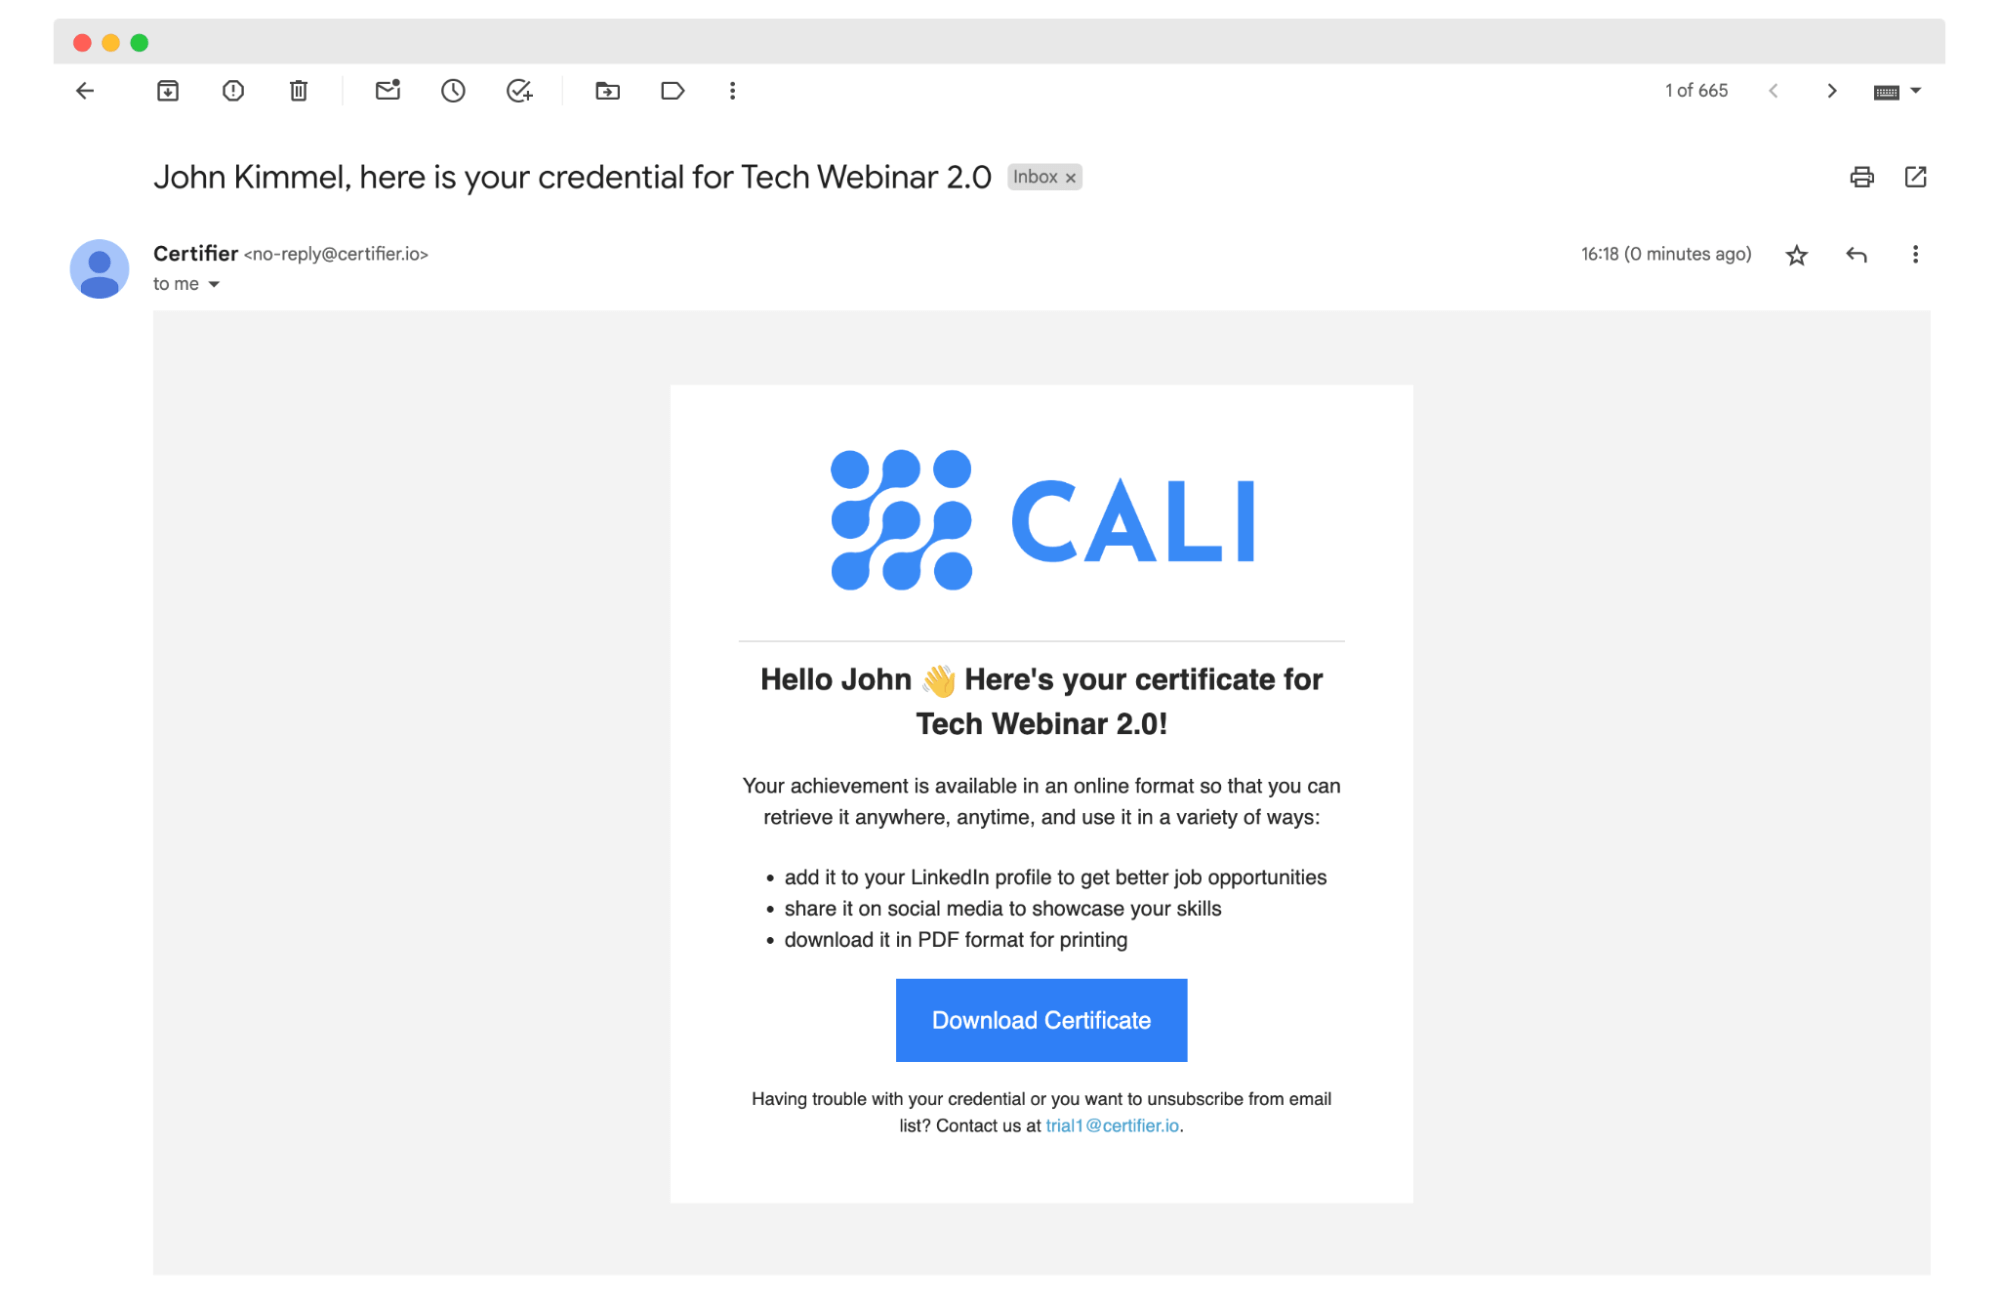
Recipient POV: Here is how the email will look to the recipient. You can customize literally every detail to make the branded email. Change the fonts, upload your company’s logo, change the CTA copy, and adjust the colors. Well, there are no limitations here.
Step 8: Track the certification process
Now, monitor your results. Right after issuing the certificates, you can use Certifier's analytics to see:
Who opened their emails.
Who downloaded their certificates as PDFs.
Who added their certificates to LinkedIn profiles.
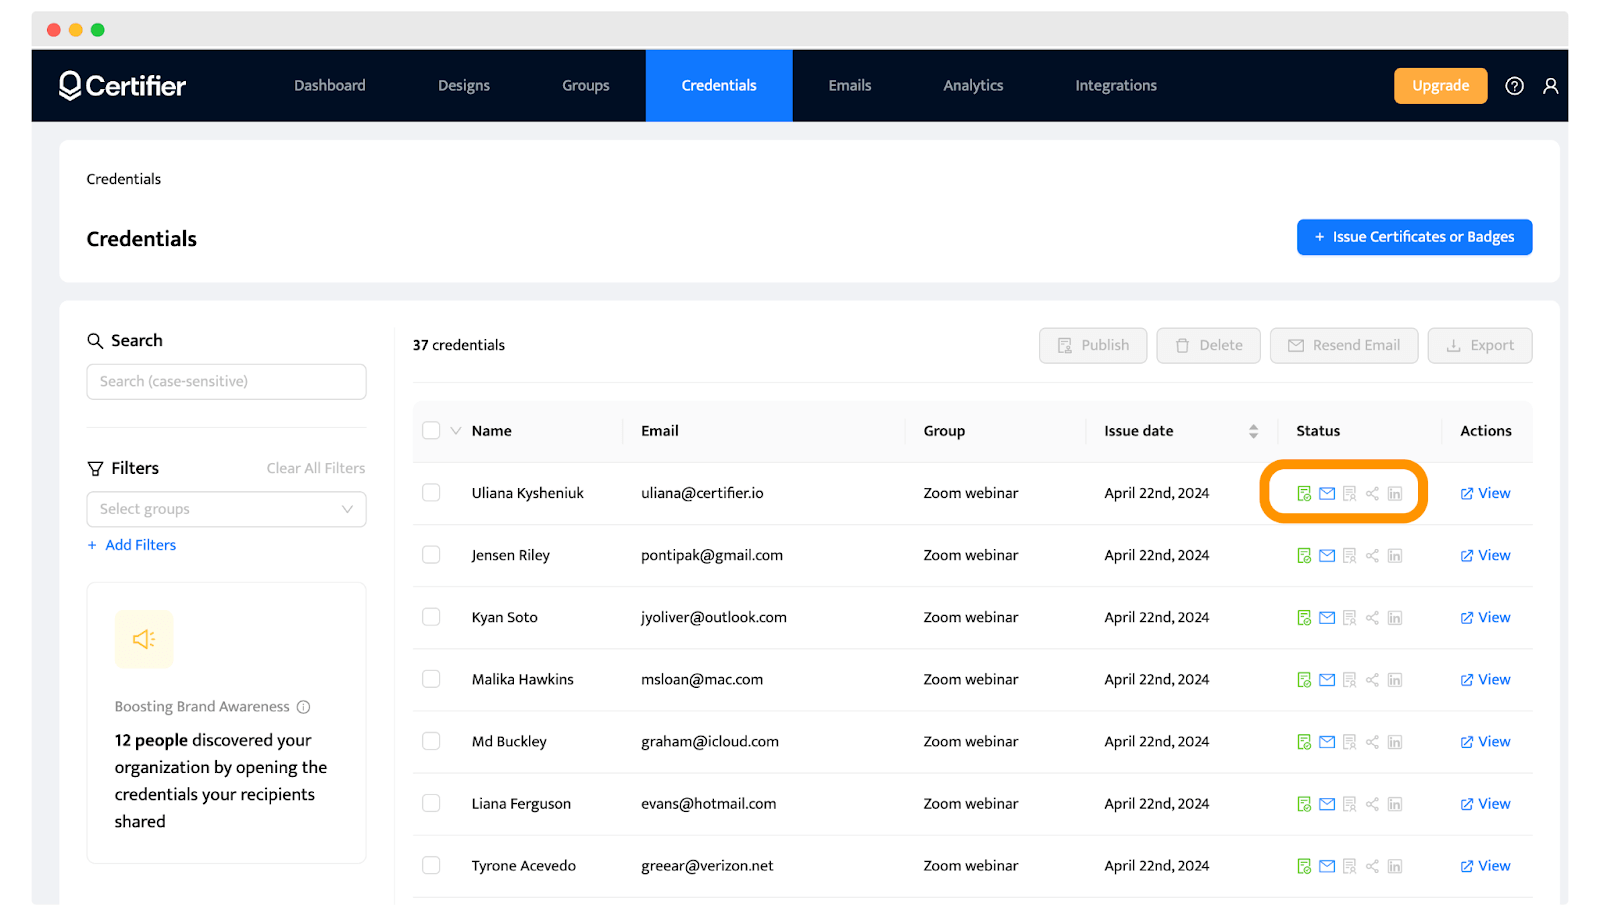
This data will help you gauge engagement and refine your certificate distribution strategy.
Automate further: Create Certifier certificates for every new Zoom registration
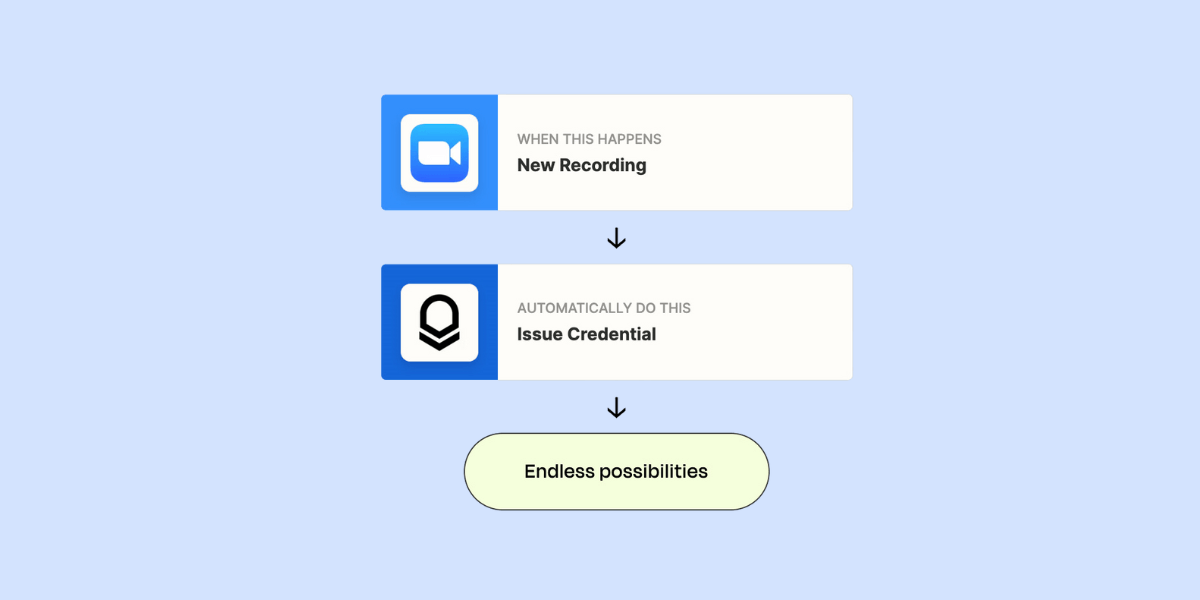
If you want to really automate the process, Certifier has the perfect solution – an integration with Zapier.
It lets you issue certificates each time a new webinar appears in Zoom.
Here’s a quick tutorial on how to do it.
01 Open Zapier
Start by opening the Zapier website.
02 Sign in to Zoom (trigger)
Connect to your Zoom account.
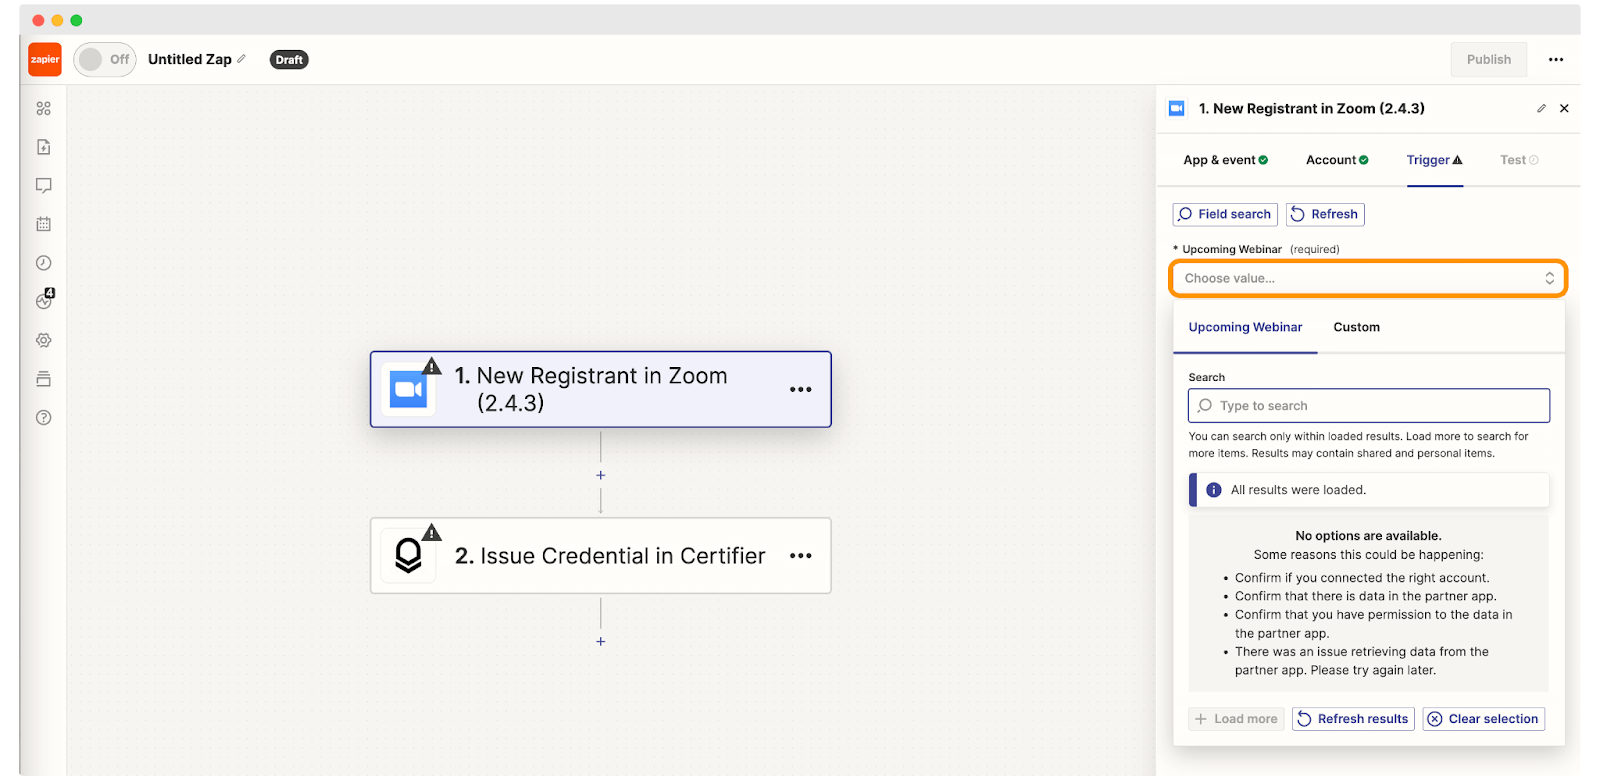
Select the trigger event as a new Zoom webinar registration. This means each time someone registers for your webinar, Zapier recognizes this action.
03 Sign into Certifier (action)
Now, log into your Certifier account within Zapier.
Set up the action to issue a certificate. Fill in the necessary data fields, such as the participant's name, email address, and any other relevant details required by your certificate template.
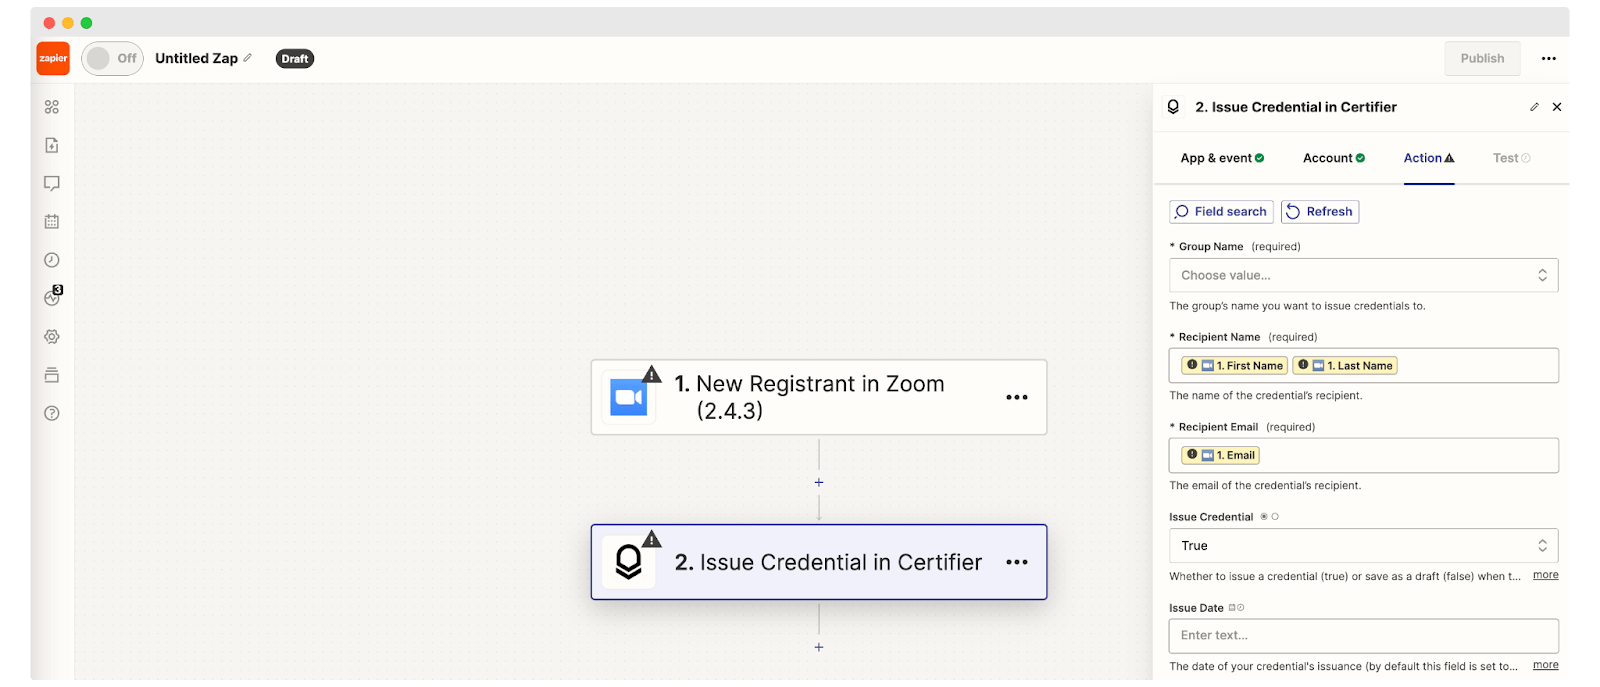
04 Test the Zap
Finally, run a test to ensure everything is set up correctly. Check if a test Zoom certificate of attendance is issued when a new registration is detected.
If you want a visual walkthrough, watch the tutorial on how to connect Certifier with other tools using Zapier:
Why is it worth awarding webinar registrants with a Zoom certificate of attendance?
Offering certificates adds significant value by recognizing their participation and achievement. This gesture can boost engagement, encourage future meeting sign-ups, and enhance the overall Zoom attendee experience. Let’s explore what you can do to provide these certificates.
Attract more sign-ups
People like to receive something for their effort and time. Certificates act as Zoom proof of attendance and can motivate more people to sign up. They show webinar registrants that you value their engagement.
When potential registrants see that they will receive a certificate, they are more likely to register.
Certificates add value to your offering. They can help attendees in their careers by showing their commitment to continuous learning. This is why online meetings that offer certificates often see higher registration numbers.
Offering certificates can also set your events apart from others. In a crowded market, that's a big plus. You'll attract attendees who are serious about their professional development.
🤌🏼 Tip: The process of issuing certificates doesn't have to be complicated. Tools like Certifier make it easy to automate and manage. You save time and reduce errors, making the whole experience better for you and the registrants.
Bring a sense of accomplishment to participants
Certificates for webinar participants validate the effort and time participants invest in your Zoom webinar. When attendees receive a certificate, it's a physical or digital proof of their commitment. This recognition can boost their professional morale and improve their resumes.
Think about it this way: When you complete something challenging, receiving acknowledgment feels good, right? It's the same with webinar participants. A certificate tells them, "Well done, you achieved something important."
This isn't just about feeling good, it's strategic too. People are more likely to sign up for a webinar if they know they'll get a certificate. It's a simple decision-maker. "Will I get something valuable out of this?" Yes, they will.
Here’s what you can do to boost webinar registrants’ satisfaction:
Clearly state that participants will receive certificates at the end of the webinar. Mention this early, perhaps in the registration form and promotional materials.
Make sure the certificate is worth their while. It should look professional and contain relevant details like the date, participant's name, and what the webinar covered.
Use a reliable tool to create and distribute these certificates. This will save you time and guarantee that participants receive their certificates promptly (hi Certifier).
Enable registrants to share Zoom certificates on social media
Sharing on social media turns attendees into advocates for your brand. It increases your visibility and can draw more registrants to your events. Make it easy and appealing for them to share their certificates. This promotes your webinar series and builds a loyal following.
Here's what to do:
Add a social media sharing feature to your certificate emails. This can be a simple button that says "Share on LinkedIn" or "Post to Facebook."
Encourage sharing in your webinar. Tell participants how and where they can share their certificates.
Consider including a unique hashtag with your webinar certificates. This tracks shares and builds your community online.
Tip: In Certifier, you can enable certificate recipients to take action and get an overview of their accomplishments. After clicking the link in their email, they land on a page where they can download and share their Zoom certificate of attendance.
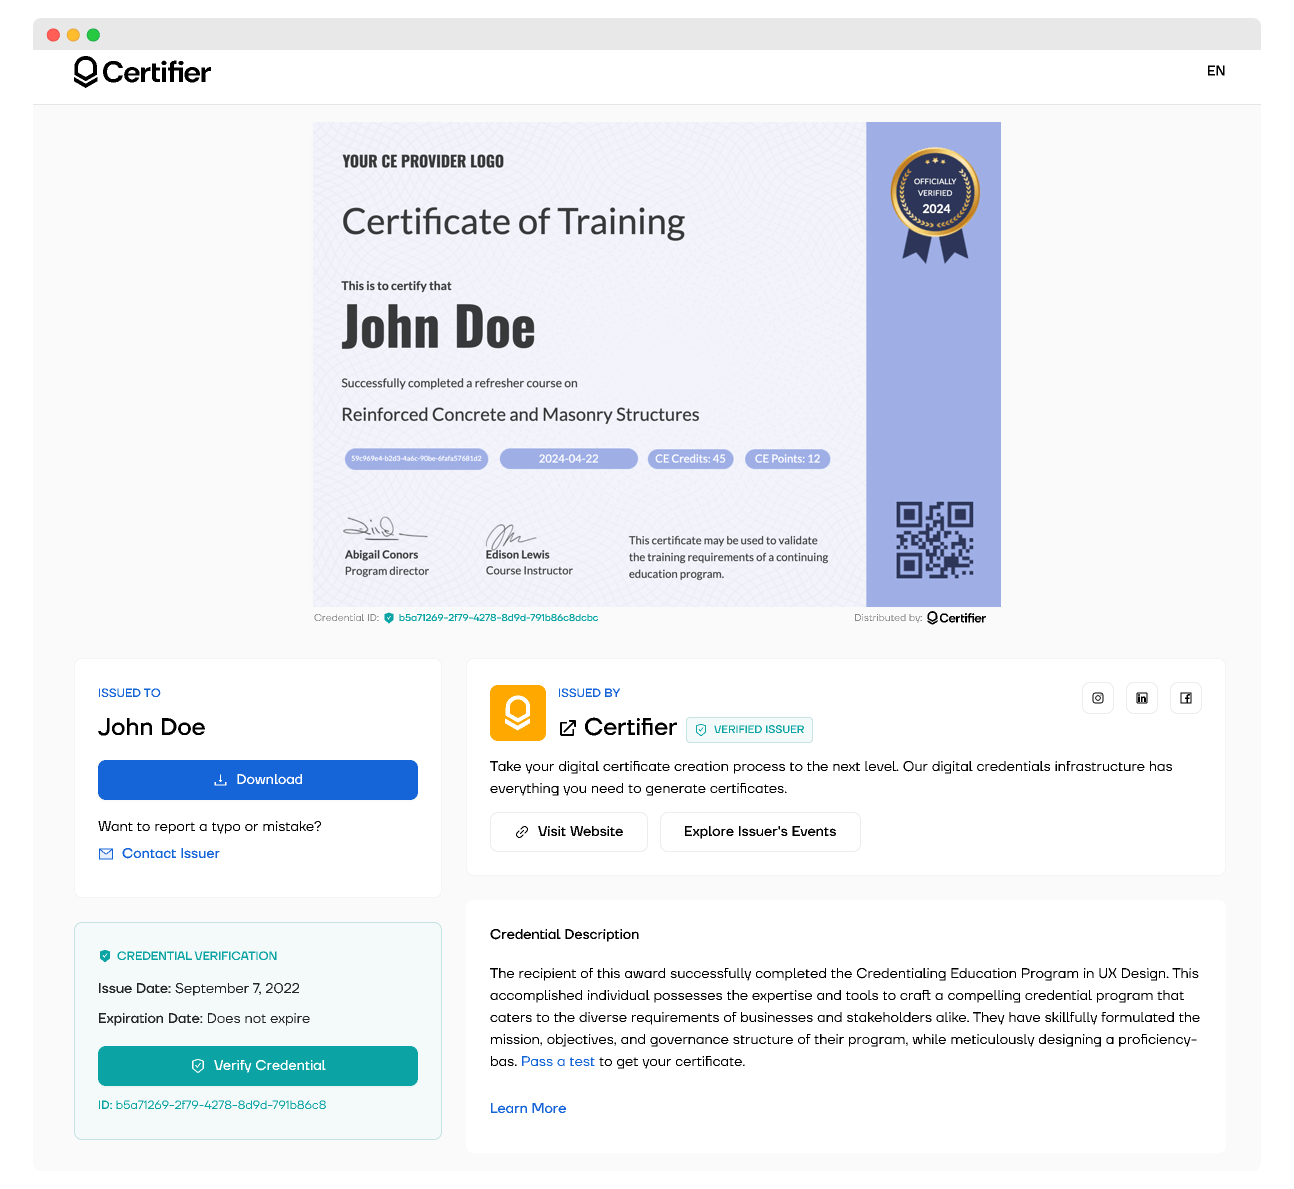
How to improve webinar engagement? Try this: early in the Zoom webinar, announce that you'll show a QR code during the last five minutes of the session. Later, they can scan the QR code to receive their certificate of attendance. This way, they stay engaged and eager to participate throughout your session.
Increase social media presence of your business
When attendees share their certificates online, it’s like a personal endorsement of your Zoom event. People trust recommendations from their network more than standard ads. This can drive more interest and increase sign-ups for your future webinars.
Also, each shared webinar certificate shows off your brand. This increases your visibility. Every time someone posts their certificate, new people see your business. Your reach grows with every share, and it doesn’t cost you extra.
All of these shares will bring new eyes to your brand. Naturally, these new people will see the certificates, and some of them will think, “Huh, that’s interesting. I want one!”
Folks on LinkedIn usually care about their professional appearance (a lot). Such a certificate is always a great addition to their resume.
Why should you choose Certifier to prove Zoom attendance?
Certifier is a standout choice as a webinar certificate generator to automate Zoom webinar certificate of attendance. Here's why it's perfect for anyone running events on Zoom.
Streamlined automation: With Certifier, setup is a one-time thing. Link it to Zoom through Zapier, and watch it automatically send certificates as attendees register. No extra steps needed.
Built for mass generation and ease: Send emails in bulk? Check. Share certificates easily? Absolutely. Certifier handles these tasks smoothly, freeing you up to focus on your online event content.
Variety of designs: Certifier offers a wide selection of webinar certificate templates. Customize them to match your branding and strengthen your professional image.
No cost to start: The free plan is generous. It includes up to 250 certificates and full access to the Zoom integration via Zapier. This makes it ideal for both new and seasoned webinar hosts.
Create beautiful certificates for Zoom webinar meeting participants
Offering a Zoom certificate of attendance for your Zoom webinar attendees really works! It’s a valuable document for seasoned professionals and field newcomers. Certificates also encourage participants to engage, learn, and grow. This can drive more sign-ups and enhance the learning experience.
Now, you know how to make certificates for Zoom webinars without much effort. Start for free to experience how fast it is to generate Zoom attendance certificates. Let us show you how to issue up to 250 free Zoom certificates with smooth integration via Zapier. Boost your webinar’s impact now.
FAQ for making Zoom certificates
Here’s the list of the most frequently asked questions related to the Zoom certificates topic.


